Using Azure Site Recovery (ASR) to protect Hyper-V workloads managed by System Center Virtual Machine Manager (SC-VMM)
Introduction
This document is a step by step guide to configuring Azure Site Recovery Services (ASR) for Cloud Solution Provider (CSP) partners. The purpose is to help service provider administrators become familiar with the process required to setup and configure the Microsoft Azure, System Center Virtual Machine Manager (VMM), and Hyper-V (HV) environment to utilize the capabilities found within the ASR service.
This version of the guide focuses on using PowerShell (PS) and Azure Resource Manager (ARM) to accomplish the configuration tasks. This guide assumes understanding of basic PowerShell concepts such as modules, cmdlets, and sessions. For more information about Windows PowerShell, please refer to the article Getting Started with Windows PowerShell. To learn more about Azure PowerShell with Azure Resource Manager, please refer to this article Using Azure PowerShell with Azure Resource Manager.
Please note that the PowerShell cmdlets are under development and changing continuously, while it transitions from ASM to ARM. Please take the time to review the latest documentation for the cmdlets used in this guide.
Please completely review the scenario, and step-by-step sections before proceeding to actual implementation. This document is authored with a lot of clarifying points and explanation of the bigger picture situation throughout. Actual steps necessary to perform the implementation are clearly marked under titles "Step X".
Scenarios
This version of the guide discusses the following scenarios:
- Enterprise to Azure (E2A) - VMM to Azure - Multi-Tenant
- Enterprise to Azure (E2A) - VMM to Azure - Dedicated VMM
Enterprise to Azure - VMM to Azure - Multi-Tenant
Enables service providers (hosters) to help protect their tenants' virtual machines (VMs) where the VMs are hosted in the same shared infrastructure.
This scenario maps to Microsoft's default Cloud OS Network deployments.
A key requirement for this scenario is configuration of the Azure subscriptions. Both CSP and Enterprise Agreement (EA) subscriptions are required. Multiple CSP subscriptions (at least two) are required to demonstrate/validate the multi-tenant capabilities. EA equivalent subscriptions (Direct, Azure Pass, Trial) can be used if necessary.
- The CSP subscriptions are associated with each tenant's VMs. Both the tenant and the service provider administrator control the VMs.
- The service provider's EA subscription is associated with the Site Recovery Vault. The vault will contain data from every tenant, therefore the vault cannot be associated with any individual tenant's CSP subscription.
- The account used for creating the EA/Direct/AzurePass subscription, must:
- Be a Microsoft Account.
- Have delegated rights to each CSP subscription.
- Be a Microsoft Account.
The diagram below presents a logical view of the scenario. The diagram depicts:
- The relationships between the Azure subscriptions.
- The target infrastructure requirements in Azure.
- The source infrastructure requirements on-premises.
- Each tenant's VMs are protected in Azure.
- The service provider administrator's remote machine. From which all configuration steps are performed.

Enterprise to Azure - VMM to Azure - Dedicated VMM
Enables service providers (outsourcers) to help protect their tenant's virtual machines (VMs) where the management plane is fully dedicated to one tenant.
In the dedicated instance of the E2A scenario, only a CSP subscription is required. This simplifies the Azure requirements. However, this scenario does require a dedicated VMM infrastructure. All VMM clouds and associated objects must serve a single tenant.
The diagram below presents a logical view of the scenario. The diagram depicts:
- The target infrastructure requirements in Azure.
- The source infrastructure requirements on-premises.
- The tenant's VMs are protected in Azure.
- The service provider administrator's remote machine. From which all configuration steps are performed.

Step-By-Step - Enterprise to Azure - VMM to Azure - Multi-Tenant
The prerequisites and configuration steps for the Enterprise to Azure - VMM to Azure - Multi-Tenant scenario are detailed in this section. The overall process, including unique considerations for multi-tenant are summarized in this table.
| STEP | Description | Multi-Tenant |
| 0.1 | Prerequisites - Azure | CSP & EA subscriptions |
| 0.2 | Prerequisites - VMM | VMM is shared |
| 0.3 | Prerequisites - Hyper-V | |
| 0.4 | Prerequisites - Network Mapping | |
| 0.5 | Prerequisites - PowerShell | |
| 1 | Configure Subscriptions & Register Providers | Extra account delegation and registration steps |
| 2 | Create Resource Group | Subscription context switching |
| 3 | Configure Site Recovery Vault | Subscription context switching |
| 4 | Install ASR provider | |
| 5 | Install MARS agent | |
| 6 | Configure Storage Account | Subscription context switching |
| 7 | Configure Cloud Protection Settings | Subscription context switching |
| 8 | Configure Network Mapping | Subscription context switching |
| 9 | Enable Protection | Subscription context switching |
| 10 | Validate VMM to Azure VM Protection |
One general prerequisite/requirement is administrative/owner rights for all resources.
Prerequisites – Azure
Azure Subscriptions
- CSP subscription with more than one tenant provisioned.
- The service provider's EA subscription for the recovery vault.
- Record the Tenant ID and Subscription ID.
Azure Storage
Azure v2 (Azure Resource Manager, ARM) storage account to store data replicated to Azure. The account needs to have geo-replication enabled. As of December 2015, the storage account and the Azure Site Recovery service must be in the same Azure region. To learn more about setting up Azure storage, refer to this article Introduction to Microsoft Azure Storage.
Azure Virtual Machines
VMs that will be protected must comply with Azure VM requirements. To learn more about Azure VM requirements, refer to this article Sizes for Virtual Machines.
Azure Regions
All resources used to enable ASR must be in the same region. This includes the virtual networks, storage account, and resource groups. To learn more about Azure regions, refer to this article Azure Regions.
As of December 2015
- Only VM level operations are possible.
- This includes failovers only per protected VM (not through recovery plans).
- Configuration and operations are only available through PowerShell.
- Recovery plan level operations are planned for a future release.
Prerequisites - VMM
Versions
System Center Virtual Machine Manager 2012 R2 with the latest Update Release and updates installed. This document was validated against VMM 2012 R2 UR7, Windows Server 2012 R2, and updates released through November 20, 2015.
VMM Clouds
At least one VMM cloud containing the VMs to be protected. The VMM cloud must include:
- One or more VMM host groups.
- One or more Hyper-V host servers or clusters in each host group.
- One or more virtual machines on the source Hyper-V servers or clusters.
The VMM infrastructure can be shared amongst many tenants.
Azure Site Recovery Provider
Version 5.1.1256.0 or later. The latest version can be downloaded at this link http://aka.ms/downloaddra. If the version is older, when trying to register the VMM server, an "unknown error" will occur while trying to read the certificate.
As of December 2015, do not assume the provider will be updated during the installation process. The installation step "looking for the latest version" does not update the ASR provider. Similarly, Microsoft Updates does not update the ASR provider. Manually download and install the latest version of the ASR Provider.
Prerequisites - Hyper-V
Versions
Windows Server 2012 R2, with the Hyper-V role enabled, and the latest updates installed is required for the Hyper-V host servers. This document was validated against VMM 2012 R2 UR7, Windows Server 2012 R2, and updates released through November 20, 2015.
Cluster Broker
For Hyper-V clusters, the cluster broker is not created automatically if using a static IP address-based cluster. Manually configure the cluster broker. Refer to the "Set up a cluster" section of this article Deploy Hyper-V Replica.
VMM Cloud Association
All Hyper-V host servers or clusters hosting VMs to be protected must be included in a VMM cloud.
Prerequisites - Network Mapping
VM Network
Protected VMs must be connected to a VM network.
VMM Logical Network
The VM network must be linked to a VMM logical network associated with a VMM cloud.
Azure v2 Network
Replicated VMs in Azure will use this network. This network must be in the same region as the Azure Site Recovery subscription, the Resource Group, and the Storage Account. Select this network at the time of failover.
Mapping
Network mapping between VM networks on the source VMM server and the target Azure networks enables:
- All VMs which failover onto the same network can connect to each other.
- If a network gateway is setup on the target Azure network, virtual machines can connect to other on-premises virtual machines.
Multiple on-premises VM networks can be mapped to a single Azure network.
If the target (Azure) network has multiple subnets, then after failover:
- Replica VMs will connect to the first subnet in the Azure network.
- Unless an Azure network subnet's name matches the name of a subnet in the source (VMM) network.
To learn more about network mapping, refer to the following articles:
- Configuring Logical Networking in VMM Overview
- Configuring VM Networks and Gateways in VMM
-
Enabling protection of a VM will fail if the VM is not connected to a network, or if the networks are not mapped.
Prerequisites - PowerShell
This version of the guide focuses on using PowerShell (PS) and Azure Resource Manager (ARM) to accomplish the configuration tasks. This guide assumes understanding of basic PowerShell concepts such as modules, cmdlets, and sessions. For more information about Windows PowerShell, please refer to the article Getting Started with Windows PowerShell. To learn more about Azure PowerShell with Azure Resource Manager, please refer to this article Using Azure PowerShell with Azure Resource Manager.
Please note that the PowerShell cmdlets are under development and changing continuously, while it transitions from ASM to ARM. Please take the time to review the latest documentation for the cmdlets used in this guide.
WMF 5.0
Windows Management Framework 5.0 is required. For Windows Server 2012 R2, WMF 5.0 must be installed. Download.
Azure PowerShell
Azure PowerShell 1.0. To learn more about Azure PowerShell, refer to this article How to install and configure Azure PowerShell. Download the latest version of Azure PowerShell from https://github.com/Azure/azure-powershell/releases/tag/v1.0.1-November2015.
Modules
Several PowerShell modules are required. These modules add Azure Resource Manager (ARM) functionality to PowerShell. The latest versions of these modules are available from the PowerShell gallery. Direct links to the ASR modules:
Installation
PowerShell installation and configuration is required once on each service provider administrator's remote machine. From which all configuration steps are performed.
- Uninstall any older version of Azure PowerShell.
- Install WMF 5.0
- Update WMF 5.0
- Install Azure PowerShell 1.0.
- Open Microsoft PowerShell, not Azure PowerShell (run as administrator).
- Install the AzureRM modules. The "-force" switch ensures the latest version will be installed (will overwrite).
Install-Module AzureRM.Profile -force -Repository PSGallery*
Install-Module AzureRM -force -Repository PSGallery*
Install-Module AzureRM.Resources -force -Repository PSGallery*
Install-Module AzureRM.SiteRecovery -force -Repository PSGallery*
Install-Module AzureRM.RecoveryServices -force -Repository PSGallery*
Do not proceed until all prerequisites have been satisfied.
Step 1 - Configure Subscriptions & Register Providers
For the multi-tenant scenario, at least three subscriptions are required:
- The EA subscription containing the Site Recovery Vault.
- Two or more CSP subscriptions containing the replicated VMs, networks, and storage accounts.
- The Microsoft Account (ex., fabrikamtest01@outlook.com) used to create the EA (or Direct, AzurePass, Trial) subscription must have delegated rights to each of the CSP subscriptions.
- Perform the following as the CSP partner, using the CSP admin account.
- Connect to the Azure Portal using Admin On Behalf Of (AOBO) for each CSP subscription being managed for a tenant.
- Select the appropriate CSP subscription.
- Delegate rights to the appropriate Microsoft Account (ex., fabrikamtest01@outlook.com)
- Perform the following as the CSP partner, using the CSP admin account.
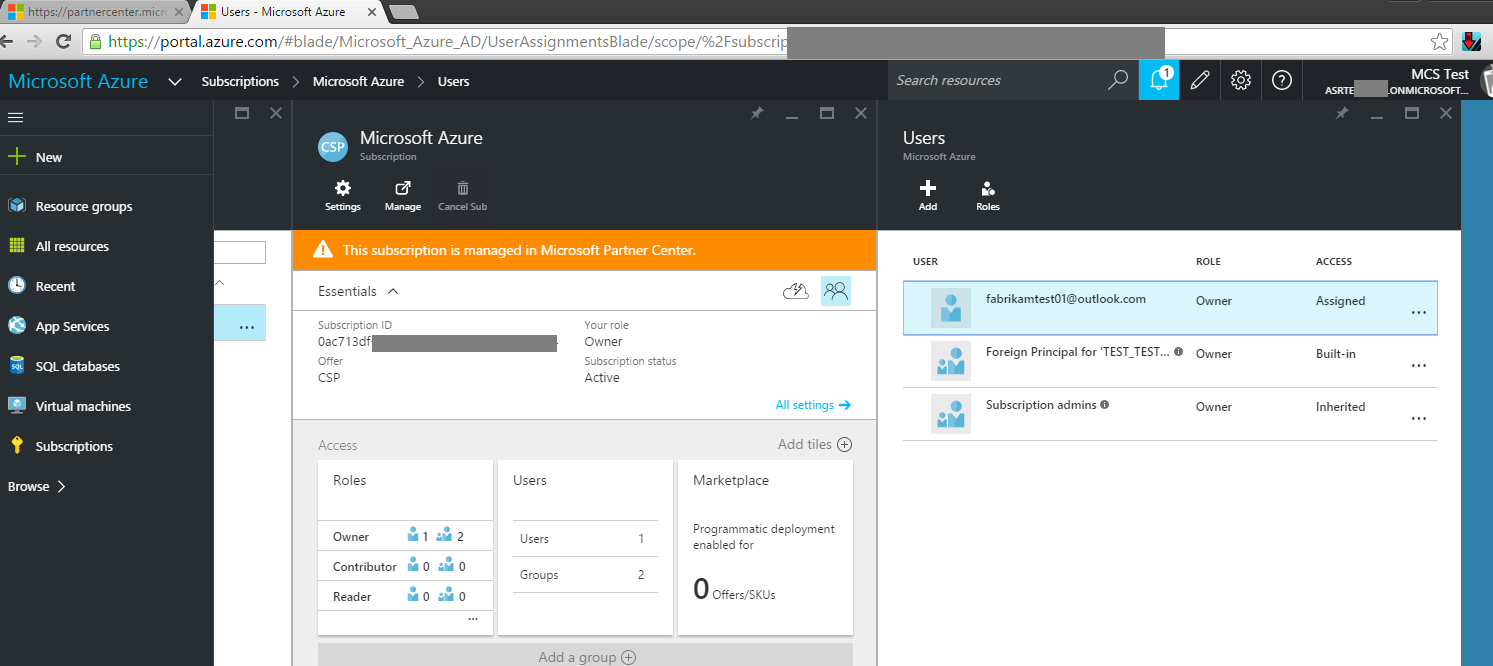
- Register the appropriate subscriptions for Azure Site Recovery Services.
- Launch Azure PowerShell.
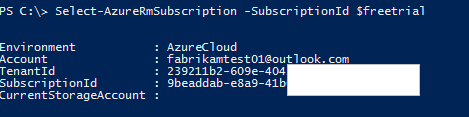
- Login to your Azure account. Supply your Microsoft Account credentials in the pop-up window. Do not use the CSP account (AOBO).
- Get a list of subscriptions.
- Note the appropriate SubscriptionID for the subscription in which the Recovery Services Vault will be created.
- Launch Azure PowerShell.
Login-AzureRmAccount
Get-AzureRmSubscription
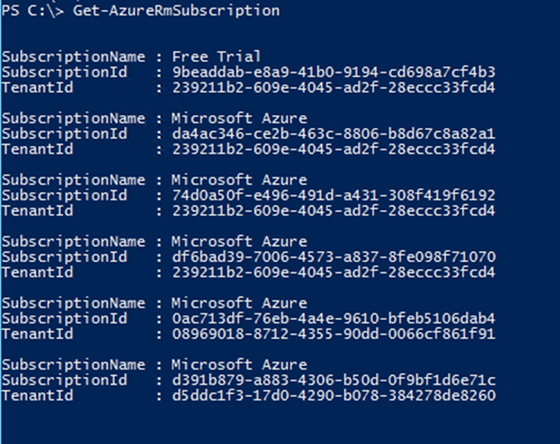
Get-AzureRMSubscription returns only subscriptions attached to the logged in account. When using the CSP account (AOBO), no subscriptions are returned.
- Select the appropriate subscription.
Set-AzureRmSubscription -SubscriptionID <SubscriptionID>
- Administering Tenant subscriptions (CSP provisioned subscriptions) using Reseller account credentials requires setting context of the subscription using both the SubscriptionID as well as the TenantID parameters.
Set-AzureRmContext -SubscriptionID <SubscriptionID> -TenantID <TenantID>
- Use variables to simplify context switching.
$freetrial = <subscriptionID> # Service Provider's EA subscription
$CSP1 = <SubscriptionID> # Tenant 1's CSP subscription
$CSP2 = <SubscriptionID> # Tenant 2's CSP subscription
-

- Register the Azure Site Recovery Resource Providers. Provider registration can take a few minutes.
- The EA account subscription must register all three providers.
Register-AzureRmProviderFeature -FeatureName betaAccess -ProviderNamespace Microsoft.RecoveryServices
Register-AzureRmResourceProvider -ProviderNamespace Microsoft.RecoveryServices
Register-AzureRmResourceProvider -ProviderNamespace Microsoft.SiteRecoveryWe have observed that registering the betaAccess feature can take over 30 minutes. An InvalidResourceNamespace 'Microsoft.RecoveryServices' is invalid error indicates that registration has not completed, even if the cmdlet returns "registered".
- Each CSP account subscription must register the SiteRecovery provider.
Register-AzureRmResourceProvider -ProviderNamespace Microsoft.SiteRecovery
Failing to register the SiteRecovery provider will lead to an error with linking the Storage Account, depicted below.

- Validate provider registration with the following cmdlets.
Get-AzureRmProviderFeature -FeatureName betaAccess -ProviderNamespace Microsoft.RecoveryServices
Get-AzureRmResourceProvider -ProviderNamespace Microsoft.RecoveryServices
Get-AzureRmResourceProvider -ProviderNamespace Microsoft.SiteRecovery
-
Step 2 - Create Resource Group
All Azure resources for a tenant's Azure Site Recovery service must be associated with the same resource group and region.
- Create a Resource Group in the service provider's EA subscription. The service provider likely already has Azure Resource Group(s) configured. A new one is not required. However, the Site Recovery Vault does to be placed within an RG.
Select-AzureRmSubscription -SubscriptionID $freetrial
$ResourceGroupName = New-AzureRmResourceGroup -Name <string> -Location <string> - Create a Resource Group in each tenant's CSP subscription. This RG will contain all of the tenant's ASR related resources.
Select-AzureRmSubscription -SubscriptionID $CSP1
$ResourceGroupName = New-AzureRmResourceGroup -Name <string> -Location <string>

Step 3 - Configure Site Recovery Vault
| ASM cmdlets | ARM cmdlets |
| AzureRMSiteRecoveryVaultSettingsFile
| AzureRmRecoveryServicesVault |
- Create the Site Recovery Vault
- In the EA subscription only.
- In the Resource Group created for ASR within the EA subscription.
- Save the Site Recovery Vault object as a variable for later use.
Select-AzureRmSubscription -SubscriptionID $freetrial
$Vault = New-AzurermRecoveryServicesVault -Name <string> -ResourceGroupName <string> -Location <string>
- In the EA subscription only.


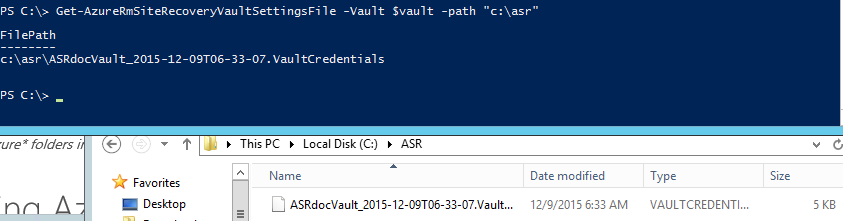
- Generate the Site Recovery Vault Registration Key. The registration key is installed on the VMM servers and used to register the VMM servers in the Site Recovery Vault.
Get-AzureRmRecoveryServicsVaultSettingsFile -Vault $Vault -Path <filepath>
- Set the Site Recovery Vault Context
Import-AzureRmSiteRecoveryVaultSettingsFile -Path <filepath>
Step 4 - Install Azure Site Recovery Provider
Install the ASR Provider on the VMM servers.
- For manual installation with the GUI, please refer to this article Install the Azure Site Recovery Provider.
- Create a directory for the ASR Provider installer. Store this directory path.
MD C:\ASR
PUSHD C:\ASR
- Copy the ASR Provider to the directory created in the previous step.
- Extract the files in the ASR Provider installer file.
.\AzureSiteRecoveryProvider.exe /x:. /q
- Shutdown the VMM service on the VMM server.
- Install the ASR Provider.
.\SetupDr.exe /i
- Register the VMM server in the Site Recovery Vault.
$BinPath = $ENV:SystemDrive + "\Program Files\Microsoft System Center 2012 R2\Virtual Machine Manager\bin"
PUSHD $BinPath
.\DRConfigurator.exe /r /Friendlyname <VMMServerName> /Credentials <VaultSettingFilePath> /EncryptionEnabled <PathToExportCertificateFile> /startvmmservice
Example:
$BinPath = $ENV:SystemDrive + "\Program Files\Microsoft System Center 2012 R2\Virtual Machine Manager\bin"
PUSHD $BinPath
\DRConfigurator.exe /r /Friendlyname VMM011 /Credentials D:\VaultBCDR_2015-11-26T14-37-56.VaultCredentials /EncryptionEnabled C:\temp\cert.pfx /startvmmservice
To learn more, refer to this article Set up protection between an on-premises VMM site and Azure.
Step 5 - Install Azure Recovery Services Agent
Install the MARS agent on each Hyper-V host server that comprise the VMM clouds containing VMs to be protected. To learn more about installing the MARS agent on many Hyper-V host servers, please refer to this article Agent install and configuration for Hyper-V hosts when using Microsoft Azure Site Recovery for disaster recovery to Azure.
As of December 2015, the agent is not available from the new Azure portal. Please download from the v1 portal.
- The installation command is:
marsagentinstaller.exe /q /nu
Step 6 - Configure Storage Account
Repeat the steps below for each tenant.
- Ensure the subscription context is set to the appropriate tenant's CSP subscription.
Select-AzureRmSubscription -SubscriptionID $CSP1
- Ensure the SiteRecovery provider has been register for the selected tenant's CSP subscription.
Get-AzureRmResourceProvider -ProviderNamespace Microsoft.SiteRecovery
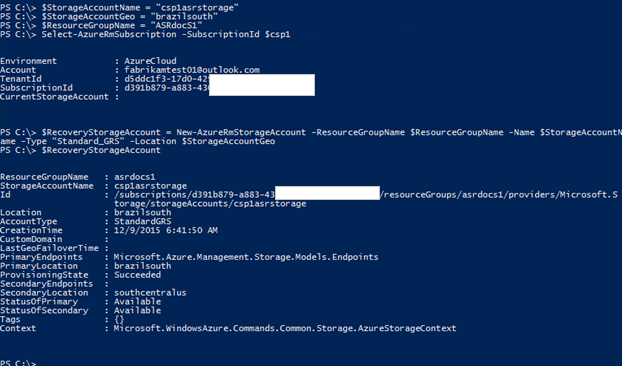
- Create the storage account
- The storage account must reside in the same Azure region as all other resources related to the tenant's Azure Site Recovery Service
- The storage account must be geo-replication enabled.
$StorageAccountName = <FriendlyStorageAccountName>
$StorageAccountGeo = <Region>
$ResourceGroupName = <ResourceGroupName>
$RecoveryStorageAccount = New-AzureRmStorageAccount -ResourceGroupName $ResourceGroupName -Name $StorageAccountName -Type "Standard\_GRS" -Location $StorageAccountGeo - The storage account must reside in the same Azure region as all other resources related to the tenant's Azure Site Recovery Service
Step 7 - Configure Cloud Protection Settings
| ASM cmdlets | ARM cmdlets |
| AzureRMsiteRecoveryProtectionProfile | AzureRmSiteRecoveryPolicy |
- Ensure the subscription context is set to the service provider's EA subscription.
Select-AzureRmSubscription -SubscriptionID $freetrial
- Create a replication policy.
$ReplicationFrequencyInSeconds = "300" # options are 30,300,900
$PolicyName = "replicapolicy"
$Recoverypoints = 6$policyResult = New-AzureRmSiteRecoveryPolicy -Name ReplicaPolicy -ReplicationProvider "HyperVReplicaAzure" -ReplicationFrequencyInSeconds 300 -RecoveryPoints 6 -ApplicationConsistentSnapshotFrequencyInHours 1 -RecoveryAzureStorageAccountId $recoverystorageaccount.Id
Validate creation of the replication policy using the $Policyresult variable and the Get-AzureRmSiteRecoveryPolicy cmdlet.

- Get a protection container.
$PrimaryCloud = <NameOfTheVMMCloud>
$protectionContainer = Get-AzureRmSiteRecoveryProtectionContainer -FriendlyName $PrimaryCloudExample:
$PrimaryCloud = "testcloud"
$protectionContainer = Get-AzureRmSiteRecoveryProtectionContainer –FriendlyName $PrimaryCloud

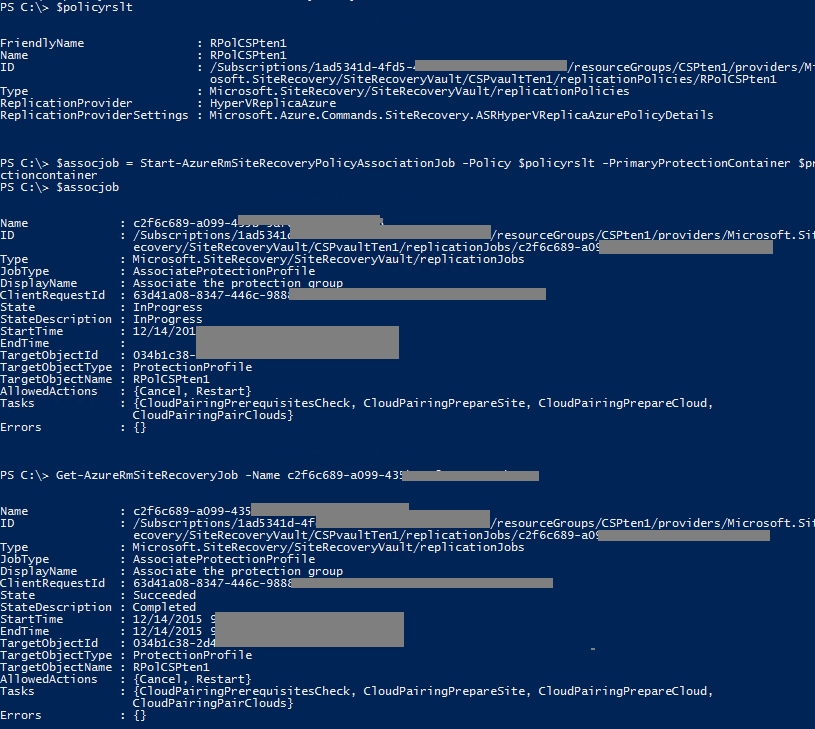
- Associate the protection container and replication policy.
$PolicyRslt = Get-AzureRmSiteRecoveryPolicy
$associationJob = Start-AzureRmSiteRecoveryPolicyAssociationJob -Policy $PolicyRslt -PrimaryProtectionContainer $protectionContainer


- Validate the association
Get-AzureRMSiteRecoveryJob -name $AssocationJob.Name

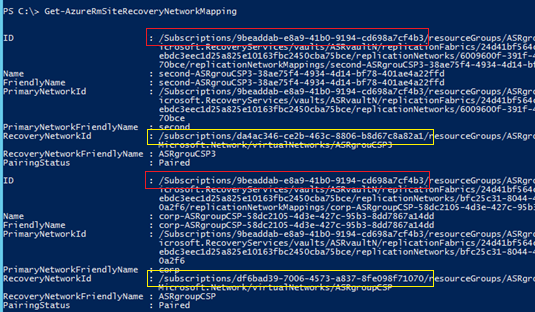
Step 8 - Configure Network Mapping
Repeat this section for each tenant.
- Ensure the subscription context is set to the service provider's EA subscription.
Select-AzureRmSubscription -SubscriptionID $freetrial
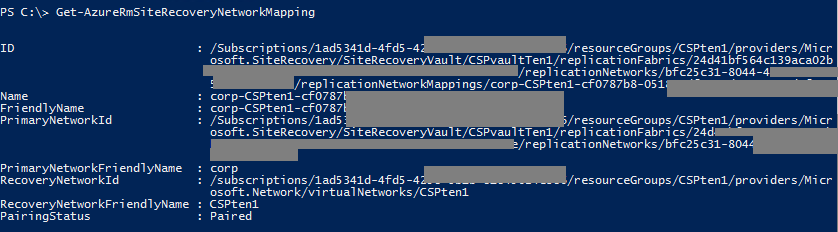
- Retrieve the servers in the current Site Recovery Vault.
$Servers = Get-AzureRmSiteRecoveryServer

- Retrieve the networks for the first server.
$Networks = Get-AzureRmSiteRecoveryNetwork -Server $Servers[0]
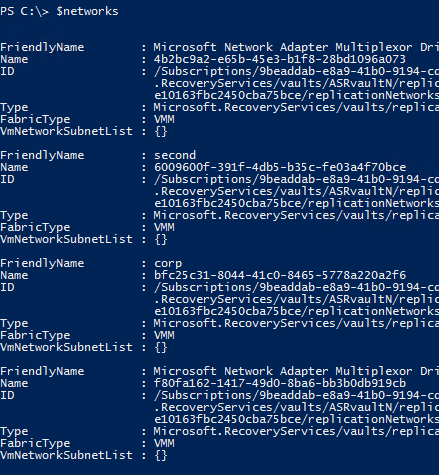
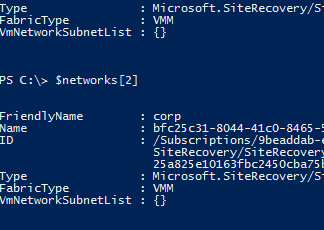
Review the network names returned. Note the index offset of the correct network name in the $Network[] array.
- $Network[2] corresponds to the "corp" network
- In the rest of the examples below, the protected VM is connected to the "corp" network.
- Ensure the subscription context is set to the appropriate tenant's CSP subscription.
Select-AzureRmSubscription -SubscriptionID $CSP1

- Retrieve the Azure virtual networks.
$AzureVmNetworks = Get-AzureRmVirtualNetwork

Review the network names returned. Note the index offset of the correct network name in the $AzureVmNetworks[] array.
- Ensure the subscription context is set to the service provider's EA subscription.
Select-AzureRmSubscription -SubscriptionID $freetrial
- Map the Primary (VMM, source) and Azure (target) networks.
$networks
$AzureVMNetworks
New-AzureRmSiteRecoveryNetworkMapping -PrimaryNetwork $Networks[2] -AzureVMNetworkId $AzureVmNetworks[0].Id
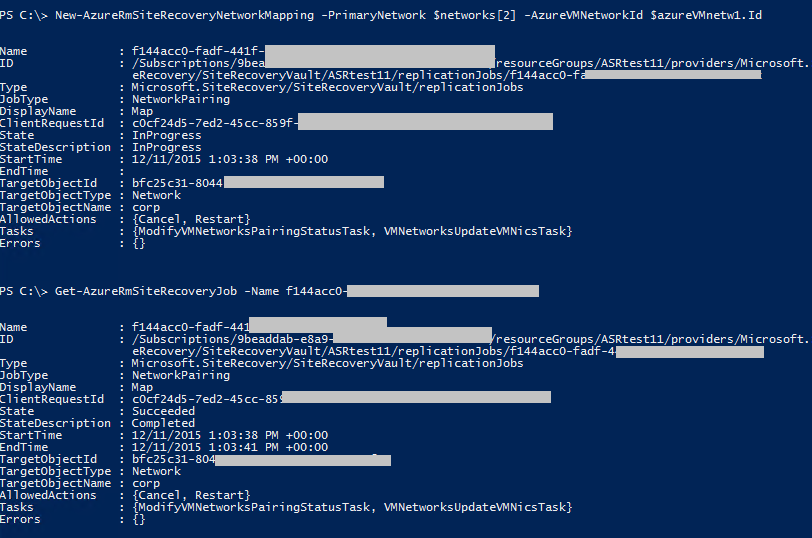
The network mapping cmdlet will map random networks if the specific networks are not defined.
For the two tenants in this example, the end result will look like this
Step 9 - Enable Protection
To enable protection the operating system and operating system disk properties must be set for the virtual machine. These can be set when creating VMs using a virtual machine template. These can also be configured for existing VMs on the General and Hardware Configuration tabs of the VM properties page.
Repeat this section for each tenant.
- Ensure the subscription context is set to the service provider's EA subscription.
Select-AzureRmSubscription -SubscriptionID $freetrial
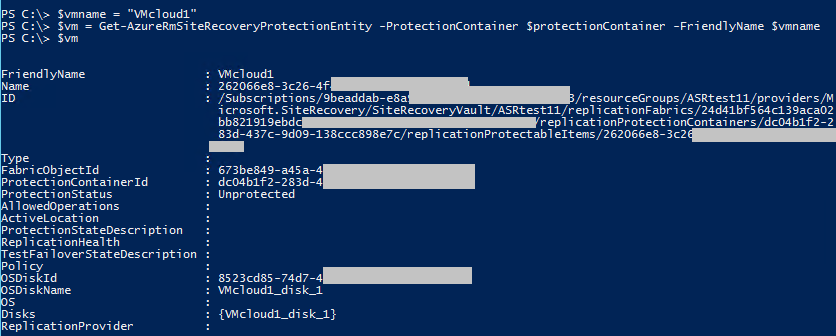
- Retrieve the protection container.
$primaryCloud = <VMM cloud name>
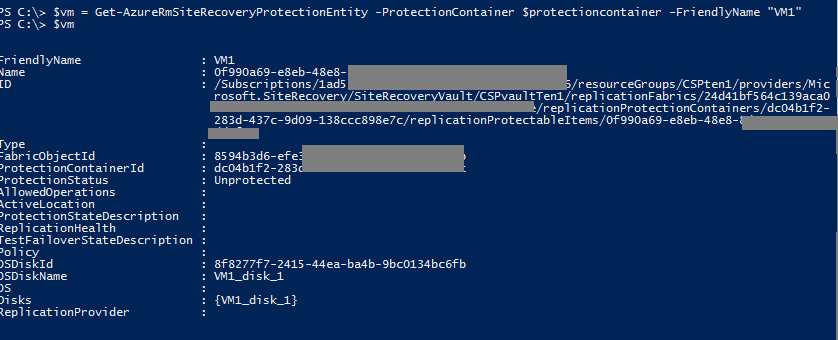
$ProtectionContainer = Get-AzureRmSiteRecoveryProtectionContainer -FriendlyName $primaryCloud - Get the protection entity (the VM to be protected).
$Vmname = <Name of the VM>
$vm = Get-AzureRmSiteRecoveryProtectionEntity -ProtectionContainer
$protectioncontainer -FriendlyName $vmname
- Retrieve the storage account ID. In Step 6: Configure Storage Account, storage account details were stored in the $RecoveryStorageAccount variable. If the variable is no longer accessible, switch context to the appropriate CSP subscription to retrieve the storage account properties, then switch context back to the EA subscription to continue enabling protection for VMs in that CSP subscription.
Select-AzureRmSubscription -SubscriptionID $CSP1
$RecoveryStorageAccount = Get-AzureRmStorageAccount
Select-AzureRmSubscription -SubscriptionID $freetrial


- Enable protection for the VM.
Set-AzureRmSiteRecoveryProtectionEntity -ProtectionEntity $VM -Protection Enable -Policy $PolicyRslt -RecoveryAzureStorageAccountId $RecoveryStorageAccount.ID -Force
- Validate successful job completion
Get-AzureRmSiteRecoveryJob -name <JobID>

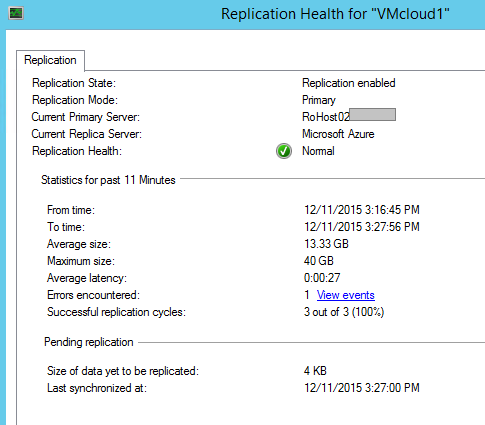
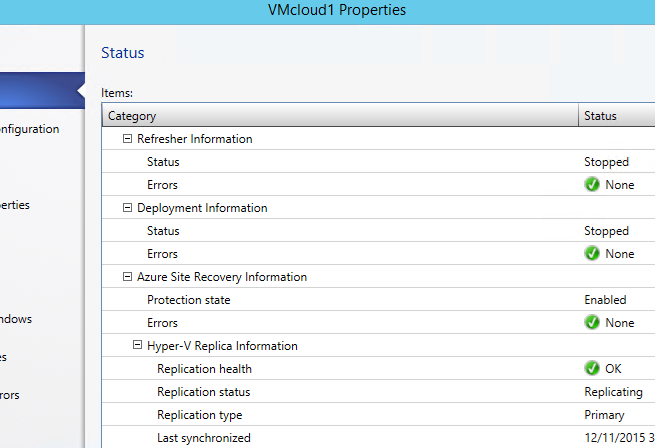
- Validate replication health. When the enable protection job completes, the VM starts replicating from VMM to Azure. The time to complete this initial replication is related to the size of the VM being protected.
Get-AzureRmSiteRecoveryProtectionEntity -ProtectionContainer $ProtectionContainer -FriendlyName $VMName

More detail is available from the Hyper-V server.
More detail is available from the VMM console.
If desired, the target VM size can be modified after protection has been enabled.
Get-AzureRmVMSize -Location "Brazil South" | Select-Object Name $targetVM = Get-AzureRmSiteRecoveryVM -FriendlyName <string> -ProtectionContainer <ASRProtectionContainer> Set-AzureRmSiteRecoveryVM -VirtualMachine $targetVM -Size "Standard\_D3"
Step 10 - Validate VMM to Azure VM Protection
Test configuration of VM protection by running a test failover. Test failover simulates failover and recovery mechanism in an isolated network.
- In order to connect to the failed over VM in Azure, enable Remote Desktop Connections in the VM before initiating the test failover.
- After failover, the protected VM is running in Azure. Connecting to the VM requires using a public IP address. Ensure domain policies don't prevent connecting to a VM using a public IP address.
- Start the planned failover.
$jobIDResult = Start-AzureRmSiteRecoveryPlannedFailoverJob -Direction PrimaryToRecovery -ProtectionEntity $VM

- Get status of the planned failover.
Get-AzureRmSiteRecoveryJob –Name <JobID>

For failed jobs, detailed error messages can be retrieved.
$Job = get-azureRMsiteRecoveryJob -name <jobName>
$job.Errors[x].ServiceErrorDetails

- Commit the planned failover.
Start-AzureRmSiteRecoveryCommitFailoverJob -ProtectionEntity $VM
- Review the planned failover.
These are the mappings done for each of the two tenants
VMM settings:

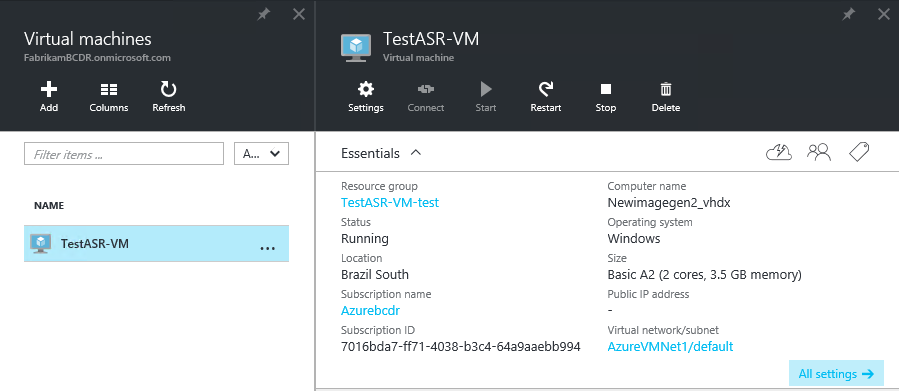
Azure portal view of the two machines

The disks of the two machines, in different Storage Accounts, which are in different Azure Subscriptions (CSP created)


Configuration of the Step-By-Step - Enterprise to Azure - VMM to Azure - Multi-Tenant scenario is complete
Step-By-Step - Enterprise to Azure - VMM to Azure - Dedicated VMM
The prerequisites and configuration steps for the Enterprise to Azure - VMM to Azure - Dedicated VMM scenario are detailed in this section. The overall process, including unique considerations for dedicated VMM are summarized in this table.
| STEP | Description | Multi-Tenant |
| 0.1 | Prerequisites - Azure | CSP subscription only |
| 0.2 | Prerequisites - VMM | VMM dedicated to a single tenant |
| 0.3 | Prerequisites - Hyper-V | |
| 0.4 | Prerequisites - Network Mapping | |
| 0.5 | Prerequisites - PowerShell | |
| 1 | Configure Subscriptions & Register Providers | |
| 2 | Create Resource Group | |
| 3 | Configure Site Recovery Vault | |
| 4 | Install ASR provider | |
| 5 | Install MARS agent | |
| 6 | Configure Storage Account | |
| 7 | Configure Cloud Protection Settings | |
| 8 | Configure Network Mapping | |
| 9 | Enable Protection | |
| 10 | Validate VMM to Azure VM Protection |
Prerequisites – Azure
Azure Subscriptions
- CSP subscription for the tenant
- Record the Subscription ID.
Azure Storage
Azure v2 (Azure Resource Manager, ARM) storage account to store data replicated to Azure. The account needs to have geo-replication enabled. As of December 2015, the storage account and the Azure Site Recovery service must be in the same Azure region. To learn more about setting up Azure storage, refer to this article Introduction to Microsoft Azure Storage.
Azure Virtual Machines
VMs that will be protected must comply with Azure VM requirements. To learn more about Azure VM requirements, refer to this article Sizes for Virtual Machines.
Azure Regions
All resources used to enable ASR must be in the same region. This includes the virtual networks, storage account, and resource groups. To learn more about Azure regions, refer to this article Azure Regions.
As of December 2015
- Only VM level operations are possible.
- This includes failovers only per protected VM (not through recovery plans).
- Configuration and operations are only available through PowerShell.
- Recovery plan level operations are planned for a future release.
Prerequisites - VMM
Versions
System Center Virtual Machine Manager 2012 R2 with the latest Update Release and updates installed. This document was validated against VMM 2012 R2 UR7, Windows Server 2012 R2, and updates released through November 20, 2015.
VMM Clouds
At least one VMM cloud containing the VMs to be protected. The VMM cloud must include:
- One or more VMM host groups.
- One or more Hyper-V host servers or clusters in each host group.
- One or more virtual machines on the source Hyper-V servers or clusters.
The VMM infrastructure must be dedicated to a single tenant.
Azure Site Recovery Provider
Version 5.1.1256.0 or later. The latest version can be downloaded at this link http://aka.ms/downloaddra. If the version is older, when trying to register the VMM server, an "unknown error" will occur while trying to read the certificate.
As of December 2015, do not assume the provider will be updated during the installation process. The installation step "looking for the latest version" does not update the ASR provider. Similarly, Microsoft Updates does not update the ASR provider. Manually downlaod and install the latest version of the ASR Provider.
Prerequisites - Hyper-V
Versions
Windows Server 2012 R2, with the Hyper-V role enabled, and the latest updates installed is required for the Hyper-V host servers. This document was validated against VMM 2012 R2 UR7, Windows Server 2012 R2, and updates released through November 20, 2015.
Cluster Broker
For Hyper-V clusters, the cluster broker is not created automatically if using a static IP address-based cluster. Manually configure the cluster broker. Refer to the "Set up a cluster" section of this article Deploy Hyper-V Replica.
VMM Cloud Association
All Hyper-V host servers or clusters hosting VMs to be protected must be included in a VMM cloud.
Prerequisites - Network Mapping
VM Network
Protected VMs must be connected to a VM network.
VMM Logical Network
The VM network must be linked to a VMM logical network associated with a VMM cloud.
Azure v2 Network
Replicated VMs in Azure will use this network. This network must be in the same region as the Azure Site Recovery subscription, the Resource Group, and the Storage Account. Select this network at the time of failover.
Mapping
Network mapping between VM networks on the source VMM server and the target Azure networks enables:
- All VMs which failover onto the same network can connect to each other.
- If a network gateway is setup on the target Azure network, virtual machines can connect to other on-premises virtual machines.
To learn more about network mapping, refer to the following articles:
- Configuring Logical Networking in VMM Overview
- Configuring VM Networks and Gateways in VMM
-
Enabling protection of a VM will fail if the VM is not connected to a network, or if the networks are not mapped.
Prerequisites – PowerShell
This version of the guide focuses on using PowerShell (PS) and Azure Resource Manager (ARM) to accomplish the configuration tasks. This guide assumes understanding of basic PowerShell concepts such as modules, cmdlets, and sessions. For more information about Windows PowerShell, please refer to the article Getting Started with Windows PowerShell. To learn more about Azure PowerShell with Azure Resource Manager, please refer to this article Using Azure PowerShell with Azure Resource Manager.
Please note that the PowerShell cmdlets are under development and changing continuously, while it transitions from ASM to ARM. Please take the time to review the latest documentation for the cmdlets used in this guide.
WMF 5.0
Windows Management Framework 5.0 is required. For Windows Server 2012 R2, WMF 5.0 must be installed. Download.
Azure PowerShell
Azure PowerShell 1.0. To learn more about Azure PowerShell, refer to this article How to install and configure Azure PowerShell. Download the latest version of Azure PowerShell from https://github.com/Azure/azure-powershell/releases/tag/v1.0.1-November2015.
Modules
Several PowerShell modules are required. These modules add Azure Resource Manager (ARM) functionality to PowerShell. The latest versions of these modules are available from the PowerShell gallery. Direct links to the ASR modules:
Installation
PowerShell installation and configuration is required once on each service provider administrator's remote machine. From which all configuration steps are performed.
- Uninstall any older version of Azure Powershell.
- Install WMF 5.0
- Update WMF 5.0
- Install Azure PowerShell 1.0.
- Open Microsoft PowerShell, not Azure PowerShell (run as administrator).
- Install the AzureRM modules. The "-force" switch ensures the latest version will be installed (will overwrite).
Install-Module AzureRM.Profile -force -Repository PSGallery*
Install-Module AzureRM -force -Repository PSGallery*
Install-Module AzureRM.Resources -force -Repository PSGallery*
Install-Module AzureRM.SiteRecovery -force -Repository PSGallery*
Install-Module AzureRM.RecoveryServices -force -Repository PSGallery*
Do not proceed until all prerequisites have been satisfied.
Step 1 - Configure Subscriptions & Register Providers
For the dedicated VMM scenario, only the CSP subscription is required. No context switching is required.
- Launch Azure PowerShell.
- Login to your Azure account. Supply your Microsoft Account credentials in the pop-up window. Do not use the CSP account (AOBO).
Login-AzureRmAccount
Get-AzureRMSubscription returns only subscriptions attached to the logged in account. When using the CSP account (AOBO), no subscriptions are returned.
- Note the appropriate SubscriptionID for the subscription in which the Recovery Services Vault will be created.
- From the Partner Center, note the MicrosoftID. This will be used for the TenantID below.
- Select the appropriate subscription using the SubscriptionID and TenantID (MicrosoftID).
Set-AzureRmContext -SubscriptionID <SubscriptionID> -TenantID <MicrosoftID>
- Validate the correct subscription has been selected.
Get-AzureRmContext
- Register the Azure Site Recovery Resource Providers. Provider registration can take a few minutes.
Register-AzureRmProviderFeature -FeatureName betaAccess -ProviderNamespace Microsoft.RecoveryServices
Register-AzureRmResourceProvider -ProviderNamespace Microsoft.RecoveryServices
Register-AzureRmResourceProvider -ProviderNamespace Microsoft.SiteRecoveryWe have observed that registering the betaAccess feature can take over 30 minutes. An InvalidResourceNamespace 'Microsoft.RecoveryServices' is invalid error indicates that registration has not completed, even if the cmdlet returns "registered".
Failing to register the SiteRecovery provider will lead to an error with linking the Storage Account, depicted below.
- Validate provider registration with the following cmdlets.
Get-AzureRmProviderFeature -FeatureName betaAccess -ProviderNamespace Microsoft.RecoveryServices
Get-AzureRmResourceProvider -ProviderNamespace Microsoft.RecoveryServices
Get-AzureRmResourceProvider -ProviderNamespace Microsoft.SiteRecovery
Step 2 - Create Resource Group
All Azure resources for a tenant's Azure Site Recovery service must be associated with the same resource group and region.
- Create a Resource Group.
$ResourceGroupName = New-AzureRmResourceGroup -Name <string> -Location <string>

Step 3 - Configure Site Recovery Vault
| ASM cmdlets | ARM cmdlets |
| AzureRMSiteRecoveryVaultSettingsFile
| AzureRmRecoveryServicesVault |
- Create the Site Recovery Vault
- In the Resource Group created for ASR within the EA subscription.
- Save the Site Recovery Vault object as a variable for later use.
$Vault = New-AzurermRecoveryServicesVault -Name <string> -ResourceGroupName <string> -Location <string>
- In the Resource Group created for ASR within the EA subscription.

- Generate the Site Recovery Vault Registration Key. The registration key is installed on the VMM servers and used to register the VMM servers in the Site Recovery Vault.
Get-AzureRmRecoveryServicsVaultSettingsFile -Vault $Vault -Path <filepath>

- Set the Site Recovery Vault Context
Import-AzureRmSiteRecoveryVaultSettingsFile -Path <filepath>
Step 4 - Install Azure Site Recovery Provider
Install the ASR Provider on the VMM servers.
- For manual installation with the GUI, please refer to this article Install the Azure Site Recovery Provider.
- Create a directory for the ASR Provider installer. Store this directory path.
MD C:\ASR
PUSHD C:\ASR - Copy the ASR Provider to the directory created in the previous step.
- Extract the files in the ASR Provider installer file.
.\AzureSiteRecoveryProvider.exe /x:. /q
- Shutdown the VMM service on the VMM server.
- Install the ASR Provider.
.\SetupDr.exe /i
- Register the VMM server in the Site Recovery Vault.
$BinPath = $ENV:SystemDrive + "\Program Files\Microsoft System Center 2012 R2\Virtual Machine Manager\bin"
PUSHD $BinPath
.\DRConfigurator.exe /r /Friendlyname <VMMServerName> /Credentials <VaultSettingFilePath> /EncryptionEnabled <PathToExportCertificateFile> /startvmmservice
Example:
$BinPath = $ENV:SystemDrive + "\Program Files\Microsoft System Center 2012 R2\Virtual Machine Manager\bin"
PUSHD $BinPath
\DRConfigurator.exe /r /Friendlyname VMM011 /Credentials D:\VaultBCDR_2015-11-26T14-37-56.VaultCredentials /EncryptionEnabled C:\temp\cert.pfx /startvmmservice
To learn more, refer to this article Set up protection between an on-premises VMM site and Azure.
Step 5 - Install Azure Recovery Services Agent
Install the MARS agent on each Hyper-V host server that comprise the VMM clouds containing VMs to be protected. To learn more about installing the MARS agent on many Hyper-V host servers, please refer to this article Agent install and configuration for Hyper-V hosts when using Microsoft Azure Site Recovery for disaster recovery to Azure.
As of December 2015, the agent is not available from the new Azure portal. Please download from the v1 portal.
- The installation command is:
marsagentinstaller.exe /q /nu
Step 6 - Configure Storage Account
- Create the storage account
- The storage account must reside in the same Azure region as all other resources related to the tenant's Azure Site Recovery Service
- The storage account must be geo-replication enabled.
$StorageAccountName = <FriendlyStorageAccountName>
$StorageAccountGeo = <Region>
$ResourceGroupName = <ResourceGroupName>
$RecoveryStorageAccount = New-AzureRmStorageAccount -ResourceGroupName $ResourceGroupName -Name $StorageAccountName -Type "Standard\_GRS" -Location $StorageAccountGeo
- The storage account must reside in the same Azure region as all other resources related to the tenant's Azure Site Recovery Service

Step 7 - Configure Cloud Protection Settings
| ASM cmdlets | ARM cmdlets |
| AzureRMsiteRecoveryProtectionProfile | AzureRmSiteRecoveryPolicy |
- Create a replication policy.
$ReplicationFrequencyInSeconds = "300" # options are 30,300,900
$PolicyName = "replicapolicy"
$Recoverypoints = 6
$policyResult = New-AzureRmSiteRecoveryPolicy -Name ReplicaPolicy -ReplicationProvider "HyperVReplicaAzure" -ReplicationFrequencyInSeconds 300 -RecoveryPoints 6 -ApplicationConsistentSnapshotFrequencyInHours 1 -RecoveryAzureStorageAccountId $recoverystorageaccount.IdValidate creation of the replication policy using the $Policyresult variable and the Get-AzureRmSiteRecoveryPolicy cmdlet.

- Get a protection container.
$PrimaryCloud = <NameOfTheVMMCloud>
$protectionContainer = Get-AzureRmSiteRecoveryProtectionContainer -FriendlyName $PrimaryCloudExample:
$PrimaryCloud = "testcloud"
$protectionContainer = Get-AzureRmSiteRecoveryProtectionContainer –FriendlyName $PrimaryCloud

- Associate the protection container and replication policy.
$PolicyRslt = Get-AzureRmSiteRecoveryPolicy
$associationJob = Start-AzureRmSiteRecoveryPolicyAssociationJob -Policy $PolicyRslt -PrimaryProtectionContainer $protectionContainer
- Validate the association
Get-AzureRMSiteRecoveryJob -name $AssocationJob.Name
Step 8 - Configure Network Mapping
- Retrieve the servers in the current Site Recovery Vault.
$Servers = Get-AzureRmSiteRecoveryServer

- Retrieve the networks for the first server.
$Networks = Get-AzureRmSiteRecoveryNetwork -Server $Servers[0]
Review the network names returned. Note the index offset of the correct network name in the $Network[] array.
- $Network[2] corresponds to the "corp" network
- In the rest of the examples below, the protected VM is connected to the "corp" network.
- Retrieve the Azure virtual networks.
$AzureVmNetworks = Get-AzureRmVirtualNetwork

Review the network names returned. Note the index offset of the correct network name in the $AzureVmNetworks[] array.
- Map the Primary (VMM, source) and Azure (target) networks.
$networks
$AzureVMNetworks
New-AzureRmSiteRecoveryNetworkMapping -PrimaryNetwork $Networks[2] -AzureVMNetworkId $AzureVmNetworks[0].Id

The network mapping cmdlet will map random networks if the specific networks are not defined.
The end result can be checked by running the "Get-AzureRMSiteRecoveryNetworkMappping"
Step 9 - Enable Protection
To enable protection the operating system and operating system disk properties must be set for the virtual machine. These can be set when creating VMs using a virtual machine template. These can also be configured for existing VMs on the General and Hardware Configuration tabs of the VM properties page.
- Retrieve the protection container.
$primaryCloud = <VMM cloud name>
$ProtectionContainer = Get-AzureRmSiteRecoveryProtectionContainer -FriendlyName $primaryCloud - Get the protection entity (the VM to be protected).
$Vmname = <Name of the VM>
$vm = Get-AzureRmSiteRecoveryProtectionEntity -ProtectionContainer
$protectioncontainer -FriendlyName $vmname
- Retrieve the storage account ID. In Step 6: Configure Storage Account, storage account details were stored in the $RecoveryStorageAccount variable. If the variable is no longer accessible, switch context to the appropriate CSP subscription to retrieve the storage account properties, then switch context back to the EA subscription to continue enabling protection for VMs in that CSP subscription.
$RecoveryStorageAccount = Get-AzureRmStorageAccount
Select-AzureRmSubscription -SubscriptionID $freetrial
- Enable protection for the VM.
Set-AzureRmSiteRecoveryProtectionEntity -ProtectionEntity $VM -Protection
Enable -Policy $PolicyRslt -RecoveryAzureStorageAccountId $RecoveryStorageAccount.ID -Force

- Validate successful job completion
Get-AzureRmSiteRecoveryJob -name <JobID>

- Validate replication health. When the enable protection job completes, the VM starts replicating from VMM to Azure. The time to complete this initial replication is related to the size of the VM being protected.
Get-AzureRmSiteRecoveryProtectionEntity -ProtectionContainer $ProtectionContainer -FriendlyName $VMName

More detail is available from the Hyper-V server.
More detail is available from the VMM console.
If desired, the target VM size can be modified after protection has been enabled.
Get-AzureRmVMSize -Location "Brazil South" | Select-Object Name $targetVM = Get-AzureRmSiteRecoveryVM -FriendlyName <string> -ProtectionContainer <ASRProtectionContainer> Set-AzureRmSiteRecoveryVM -VirtualMachine $targetVM -Size "Standard\_D3"
Step 10 - Validate VMM to Azure VM Protection
Test configuration of VM protection by running a test failover. Test failover simulates failover and recovery mechanism in an isolated network.
- In order to connect to the failed over VM in Azure, enable Remote Desktop Connections in the VM before initiating the test failover.
- After failover, the protected VM is running in Azure. Connecting to the VM requires using a public IP address. Ensure domain policies don't prevent connecting to a VM using a public IP address.
- Start the planned failover.
$jobIDResult = Start-AzureRmSiteRecoveryPlannedFailoverJob -Direction PrimaryToRecovery -ProtectionEntity $VM
- Get status of the planned failover.
Get-AzureRmSiteRecoveryJob –Name <JobID>
For failed jobs, detailed error messages can be retrieved.
$Job = get-azureRMsiteRecoveryJob -name <jobName>
$job.Errors[x].ServiceErrorDetails
- Commit the planned failover.
Start-AzureRmSiteRecoveryCommitFailoverJob -ProtectionEntity $VM
- Review the planned failover.
These are the mappings done for each of the two tenants
VMM settings:
Azure portal view of the two machines
The disks of the two machines, in different Storage Accounts, which are in different Azure Subscriptions (CSP created)
Configuration of the Step-By-Step - Enterprise to Azure - VMM to Azure - Dedicated VMM scenario is complete
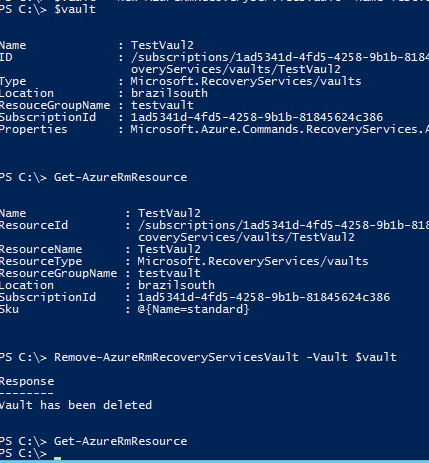
Remove the Vault
Removing the Site Recovery Vault is not a normal action. It might perhaps be useful to clean up dev/test environments. It is not required when deprovisioning a specific tenant. To remove the Vault
$vault = Get-AzureRmSiteRecoveryVault -Name <vault name>
Remove-AzureRmRecoveryServicesVault -Vault $vault
Additional Resources
- Azure Recovery Services Forum
- ASM Azure Site Recovery Cmdlets
- Azure Site Recovery Pricing
- Prepare for Azure Site Recovery deployment
- Replicate Hyper-V virtual machines (in VMM clouds) to a secondary VMM site
- What's New in Microsoft System Center 2012 R2 VMM
- VMM 2012 and the clouds
- Creating a Private Cloud in VMM
- Walkthrough: Creating Private Clouds with System Center 2012 SP1 Virtual Machine Manager - Build Your Private Cloud in a Month