SQL Server 2014 Disaster Recovery Lab
Introduction
The Microsoft Hybrid Cloud High Availability and Disaster Recovery strategy includes the Add Azure Replica option within SQL Server Management Studio. This extension offers Cloud Solution Provider (CSP) customers the opportunity to increase the resilience of their data center operations. Their SQL Server AlwaysOn Availability Group can be extended to the Microsoft Azure Public cloud by provisioning one or more secondary replicas within Microsoft Azure using a subscription.

Figure 1 High Level Architecture
The network architecture diagram shown in figure 1 supports implementation of the prerequisite Site-to-Site (S2S) Virtual Private Network (VPN) Tunnel and the SQL Server Hybrid AlwaysOn Availability Group. We planned and documented the S2S VPN Tunnel design separately but is referred to in this document. The solution component settings were documented in a planning worksheet, shared in Appendix A.
Enabling AlwaysOn with Disaster Recovery
Once the on-premises SQL AlwaysOn is setup, the next step is to add an Azure Replica to interact with the cluster. In this section you will use SQL Server Management Studio to enable completing the setup. The diagram below illustrates the AlwaysOn with DR solution we will build in this lab.
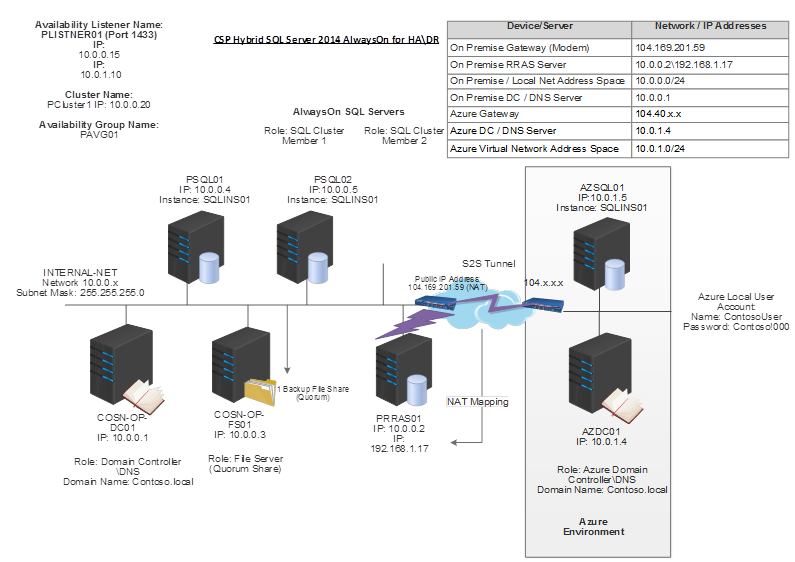
Figure 1 AlwaysOn Availability Group Lab Architecture (using RRAS)
The network architecture diagram shown in figure 1 supports implementation of the prerequisite Site-to-Site (S2S) Virtual Private Network (VPN) Tunnel and the SQL Server Hybrid AlwaysOn Availability Group. We planned and documented the S2S VPN Tunnel design details in the Networking Lab. The solution component settings were documented in a planning worksheet shown in figure 2. See Appendix
For this lab, participants use the GUI and command line scripts where appropriate.
Preconditions
- Site-to-Site Configuration has already been established per our existing guidance (SQL14-Labs HADR – Network Lab.docx)
- Domain server has been provisioned
- PowerShell scripts used to provision user and services accounts
- Member servers have been provisioned
- Windows Server Failover Cluster provisioned and operational
- Initial AlwaysOn Servers have been setup and configured for HA
- IP address for the listener has been identified
- SQL Server 2014 has been installed on each member server
- Install the stand-alone version of SQL 2014 server
- Database Engine Services (all) & Management Tools (All)
- Install using the default instance
- Set security to install in Mix Mode (add current user and note the SA password)
- If there is a data, log and backup drive ensure you use the same on all servers Note: You may need to add disc in Azure to meet this requirement after Azure Replica is ran
- SQL Server 2014 Post Hotfixes required: Download the current SQL 2014 hot fix rollup 480863 identified at https://support.microsoft.com/en-us/kb/3011055 - Apply after you install SQL on all Servers (Note: It is not needed on Azure SQL 2014 servers)
- Download the Adventureworks Full Backup Bits and share out on the DC which is located at: https://msftdbprodsamples.codeplex.com/downloads/get/880661
- In this document we leverage the details outlined in the table below to setup and deliver the solution.
| Device or Server Name | Network Subnet or IP Address | Explanation |
| DNS Server IP Address | IP 192.168.1.85 (104.40.28.79) | RRAS mapped to external internet facing IP |
| On-prem RRAS Router | IP 10.0.0.2 (104.40.28.79) | Public IP Address entered on Azure Local Network Setup |
| On-premises IP Address Space | 10.0.0.0/24. 192.168.1.0/24 | Private IP Address used as the gateway for on-Prem Systems |
| On-prem DC/DNS Names/IP Address | PDC01, IP 10.0.0.1 | Will be entered in the Azure Local Network Setup |
| On-prem Active Directory Site Name | Contoso.local | Domain Name |
| Azure Local Network Name | VNET01 | Name used to refer to the on-premises Network |
| Azure Local Network Address Space | 10.1.0.0/16 | On-premises Network IP Subnet Address Range |
| Azure Local Network (VNET01) VPN Gateway Address | IP 104.40.28.79 | IP Address of outer network perimeter router/modem |
| Azure Resource Group Name | VNET01 | Name of Resource Group |
| Azure Virtual Network IP Address Space(s) and Subnets Name(s) | Gateway Subnet - 10.1.2.0/24, Default 10.1.1.0/24 | Address spaces define for Windows Azure Virtual Network Definitions |
| Azure Virtual Network Gateway IP Subnet | Gateway 10.1.2.0/24 | Network Subnet defined |
| Azure Virtual Network IP Address | 104.40.28.79 | Domain-dial IP address utilized to connect the on-premises Local Network with Windows Azure Virtual Network |
| Azure IaaS VM DC Name(s) (Discovered after rec'd IP from Azure DHCP) | AZDC01, 10.1.1.4 | Will be available for use after receiving IP address from Azure DHCP |
| Azure AD Site Name | Contoso.local | On-premises domain controller name |
| Azure AD IP Subnet (s) | 10.1.1.0 | Will be used for domain controllers and other infrastructure virtual machine based servers |
| Azure Virtual Network Name | VNET01 | Name of targeted Virtual Network to build the GW into |
| ILB - Azure Availability Group IP Address | 10.1.1.25 | Will be used for failover from on-premises SQL 2014 AlwaysOn Availability Group using ILB |
| Quorum Share and SQL Backup Server | 10.0.0.3 | On-premises PFS01 File Server Setup to support failover. |
Table 1 Planning Details
This table contains our lab settings required to build the Hybrid SQL Server Availability Group by using the S2S VPN Tunnel.
Note: Details may vary for different implementations and subscriptions. The S2S VPN is the foundation for delivering a hybrid cloud AlwaysOn Availability Group. We leverage the Add Azure Replica Wizard to complete several steps document later in this document.
Setup and Configure on-premises environment
High Level Architecture and Assumptions
The following diagram identifies the key components needed for delivering SQL 2014 DR. The Azure side will leverage an existing CSP tenant already provisioned with a single Windows 2012R2 Domain Controller and a separate SQL 2014 server installed on top of Windows 2012R2. All on-premises servers are configured with Windows 2012R2 with a single server representing a DC, File Server and RRAS each and 2 SQL Servers with the AdventureWorks Database installed and backed up at least once. This procedure will focus on setting up the key elements that enable DR with Azure.

Creating a Routing and Remote Access Server
This lab scenario walks the participant through installing and configuring a new RRAS server. Ensure that at least 2 NIC are available where 1 on the 192.168.x.x network (Internet) and the other in on the 10.0.x.x network (internal).
Time Duration: 25 minutes
Preconditions
- ISP router/modem configured with static IP address to bypass NAT
- Device functioning in bridge mode
- VM exist with Windows 2012 R2 is installed and updated
Tasks and Detailed Process Steps
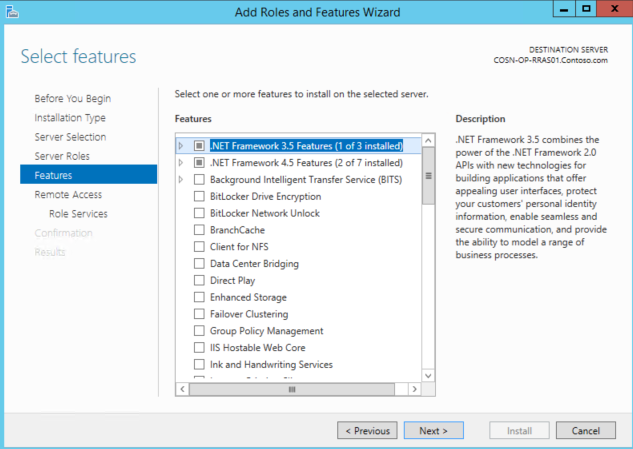
- Log onto the D-PRRAS01 and add the RRAS Server Role
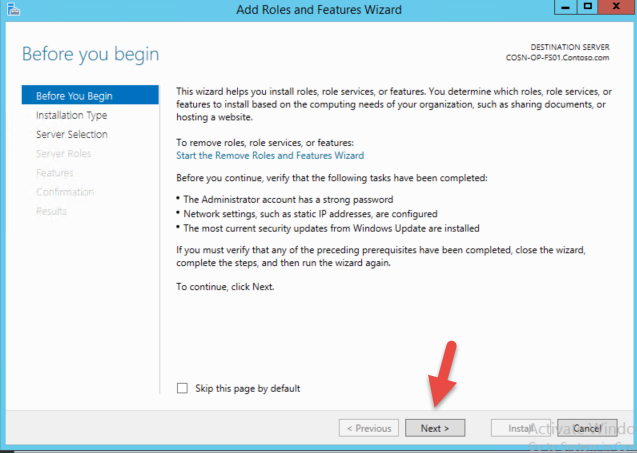
- Click Next with defaults
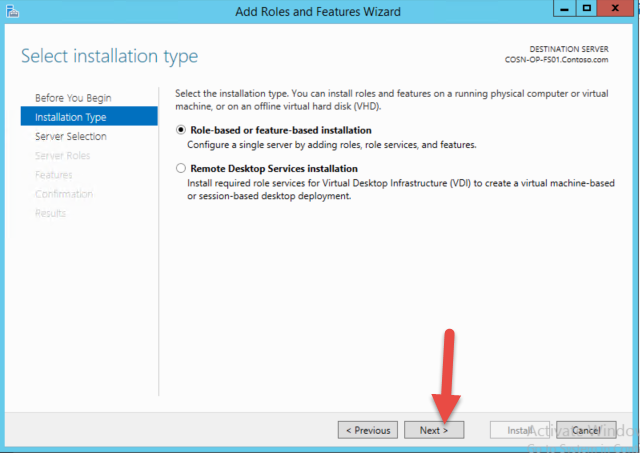
- Click Next with defaults
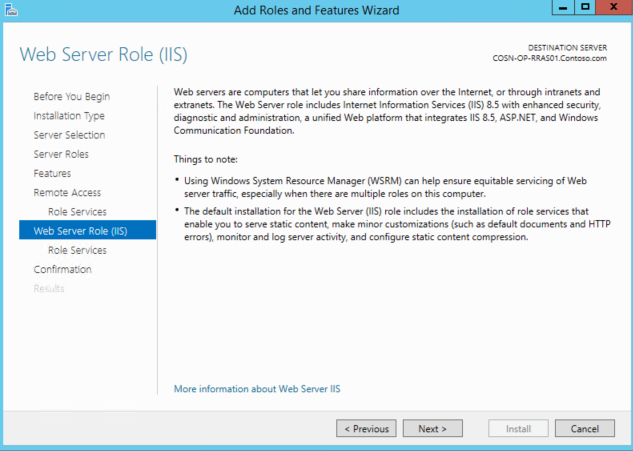
- Select Remote Access and Click Next
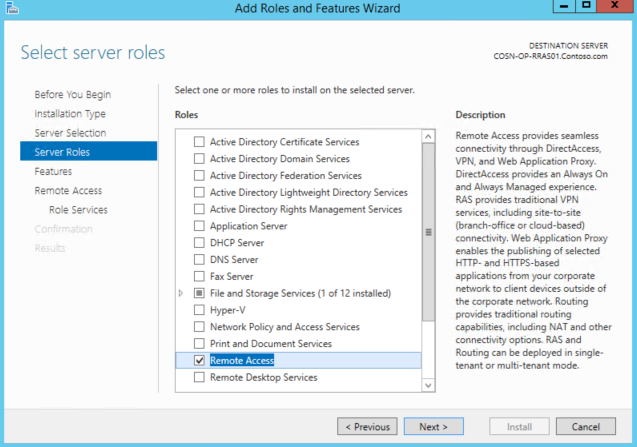
- Click Next with defaults
- Select DirectAccess and VPN (RAS) and Routing and then click Next

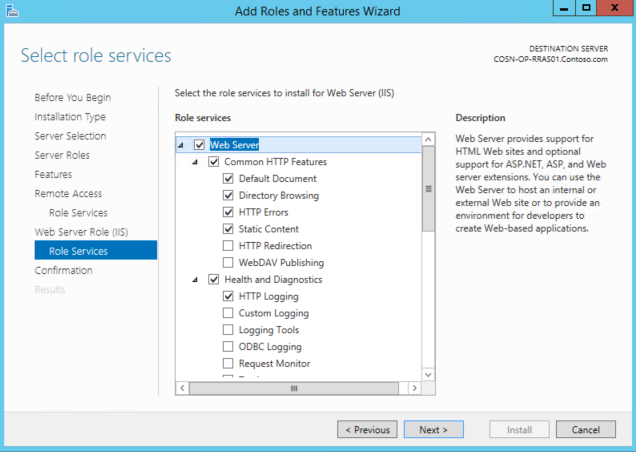
- Click Next with defaults
- Click Next with defaults
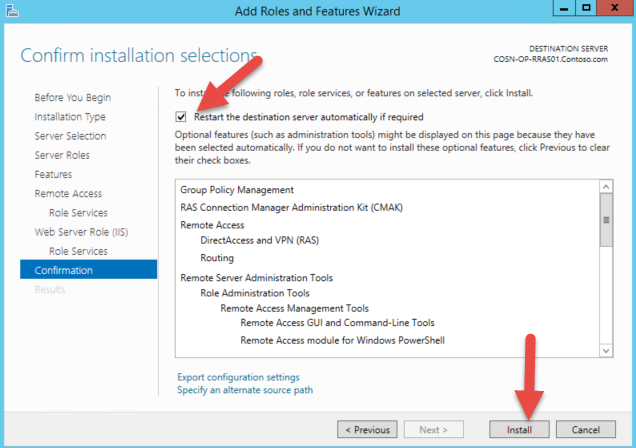
- Select the Restart Option and then Click Install
- When Prompted to configure RRAS cancel out since we will do it manually
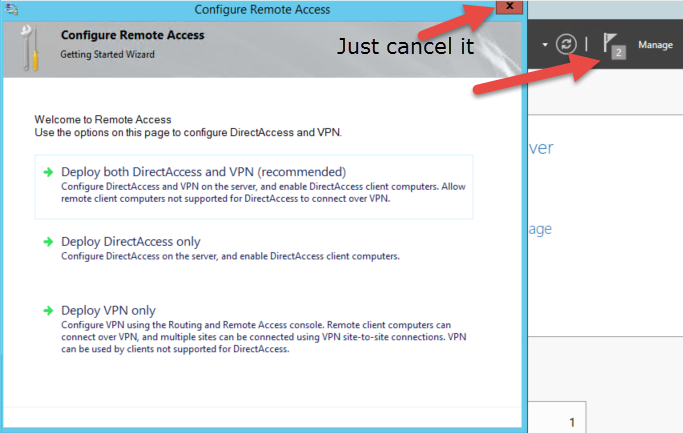
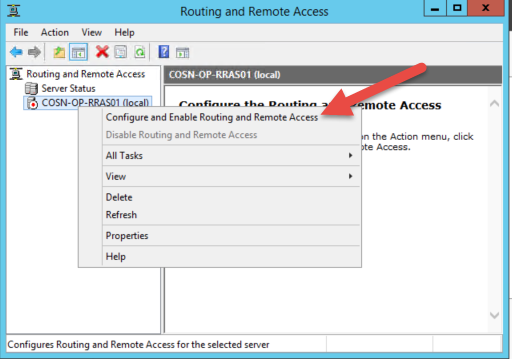
- Open the Routing and Remote Access applications via the Tool bar and begin to configure

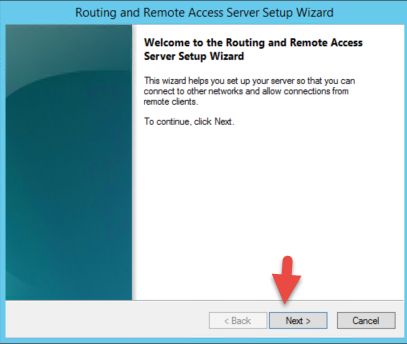
- Select the Server as shown and then Configure and Enable RRAS
- Select Next
- Select NAT and click Next
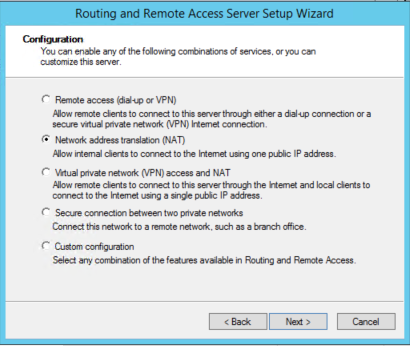
- Select the internet facing interface and click Next
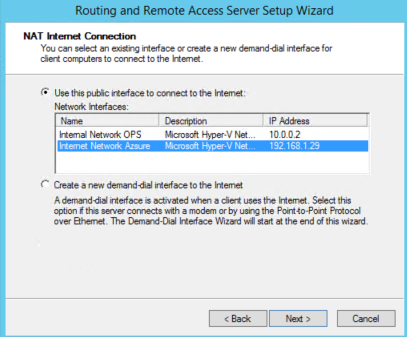
- RRAS completes configuration and select Finish
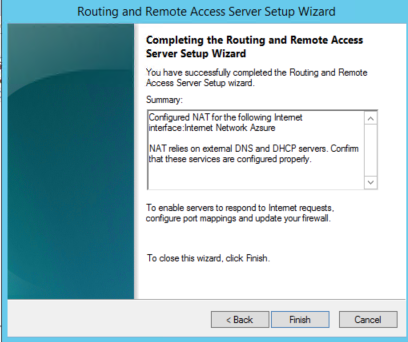
- Notice that RRAS is now online

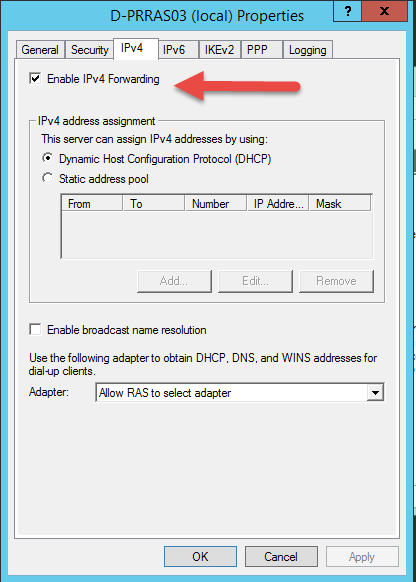
- Now right click on the new RRAS server listed and select properties and then set up routing as shown.

- Now go to the IPv4 tab and select "Enable IPv4 Forwarding to finalize the routing" configuration.
- From the RRAS server open up a browser and verify that the you see an external IP shown when you go to http://whatismyipaddress.com
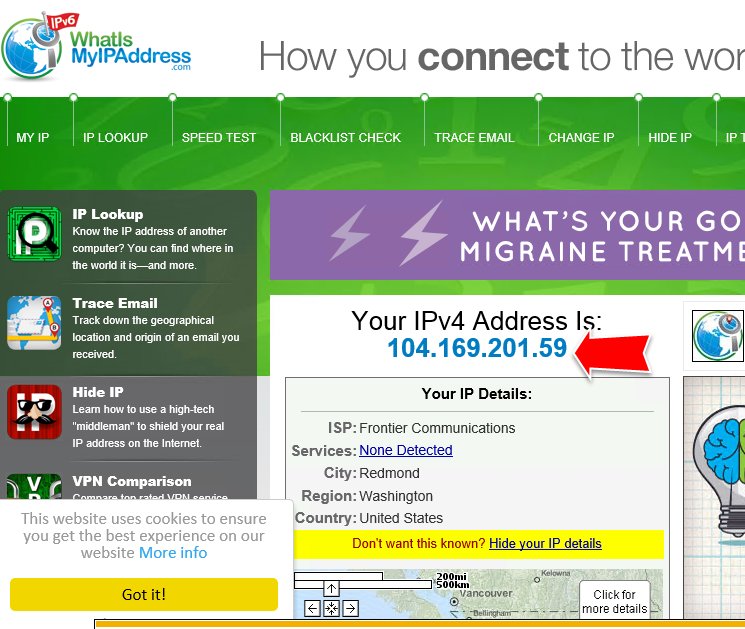
- RRAS is setup
You have now completed your RRAS setup and can now configure the Azure network side of the S2S Tunnel.
Creating Persistent Routes
This section covers creating persistent routes on all on-premises servers to ensure that they point to RRAS server on the backend (interface 10.0.0.2).
Description
The section walks participants through the creation of persistent routes on each of the servers that will route via RRAS. This includes all on-premises SQL boxes, DC and File Servers.
Time Duration: 25 minutes
Preconditions
- VLAN is setup to support a Local Network and address space is 10.0.0.0/24.
- The local domain controller is setup to use 10.0.0.1 MASK 255.255.255.0 on the Local Network.
- The identified Azure Network is 10.1.1.0/24.
- The RRAS server is setup with one network on the internet and the other on the Local Network using 10.0.0.2 MASK 255.255.255.0.
Detailed Task Process Steps
Each of the existing servers are configured to route all 10.1.1.0 traffic to 10.0.0.2 RRAS Interface using a persistent route.
| Step | Activity | Task | |||
| 1 | Log into each of the on-premises servers that will need to route from the on-premises environment via the RRAS server to Azure assets | Configure the route using the following command: "route add 10.1.1.0 MASK 255.255.255.0 10.0.0.2 –p" | |||
| 2 | Ensure you are able to review the new persistent route in the route table for each box | After you successfully run this on each server (not the RRAS server) validate it by typing a "route print" and ensure it is listed. | |||
| 3 | Ensure that you have set your Firewall settings to allow for ICMP on all boxes involved. This pertains to both on-premises assets and in Azure. | After validation your setup, and the Site-to-Site (allow any-any) is operational, you should be able to ping any server in azure assuming they allowed. You can validate by going to the targeted server you want to ping and validate it allows File and Print Sharing (Echo-Response – ICMP-v4-in) by enabling it. | |||
| 4 | Once you have validated that you are able to ping both ways you're good | Successfully completed | |||
AlwaysOn Availability Group Replicas Implementation paths
Adding Availability Group Replicas Manually
Description
This scenario walks participants through creating one or more AlwaysOn Availability Group secondary replicas within your Microsoft Azure subscription. We assume that you have already setup your site-to-site connector using the CSP SQL14 Hybrid Kit – Network Lab guidance. In this section we will outline two possible ways in which you can add additional in Azure.
Preconditions
- An AlwaysOn Availability Group configuration is already in-place in the on-premises environment
- You must be connected to the server instance that hosts the current primary replica
- Your availability group must contain on-premises availability replicas
- Clients to the availability group listener must have connectivity to the Internet if they want to maintain connectivity with the listener when the availability group is failed over to a Microsoft Azure replica
- A Microsoft Azure subscription that will host SQL Server AlwaysOn secondary replicas
- A CSP Site-to-Site VPN Tunnel between your private on-premises network and Microsoft Azure
- On-premises Windows Server Failover Cluster has been created
- Prerequisites for using full initial data synchronization - You will need to specify a network share in order for the wizard to create and access backups
- For the primary replica, the account used to start the Database Engine must have read and write file-system permissions on a network share
- For secondary replicas, the account must have read permission on the network share
-
Using the "Add Replica" Wizard in SQL 2014
The following steps are provided to help identify all required steps to add a newly created SQL Server 2014 in Azure to an existing AlwaysOn High Availability Group.
- Before you add a specific SQL box as a member of the cluster a you need ensure the following:
- The Azure Server has Windows Server Failover Cluster installed and has been added to the existing on-premises WSFC.
- You also need to ensure that the File Server shares have been configured with this new Azure Server given full rights to the shares (i.e. Quorum and SQL Backup Directory).
- You need to ensure that the same account use to run the MSSQL Server has already been setup and running.
- You also want to ensure that you "Enable AlwaysOn Availability Groups" via the SQL Server Configuration Manager.
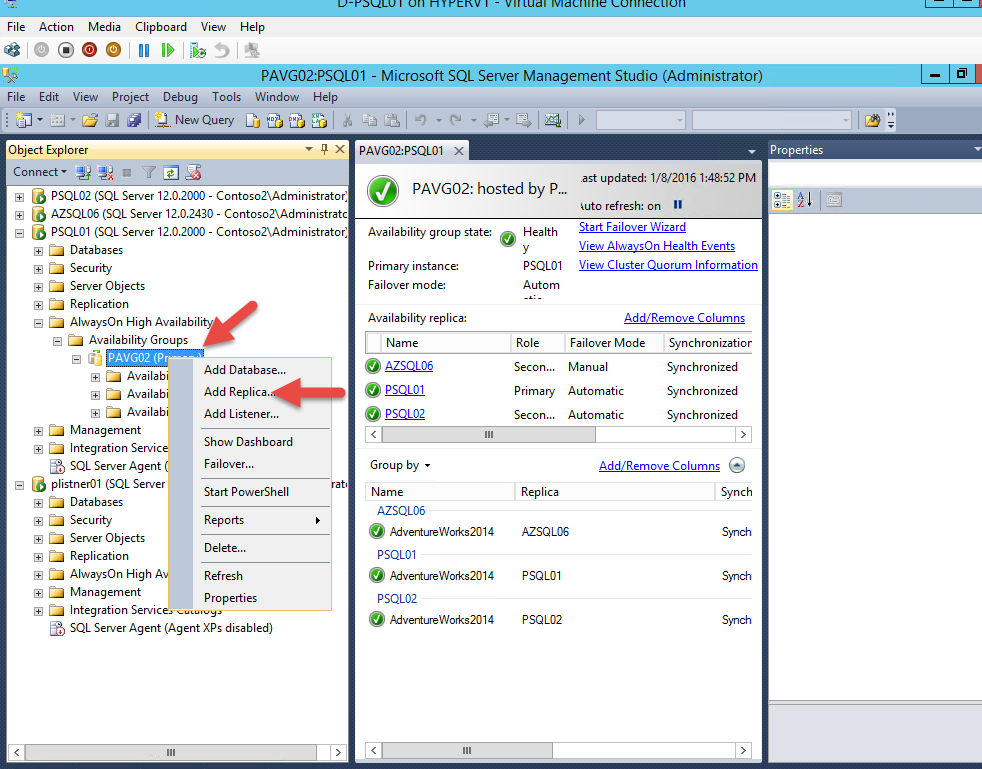
In SQL Server Management Studio select the existing primary server in the existing availability Group, right click and select "Add Replica".
c. Click Next

d. Connect to both existing Servers in the Replica as shown
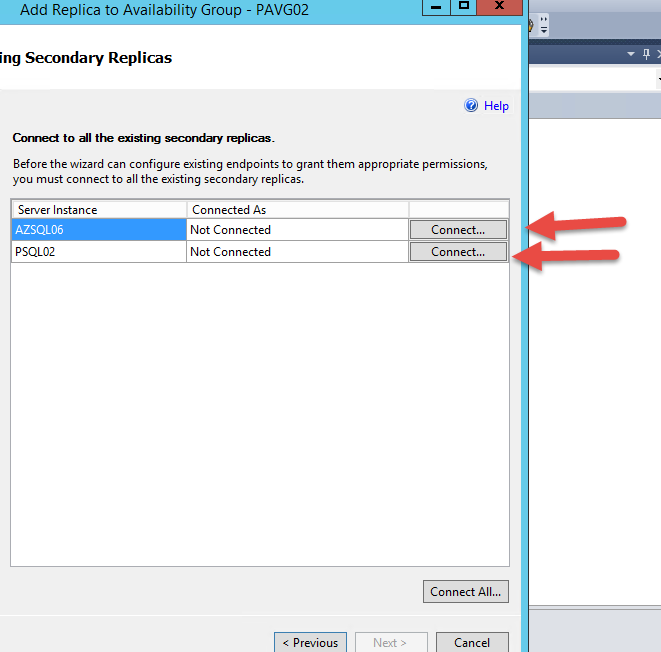
Click Connect as shown when prompted for each server separately.
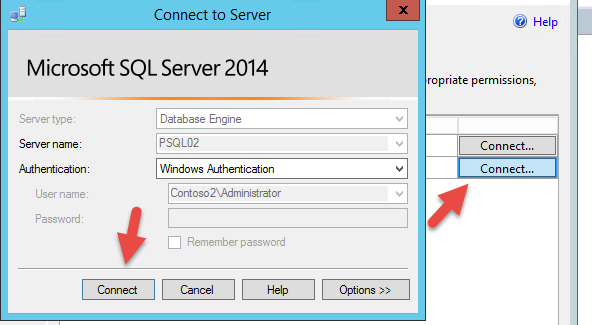
Next you will need to provide the Creds to access the new Server. Note: We assume the server is part of the existing on-premises Domain.

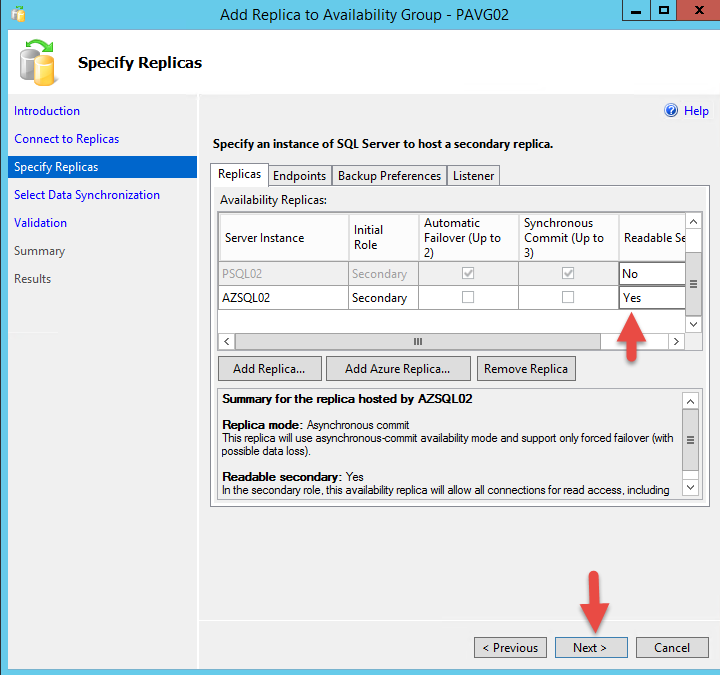
g. Once added, select the option needed under Readable Server as needed and then click next.
h. Click next to use the existing SQLBACK up location already associated to the existing Availability Group.
Click Next

j. Click Finish
Click Close
Now you can see that AZSQL02 was added to the Availability Replicas as shown. Your Done

Using "Add Azure Replica Wizard" in SQL Server 2014
Description
This scenarios walks participants through creating an AlwaysOn Availability Group secondary replicas within your Microsoft Azure subscription.
Preconditions
- An AlwaysOn Availability Group configuration already in-place in the on-premises environment.
- You must be connected to the server instance that hosts the current primary replica.
- Your availability group must contain on-premises availability replicas.
- Clients to the availability group listener must have connectivity to the Internet if they want to maintain connectivity with the listener when the availability group is failed over to a Microsoft Azure replica.
- A Microsoft Azure subscription that will host SQL Server AlwaysOn secondary replicas.
- A Site-to-Site VPN Tunnel between your on-premises network and Microsoft Azure.
- On-premises Windows Server Failover Cluster with all nodes and networks operational
- Prerequisites for using full initial data synchronization - You will need to specify a network share in order for the wizard to create and access backups. For the primary replica, the account used to start the Database Engine must have read and write file-system permissions on a network share. For secondary replicas, the account must have read permission on the network share.
- If you are unable to use the wizard to perform full initial data synchronization, you need to prepare your secondary databases manually. You can do this before or after running the wizard. For more information, see Manually Prepare a Secondary Database for an Availability Group
- Review the existing on-premises SQL Installation on both servers for the location of Date, Log and Backup. This will be key once the new Azure SQL Server (Secondary) is installed. You will need to ensure the new Azure box has the appropriate drives and associated drive letters that match the on-premises servers. Any miss-match will cause problems later in the installation once you try setup AlwaysOn.
- You have the identified details for the Shared Directories for both the Quorum and Backup Disk
- Ensure that you have already installed the Post SQL 2014 Hotfix rollup
- Ensure you install the Telnet clients on all on-premises SQL boxes for testing ports
- Run Regedit and disable the cleanup of the Azure Environment add the following registry key prior to running the Add Azure Replica Wizard:
HKEY_CURRENT_USER\Software\Microsoft\Microsoft SQL Server\120\Tools\Client\CreateAGWizard
Value Name: CleanupDisabled
Value Type: DWORDSet it to 1 to disable cleanup.
- Assuming at least one computer or DC exist in the Azure, verify that you are able to reach it from all on-premises servers involved. The following are the recommended ports you need to ensure are available:
- For DC: The following is the list of services and their ports used for Active Directory communication:
- UDP Port 88 for Kerberos authentication
- UDP and TCP Port 135 for domain controllers-to-domain controller and client to domain controller operations.
- TCP Port 139 and UDP 138 for File Replication Service between domain controllers.
- UDP Port 389 for LDAP to handle normal queries from client computers to the domain controllers.
- TCP and UDP Port 445 for File Replication Service
- TCP and UDP Port 464 for Kerberos Password Change
- TCP Port 3268 and 3269 for Global Catalog from client to domain controller.
- TCP and UDP Port 53 for DNS from client to domain controller and domain controller to domain controller.
- For SQL Assets:
- # PORT(S) PROTOCOL(S)
- 3343 TCP and UDP
- 135 TCP
- 137 UDP
- 49152-65535 UDP
- SQL 1433
Note: If any of the above ports are not responsive you will need to ensure the Infrastructure team for resolution.
Detailed Task Process Steps
- Ensure you are log into the on-premises SQL Server Enterprise Studio that is currently the identified as the Primary Availability Group owner.
- Right click on the Availability Group and select "Add Replica"
- You will then be prompted to select the other Node and connect to it. Connect to it and then click next
- You will then select the Add Azure Replica option that will kick off the wizard
- Once the Add Azure Replica window displays. Select download button to download a management certificate for your Microsoft Azure subscription. You will need to identify your Subscription ID as part of this process
- Then click download to open the sign-in page
- In the sign-in page, sign in to your Microsoft Azure subscription. Once you are signed in, the wizard installs a management certificate onto your local machine. This management certificate is automatically loaded when you use this wizard again. If you have downloaded multiple management certificates, you can click the ... button to select the one you want to use.
- After you have downloaded the certificate select Connect
After the connection to Microsoft Azure has been established, specify the following parameter:
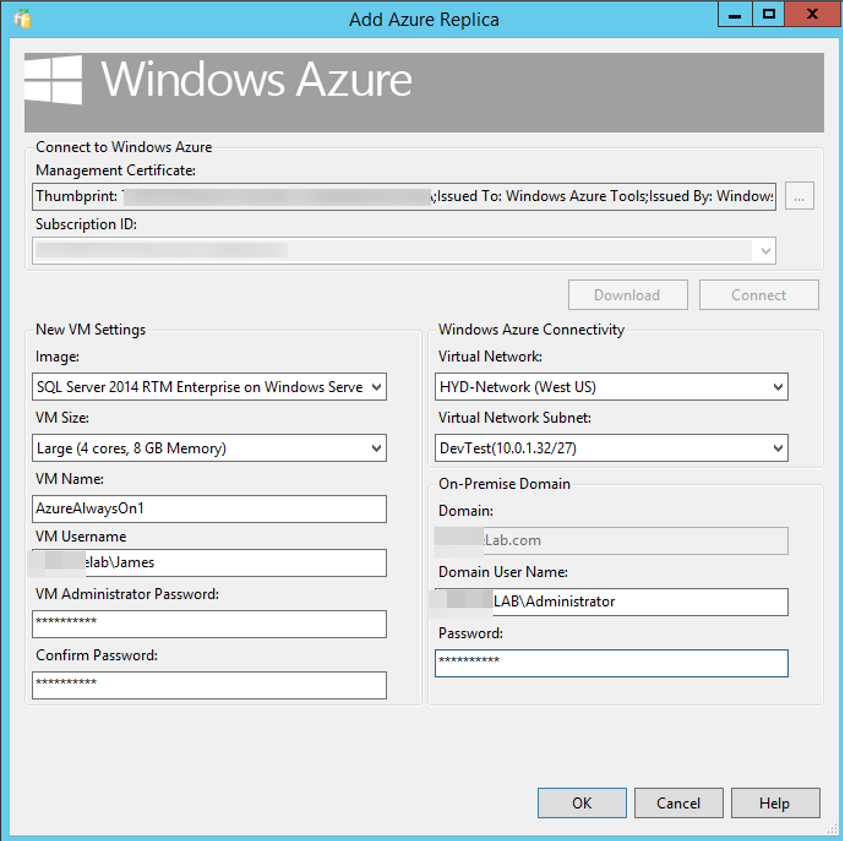
Figure 3 Populating Add Azure Replica wizard page
- Image Type – SQL Server 2014 RTM Enterprise on Windows Server 2012 R2
- Image Size – Large VM is the minimum recommendation for a production environment (4 Cores, 8 GB Memory)
- Virtual Network – Name and Virtual Network Subnet name
- Virtual Machine name - Identify the Name of the Server you want to create
- Domain Name and Domain User – Identify new Admin Local User Credentials
- Domain User\Password: Enter the Domain Password for the User that has permissions to Add Computers in the domain
- Click Ok and the connection will be up and running.
- Keep the defaults as shown in the figure 4.
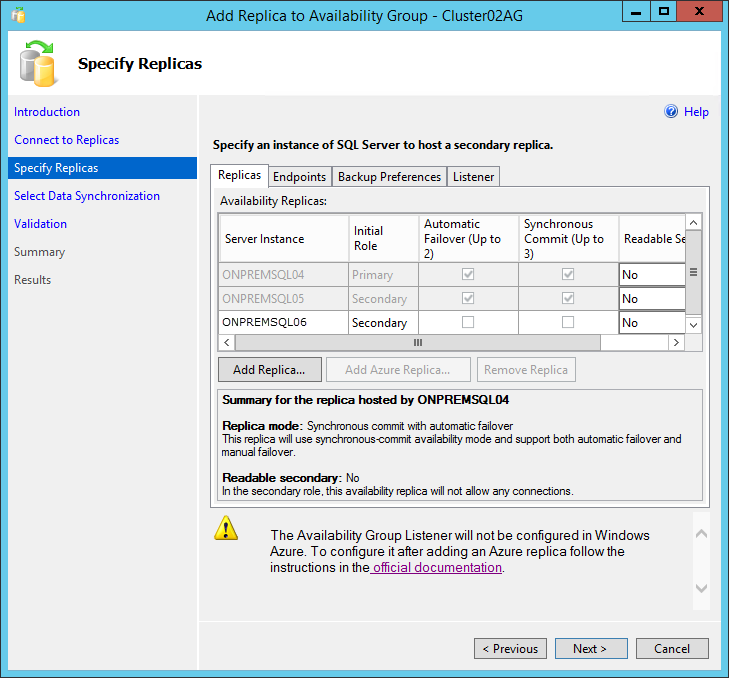
Figure 4 Adding third replica
- Click Next
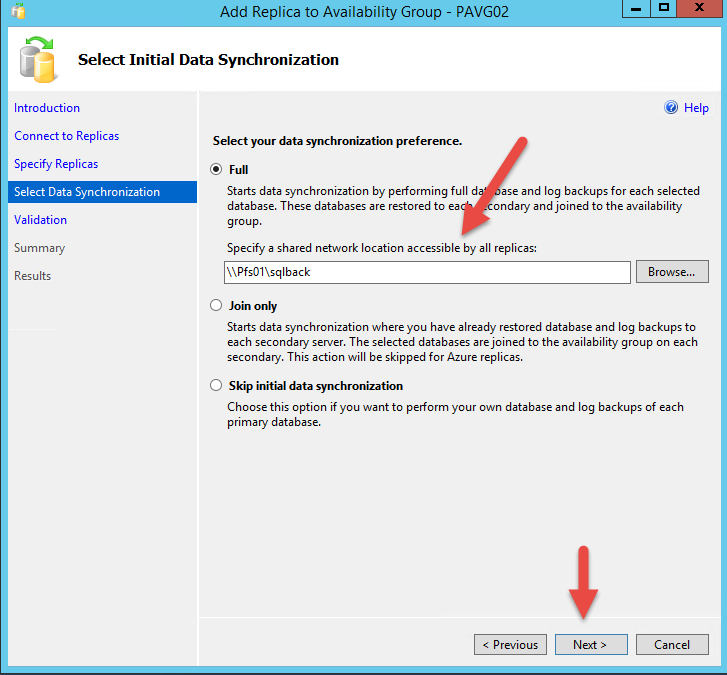
- Select the Full data synchronization option and specify backup share as shown in figure 5
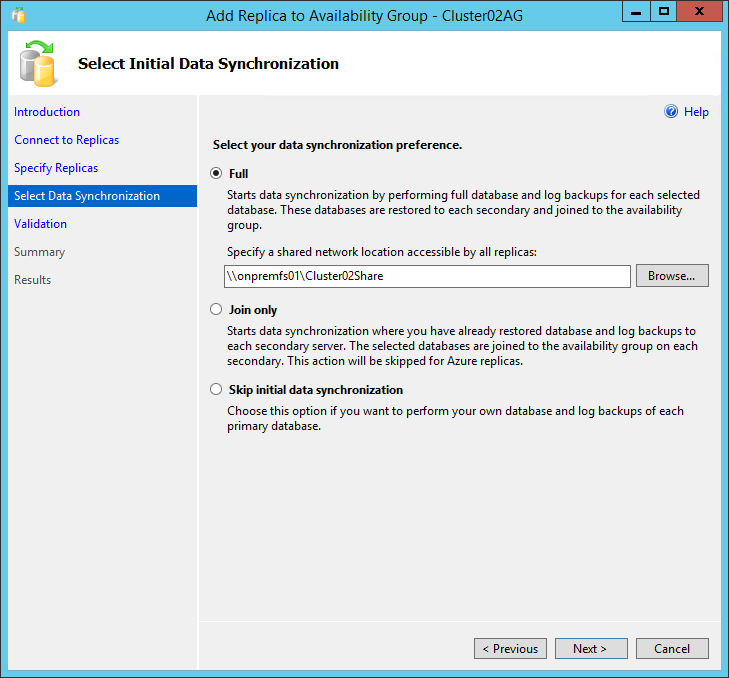
Figure 5 Selecting Data Synchronization Selection
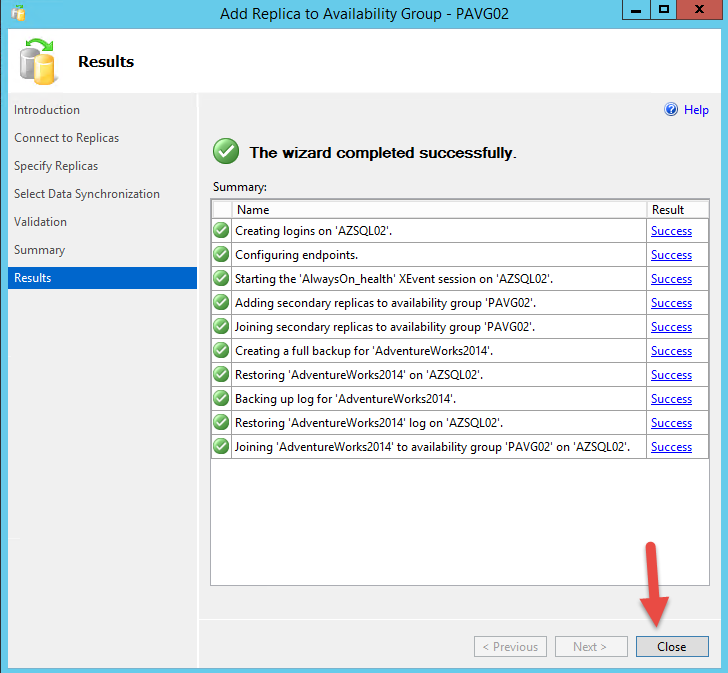
- Click Next, to display the provisioning wizard progress page

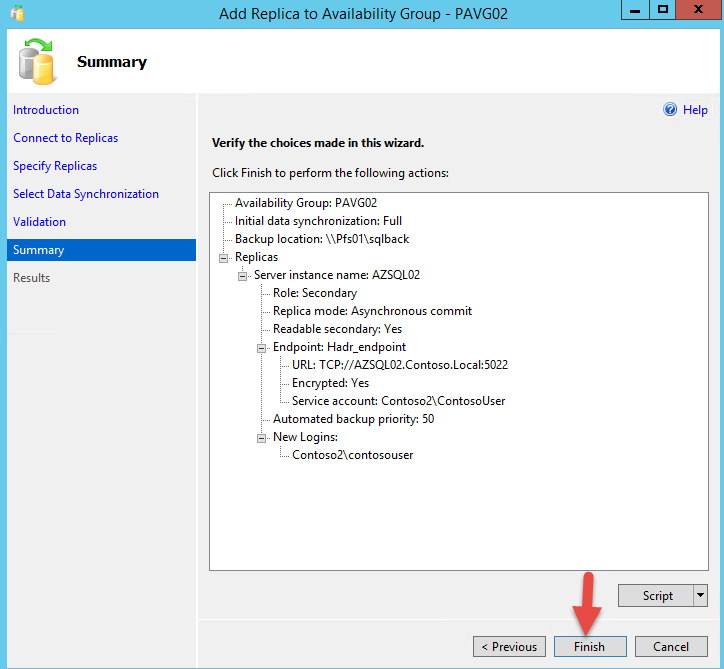
Figure 6 Add Replica to Availability Group Completing validation
- Click Next and continue on to section 3.1.4.3
Detailed Task Process Steps if the Add Replica Wizard is Not-Successful
Validate that the new Azure SQL VM has been installed
- Go to https://manage.windowsazure.com and log on
- Select Virtual Machines and find your recently created SQL Server
- Select the Server and select Connect to remotely log onto the box –
Note: If it is shaded you will need to create an endpoint by
a. selecting the server,
b. selecting endpoints,
c. Select Add (bottom of screen),
d. Add a standalone endpoint
e. Select the Drop Down and select "Remote Desktop" and then select the check mark. A new endpoint will be created and allow you to connect.
- Once you are connected to the Server validate that the following has been completed.
- The server allows you to log locally using the Server Account recently created.
- The server is a member of the domain and all key domain accounts have been added to the local administrative group on the server.
- Windows Failover Cluster Server and SQL Server have both been provisioned on the Server
- You are able to long onto the new Server using your Domain Credentials
- You are able to ping and telnet over all required ports to the on-premises SQL boxes and DC's
- Validate that the new server is reflected in DNS and AD
- Ensure the new node has all the required drives needed to align it to what is setup on-premises (if needed provision additional drives as appropriate)
- Go to the on-premises server that is acting as the File Server and give this new Server Permissions on both the Quorum and Backup Shares previously created.
- Add the new Azure SQL node to the existing WFCS
- Review that the new node is operational in the WFCS and the new details are visible from all nodes
- Log onto the new Azure Node and turn on AlwaysOn using the "SQL Server Configuration Manager"
- Right Click on the "SQL Server (MSSQLSERVER) process and select properties
- Go to the AlwaysOn High Availability" tab and select the check box called "Enable AlwaysOn Availability Groups" to enable it.
- Once enabled, go to the "SQL Server Management Studio" and add the new node to the cluster by right clicking on the Availability Group
- The select Add Replica
- Connect to the secondary and click next
- Then select Add Replica and add the new Azure SQL Box
- Only update the Readable Secondary and select yes and click next.
- The new Node will be added and you will then see it reflected as a new node in WSFC.
- You have manually added the new node to the existing cluster.
- Click Close
Detailed Task for completing the Add Replica process
- Remotely log onto the recently created SQL Azure server and Enable AlwaysOn via the SQL Server Configuration Manager.
- Once set Add the new Node to the existing SQL Cluster from the primary Node.
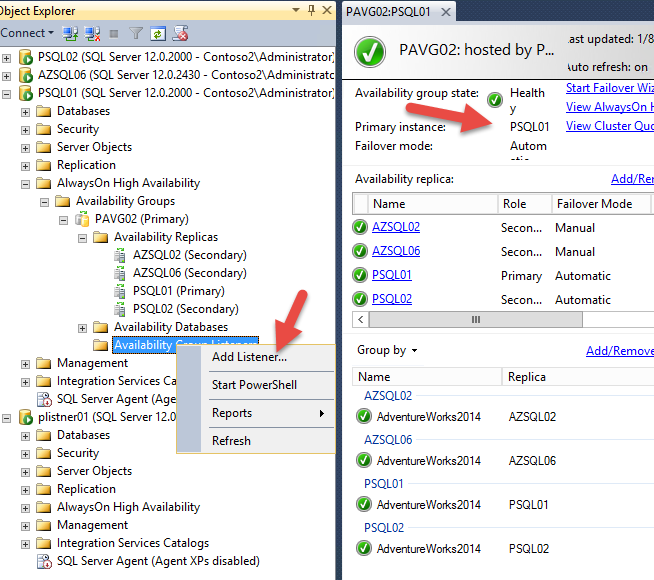
- Once Added, Right-click on the Availability Groups Node and select Dashboard to display the Availability Group Dashboard as shown in figure 8.
- Verify you can see the new node added as a New Node in the AlwaysOn High Availability list.

Figure 8 Cluster02AG AlwaysOn Availability Groups Dashboard
Post Conditions
- AlwaysOn Availability Group spans the on-premises and Microsoft Azure virtualized networks.
- Failover from the on-premises primary replica can be manually failed over to Microsoft Azure replicas if needed
Client and Server Connectivity in Availability Groups
Description
This scenario walks through the creation and configuration of an AlwaysOn Availability Group Load Balancer and Listener for a SQL Server 2014 replica within a Microsoft Azure virtual network and on-premises local network. The listener will support interaction between the two networks to facilitate a primary replica failover to a secondary Microsoft Azure or on-premises replica. It is critical to ensure you use the previously created Virtual Network that has the existing Site-to-Site for this procedure to ensure the ILB is created on the right Virtual Network. We will be using an internal load balancer.
Preconditions
- The availability group listener is supported on Windows Server 2008 R2, Windows Server 2012, and Windows Server 2012 R2.
- The client application must reside on a different cloud service than the one that contains your availability group VMs. Azure does not support direct server return with client and server in the same cloud service.
- Only one availability group listener is supported per cloud service because the listener is configured to either use the cloud service IP address or the Virtual IP (VIP) address of the Internal Load Balancer (ILB).
- If you are creating a listener for a hybrid environment, the on-premises network must have connectivity to the public Internet in addition to the site-to-site VPN with the Azure virtual network. When in the Azure subnet, the availability group listener is reachable only by the public IP address of the respective cloud service.
- All items have already been provisioned in Azure As Part of the Site-to-Site Implementation and post implementation
- The Tenant Subscription ID has been identified
- Resource Group Identified
- Virtual Network Created
- Site-to-Site Gateway already setup and operational
- The Availability Set has been created
- SQL Server 2014 has been provisioned in Azure and on the network identified above and associated to the Availability Set
Detailed Task Process Steps
- Identify which Virtual Network will be used and capture the name.
- Identify the Subscription that will be used for setting up the load balance.
- Identify the Resource Name that contains the existing Virtual name already created
- Identify an available IP address on the subnet that will be used for the ILB.
- Identify the on-premises RRAS server to run the script from as shown below:
Run the following script to create the ILB from on-premises using the following details in our example:
| Commands | What does it need to run |
| Login-AzureRmAccount | Will need a user account that has permissions in the targeted subscription. I recommend using the CSP permissions since they are global. |
| -SubscriptionId | Requires the unique Tenant Subscription information |
| Get-AzureRmVirtualNetwork | Identify the Virtual Network Name |
| -ResourceGroupName | Identify the Resource Group Name you created and contains the Virtual Network |
| New-AzureRmLoadBalancerFrontendIpConfig | Identify a name to call the Load Balancer |
| -PrivateIpAddress | Identify the assigned IP address we will use for the Load Balancer and then use it when you configure the Availability Group Listener for the Azure Network. |
| New-AzureRmLoadBalancerBackendAddressPoolConfig | Name of the Backend ILB Pool Configuration needed by ILB |
| New-AzureRmLoadBalancerProbeConfig | ILB Prob Name and Protocol that we are using (TCP\Port 1433 (SQL)) |
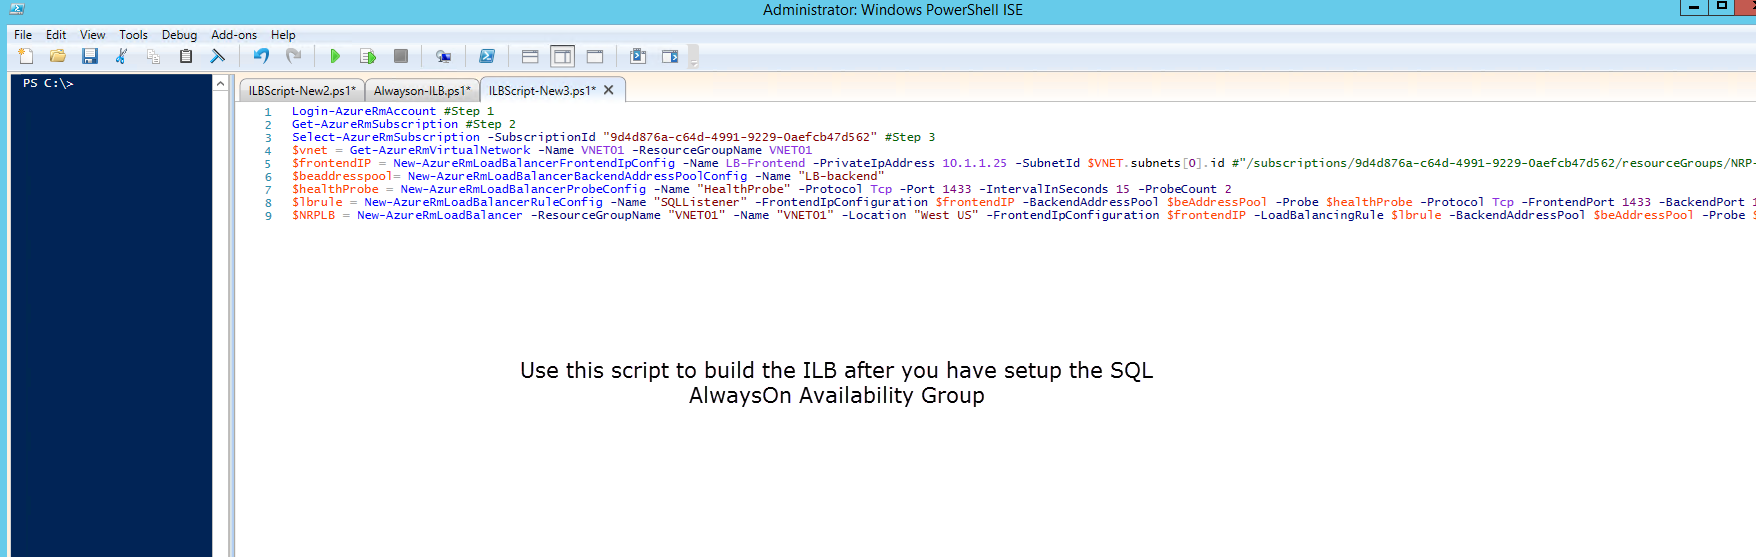
Note: The script below had to be customized a bit to make this work since the existing article above (1) did not work as identified.
Login-AzureRmAccount #Step 1
Get-AzureRmSubscription #Step 2
Select-AzureRmSubscription –SubscriptionId "Put Subscription ID Here" #Step 3
$vnet = Get-AzureRmVirtualNetwork –Name VNET01 –ResourceGroupName VNET01 #Step 4
$frontendIP = New-AzureRmLoadBalancerFrontendIpConfig –Name LB-Frontend –PrivateIpAddress 10.1.1.25 –SubnetId $VNET.subnets[0].id #Step5
$beaddresspool = New-AzureRmLoadBalancerBackendAddressPoolConfig –Name "LB-backend" #Step 6
$healthProbe = New-AzureRmLoadBalancerProbeConfig –Name "HealthProbe" –Protocol Tcp –Port 1433 –IntervalInSeconds 15 –ProbeCount 2 #Step7
$lbrule = New-AzureRmLoadBalancerRuleConfig –Name "SQLListener" -FrontendIpConfiguration $frontendIP –BackendAddressPool $beAddressPool -Probe $healthProbe -Protocol Tcp -FrontendPort 1433 -BackendPort 1433 #Step 8
$NRPLB = New-AzureRmLoadBalancer –ResourceGroupName "VNET01" -Name "VNET01" -Location "West US" -FrontendIpConfiguration $frontendIP -LoadBalancingRule $lbrule -BackendAddressPool $beAddressPool -Probe $healthProbe #Step 9
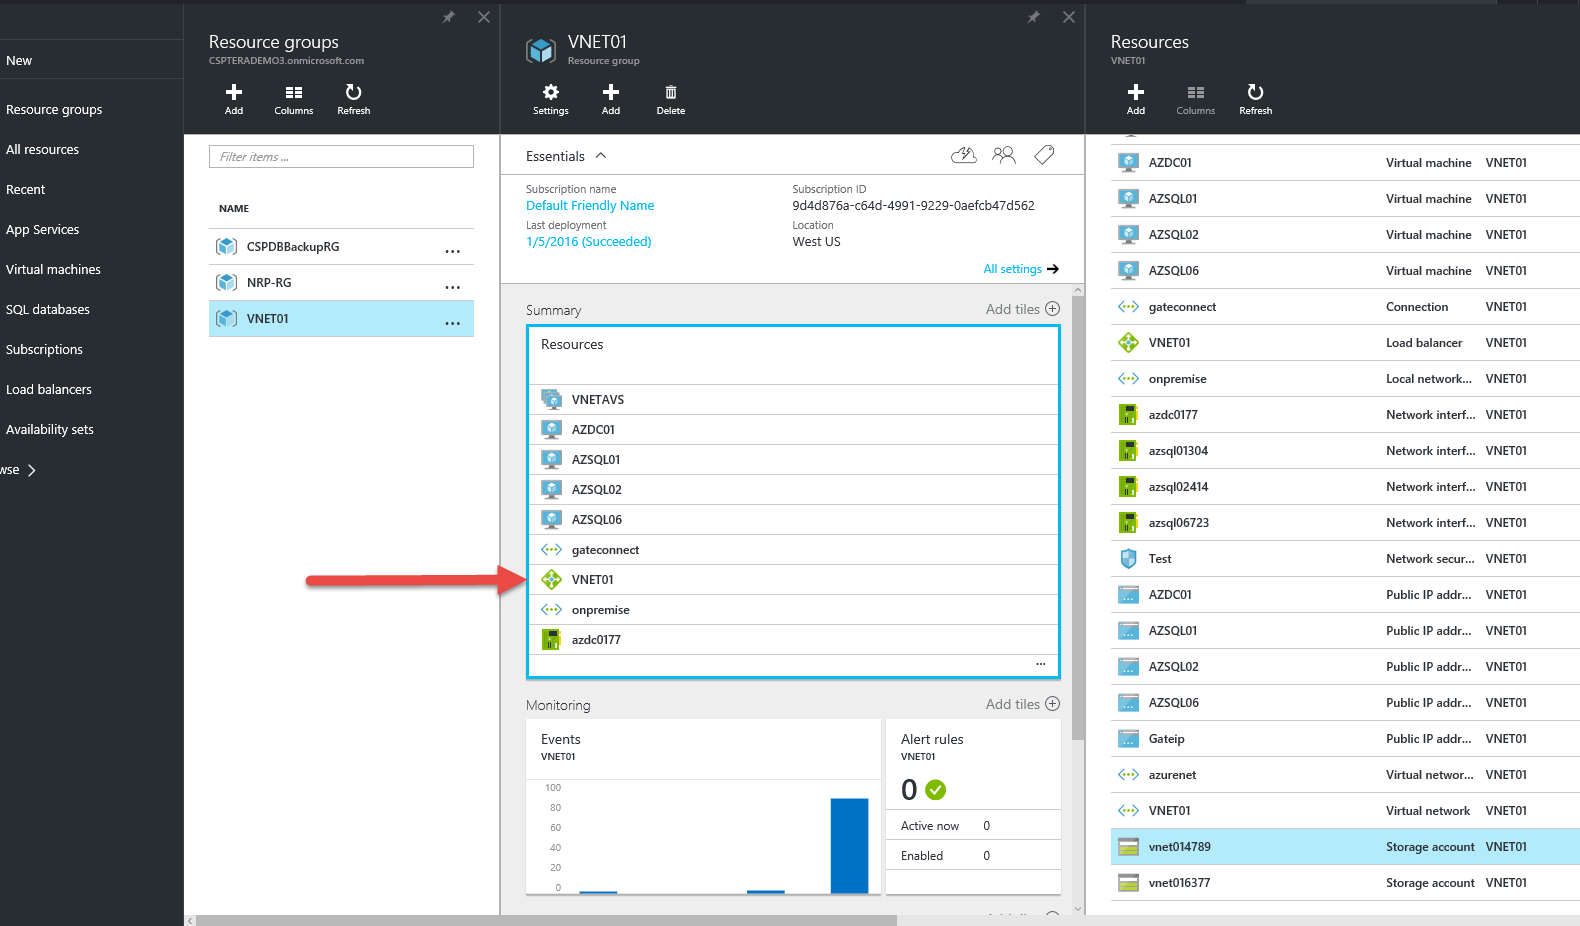
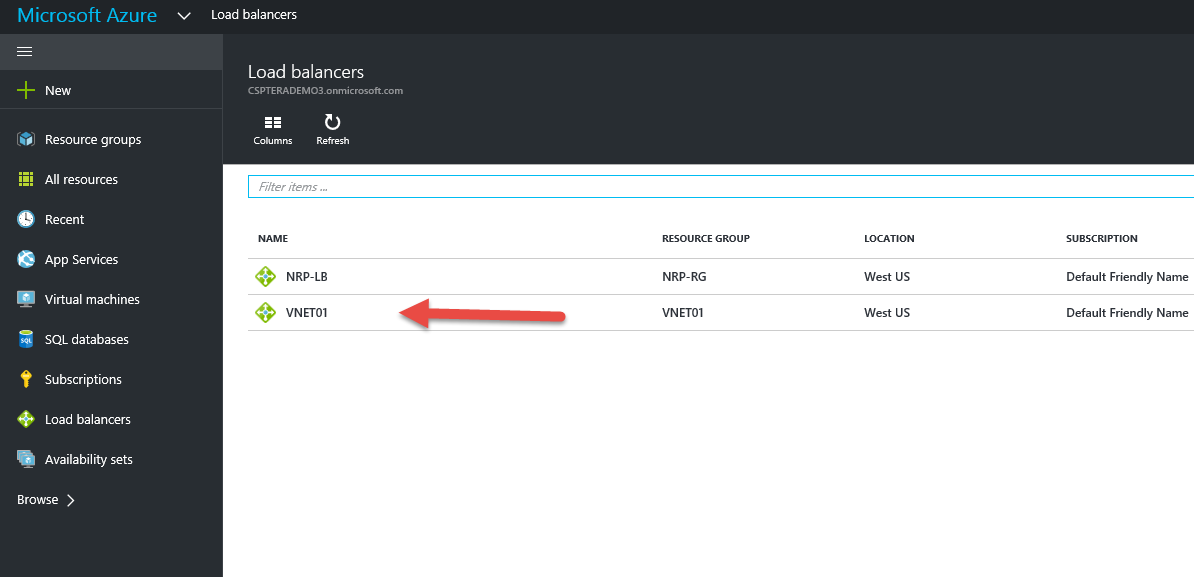
- Once you run the above script you will see a new Load Balancer created in the Resource group as shown below.
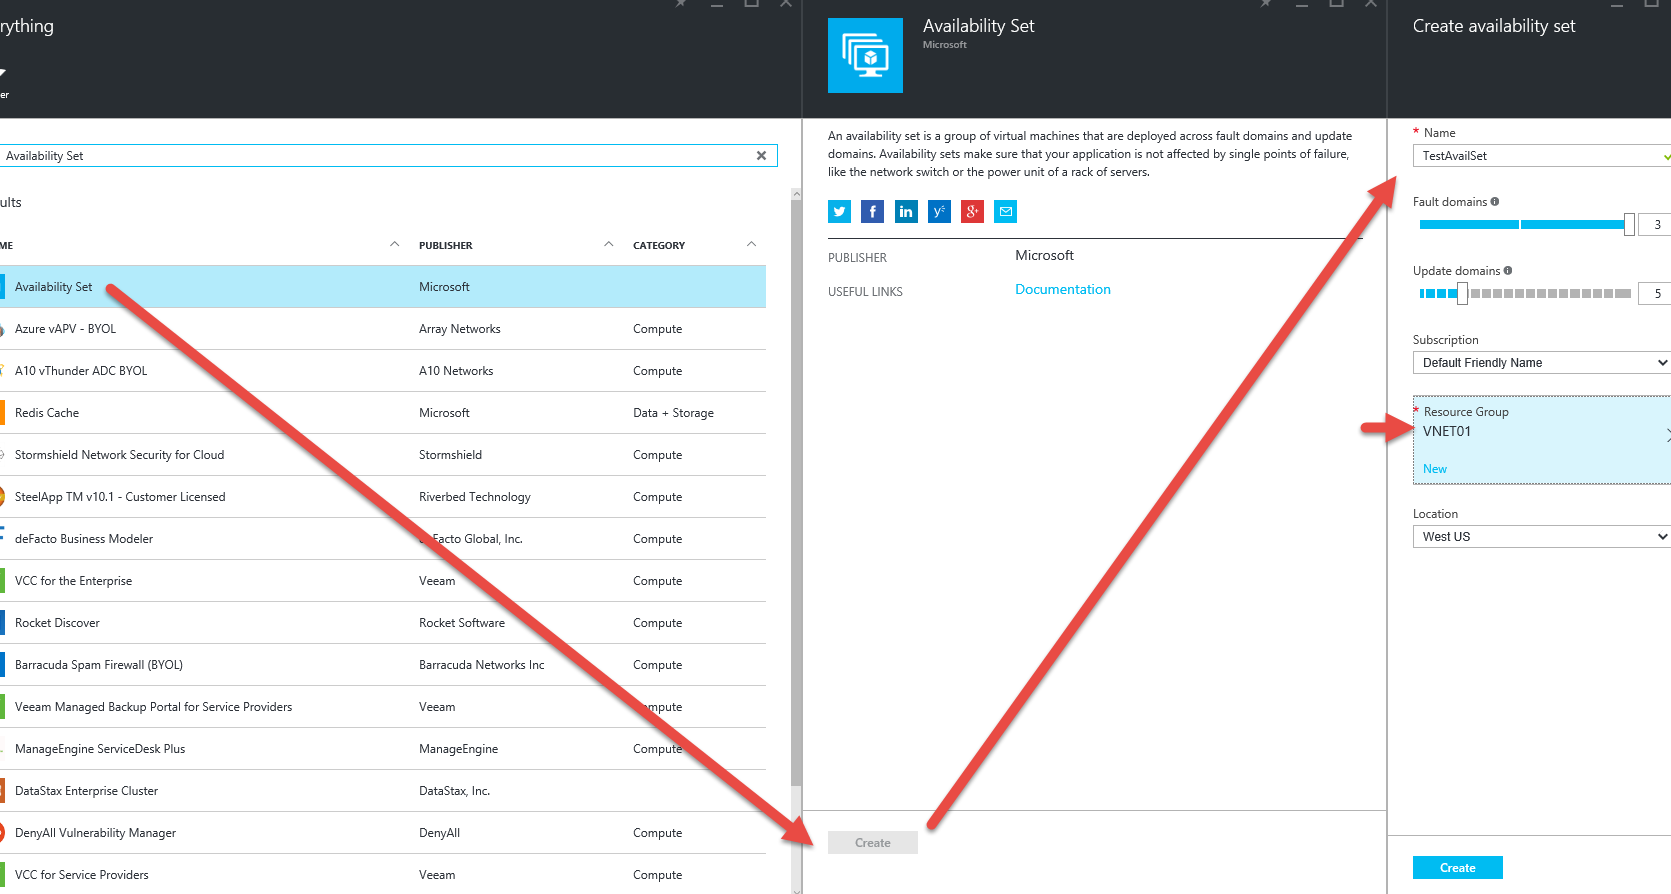
- Next you need to create a new Availability Set as follows:
- In the Tenants Azure Portal, select new and search for Availability Set and you will see the following:

- Select the Availability Set and then select Create as shown and then click create. When there identify a name and also select the existing Resource Group you plan on using. We set this to VNET01 in our example below.
- Next you need to create a new SQL Server 2014 VM and add it to the Availability Set.
- Once this has been completed you can select the Load Balancer as shown below:
- Once you select the Load Balancer by double clicking it you will see the following:
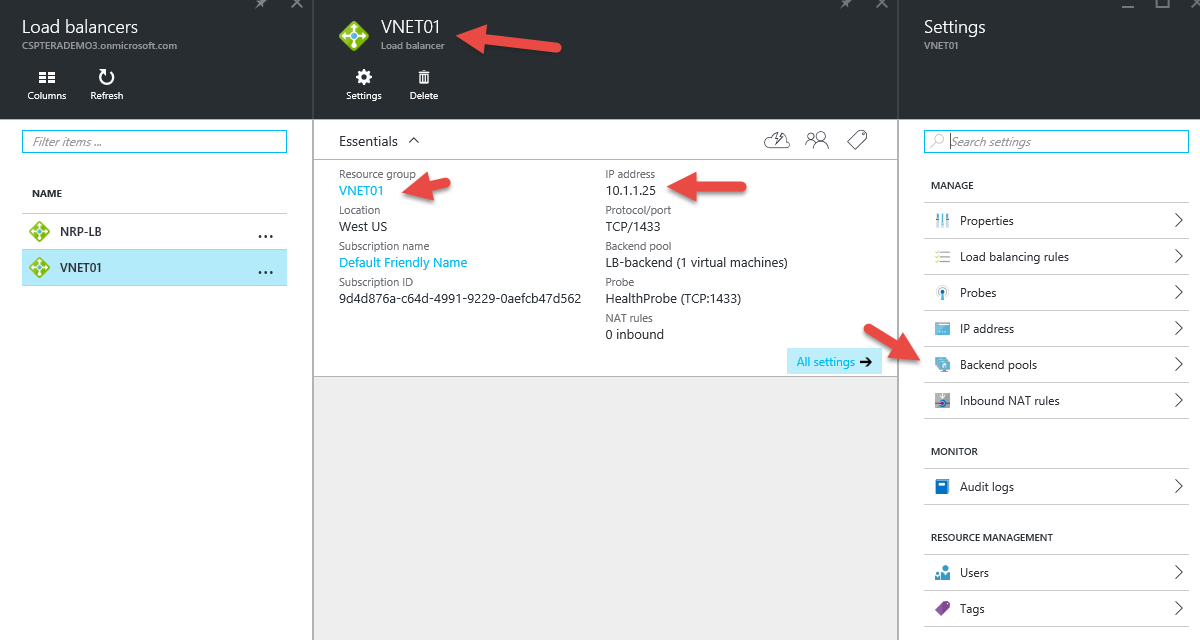
- You will now see the following key details:
- You can see the Resource Group it belongs to
- You can see that IP Address that is assigned to the ILB
- You can see the Backend Pool that is used which in this case contains 1 VM as indicated
- You can view the details settings
- Next go into the Backend Pools by double clicking the Backend Pools on the right side. You will see the following details:
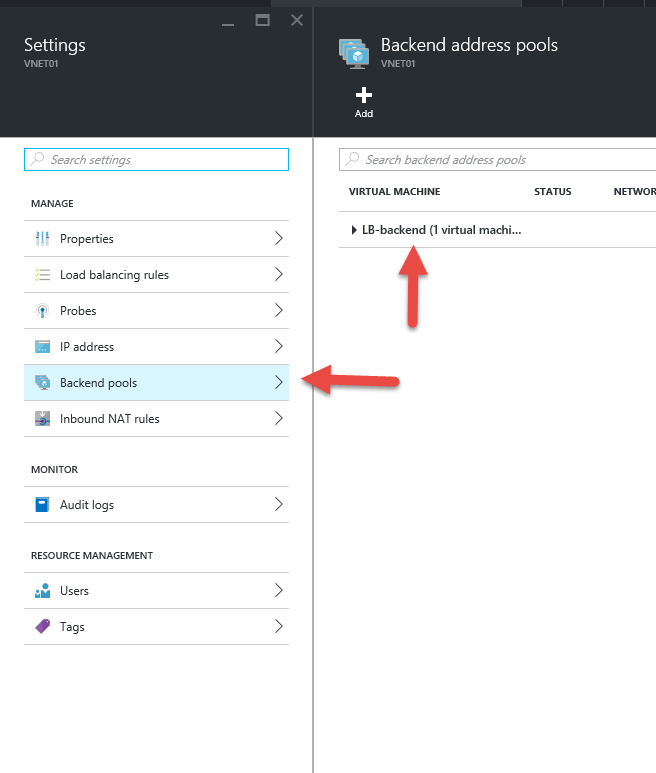
- Next you want to double click on the LB-Backend listed to see the details as shown:
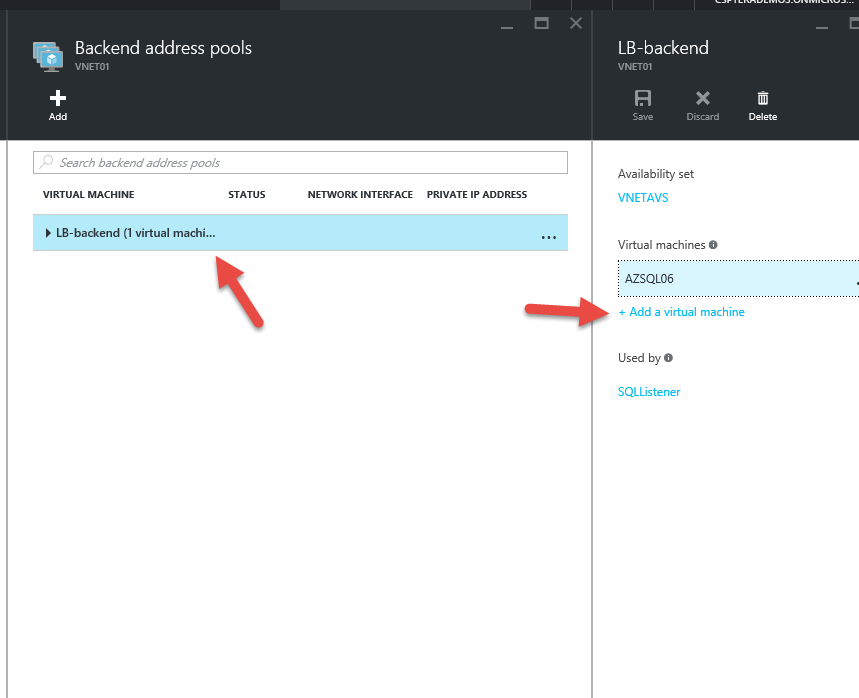
- Now you can see the previously added AZSQL06 server I previously added. Note: You will not see any of the other VM that could be added because they were not setup with an Availability Set that we previously identified as required by ILB.
- Now you're ready to setup the new Availability Group with ILB in SQL Server as follows.
- Log into the existing on-premises SQL Server that is currently setup as Primary
- Open the Microsoft SQL Server Management Studio
- Right Click on the "Availability Group Listener" as shown below
- Now you want to configure the new Availability Group Listener as follows (per our example)
- Identify the Listener Name
- Port: Always use port 1433 for SQL
- Network Node: Change it to Static
- Update the IP for on-premises Network (10.0.0.15)
- Update the IP for the Azure Network (VNET01 – 10.1.1.25)

- Click OK once you're done to complete.
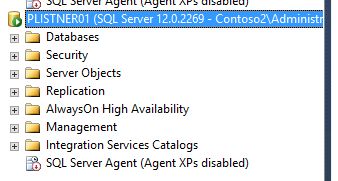
- Finally use the SQL Management Studio to connect to the PListner01 as shown below
- To verify that it is using the primary right click on the listener name and open properties. Under the name you can see the primary matches the primary the Listener is currently using. See this below.
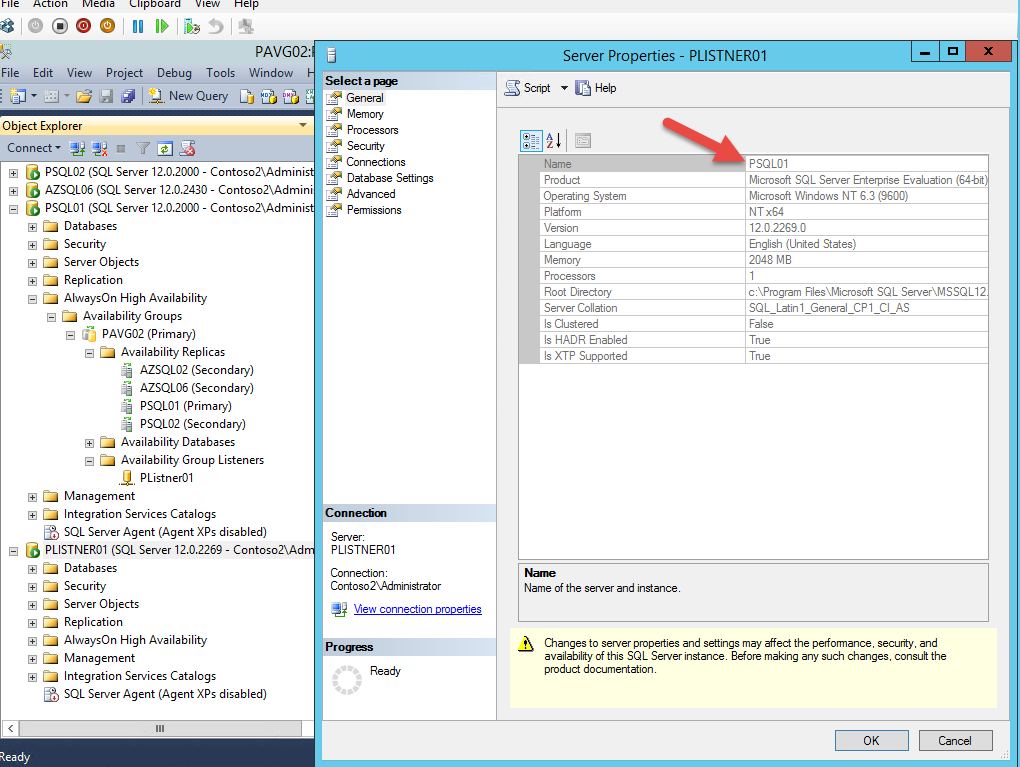
- You have completed setting up the new Availability Group Listener.
Note: Because the ILB is not accessible from outside the Azure it offers another layer of security.
Post Conditions
- You have now created internal load balancer that is in use
- Created a listener for Azure replica and on-premises replicas
Primary Replica Failover to Secondary Replica and Failback to Primary
Description
In this scenario, we demonstrate the failover from the on-premises primary replica host node to the Microsoft Azure secondary node as a manual failover operation. An initial test failover failure simulates a real world failover practice drill in which the participants discover additional planning and setup tasks are warranted.
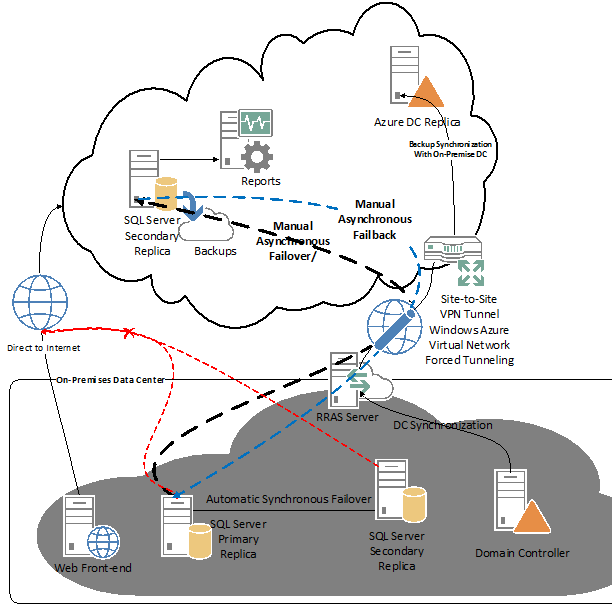
Figure 24 Hybrid Disaster Recovery Failover and Failback Process
Figure 24 illustrates the manual failover process that moves the primary replica and transfers primary hosting responsibility to the Microsoft Azure secondary replica. After the failover, stabilization, and recovery of the former primary host, the hosting provider would have the option to failback to the secondary on-premises replica as an interim step, but we show the decision and failback to former on-premises primary replica. The diagram represents a very high level, two-step process, but the actual process requires planning and preparation for a failover and failback to work successfully during a disaster at the primary site, which would force a manual failover transition to the Microsoft Azure based secondary AlwaysOn Availability Group replica.
Preconditions
- Hosting provider network planned, deployed, and connected to ISP first and Window Azure.
- Microsoft Azure VNET has been defined, deployed, operational, and validated as working.
- Backup domain controller deployed and synchronized with on-premises domain controller.
- Forced Tunneling implemented to redirect direct cluster node traffic through VPN Tunnel.
- Secondary replica provisioned to Microsoft Azure using SSMS Add Azure Replica Wizard/process.
- Availability Group listener provisioned within in Microsoft Azure replica using Azure PowerShell.
- Validated listener configuration for each primary and secondary replicas listener
- Failover/back planning, preparation, and readiness training completed prior to live test drill.
Note: Reference Listener Configuration for AlwaysOn Availability Groups for guidance.
Detailed Task Process Steps
- Access your primary Windows Server Failover Cluster and login as a domain administrator.
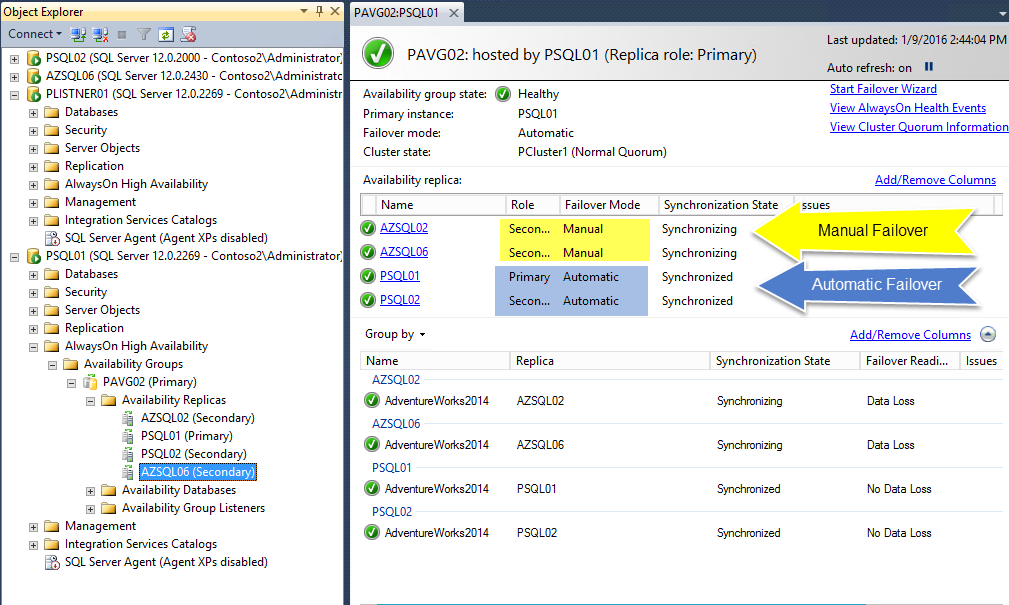
Figure 25 Primary AlwaysOn Availability Group replica
- Launch SQL Server Management Studio 2014 and expand the primary availability group replica host server as identified by the number one notation
- Expand the Availability Group node and expand the cluster name node annotated as step two in figure 25.
- Expand the Availability Group Listener node to validate existence of the listener.
- Note the on-premises primary and secondary are configured for automatic failover, synchronous replication and the Microsoft Azure based secondary replica replicates asynchronously, requiring manual failover as annotated as five in figure 25.
- Annotation six provides a visual representation of the state of each replica. The two on-premises replicas are synchronized, with a predicted "No Data Loss" Failover Readiness prediction and the Microsoft Azure based secondary replica has a Synchronizing Synchronization State and "Data Loss" Failover Readiness, which indicates further preparation and mediation are warranted to mitigate the opportunity for data loss.
Click View AlwaysOn Health Event hyperlink button to display the AlwaysOn Health Events view as shown in figure 26.
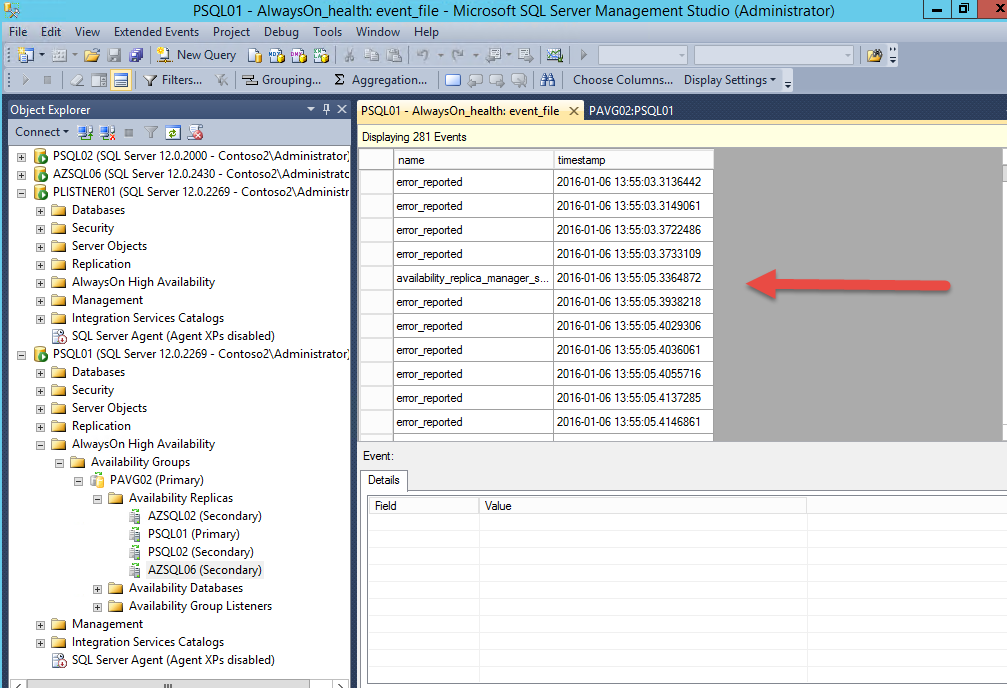
Figure 26 Viewing and analyzing AlwaysOn Health Events
- As a best practice step we recommend opening your web browser and navigating to MSDN article Perform a Forced Manual Failover of an Availability Group (SQL Server), Review the article with a focus on examining your current cluster configuration and seriously consider applicable, suggested modification in your Windows Server Failover Cluster infrastructure and configuration.
- Now, navigate back to the dashboard view and click on the View Cluster Quorum Information hyperlink button to display the corresponding view shown in figure 27.

Figure 27 Cluster Quorum Information view
- Note that all member server names across the on-premises and Microsoft Azure hybrid hosting provider WSFC and Availability Group cross-site environment are shown. Secondarily, note the Member Type column setting for each cluster member.
- Note that all Member States are Online, which represents a positive operational status.
- Focus in on the Vote Count column and note the number of members participating in the quorum voting process.
- Navigate to the dashboard and click the Start Failover Wizard hyperlink button and click next on the Introduction page which displays Select New Primary Replica Failover Wizard view shown in figure 28.
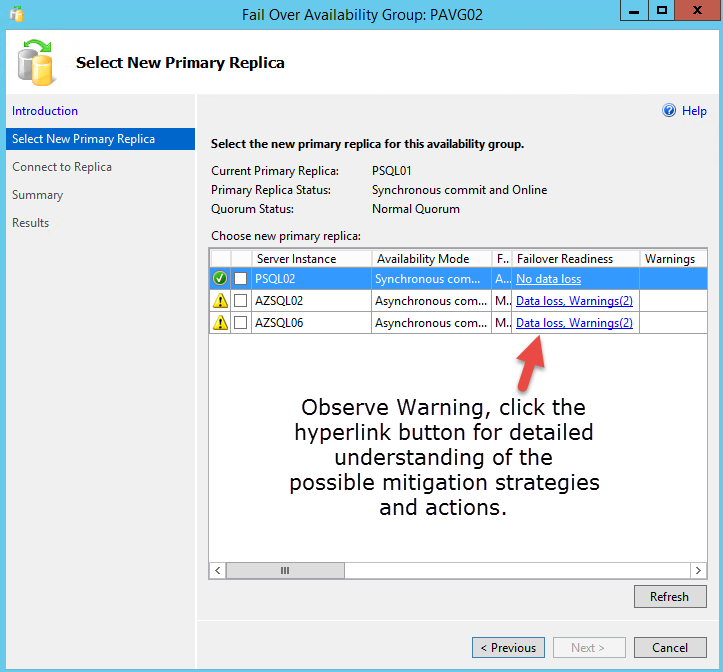
Figure 28 Selecting new primary replica
- Click the Failover Readiness hyperlink button on the chosen server instance and read the popup message and navigate to the suggested article to weigh the potential impact of the suggested actions as shown in figure 29.
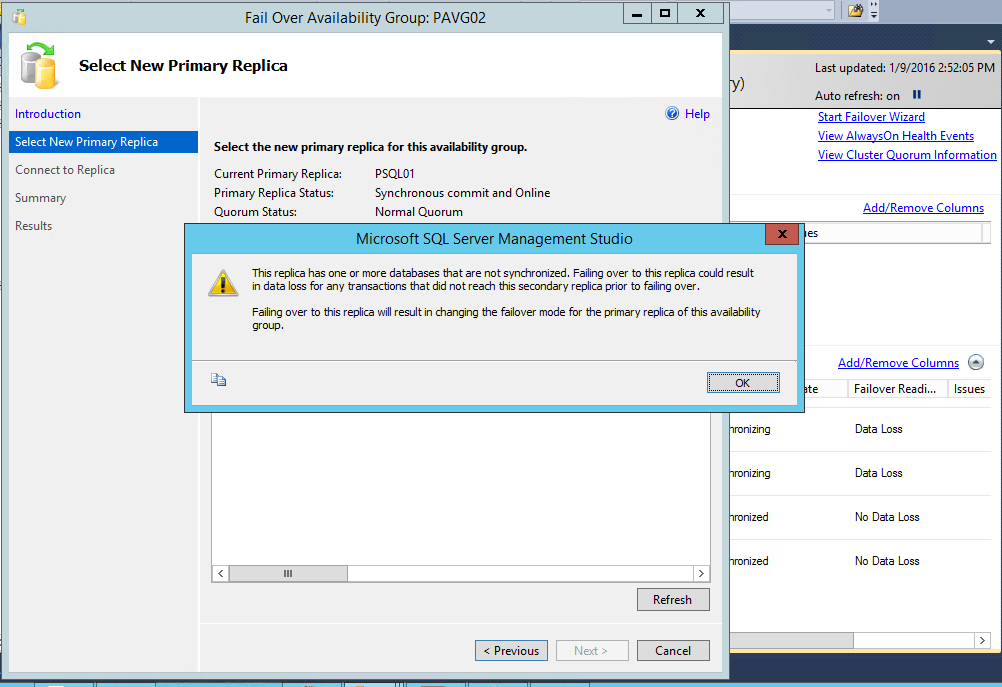
Figure 29 Reviewing the data loss warning mediation suggestion.
- Click Ok, because we are sure confident no outstanding transaction are in progress at this time.
- Now Select the SQL Server in Azure you want to failover to as shown below.

- Click Next, to view the Confirmation Failover with potential loss wizard page as shown in figure 30.
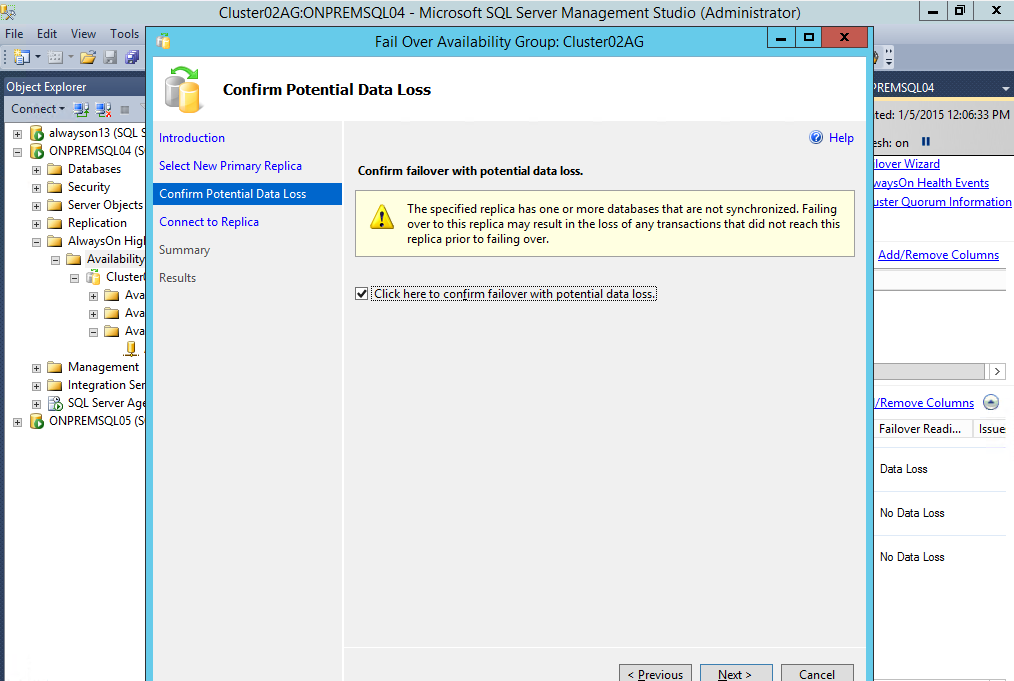
Figure 30 Confirming potential data loss
- Click the Click here to confirm failover with potential loss checkbox as in figure 30.
- Click Next to display the Connect to Replica wizard page as shown in figure 31.
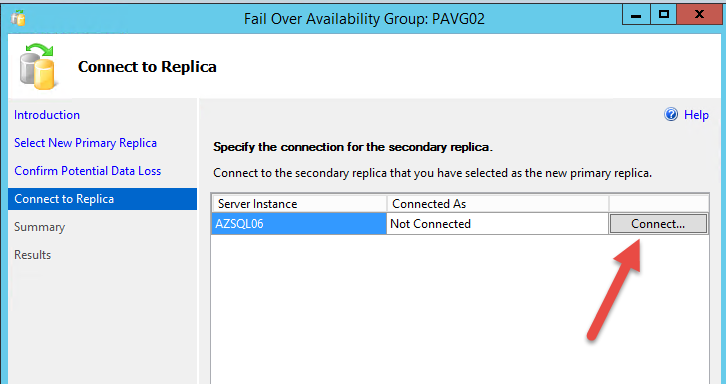
Figure 31 Connect to Replica wizard page
- Click the Connect… button, which displays the Connect to server dialog.
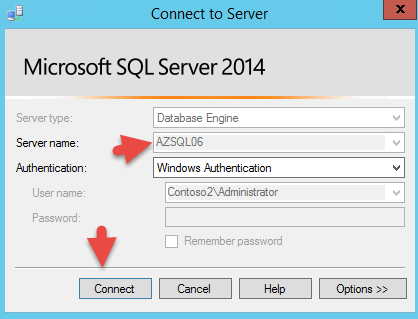
Figure 32 Connection to Microsoft Azure Availability Group Replica
- Select the correct Azure secondary replica database and click Connect.
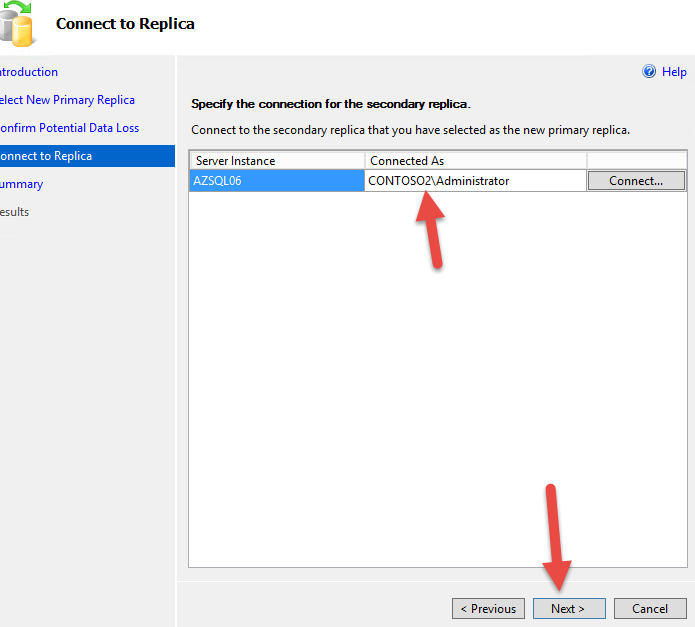
Figure 33 Successful connection to SQL Server Microsoft Azure based instance
- Click Next to display the Summary page showing current choices made in the wizard as shown in figure 34.
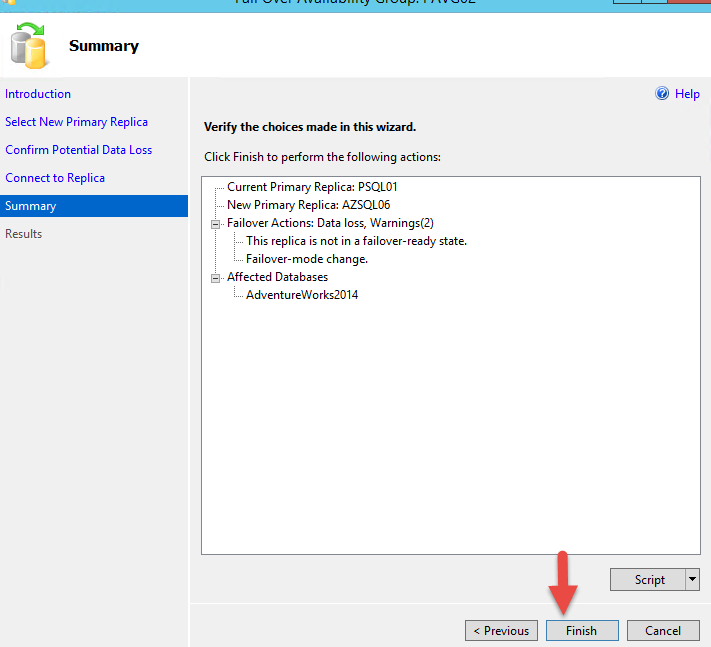
Figure 34 Summary choices wizard page
- Click the Script dropdown to select File option to save your choices as a PowerShell script for reuse later.
- Click Finish to start the failover process as shown in figure 35.
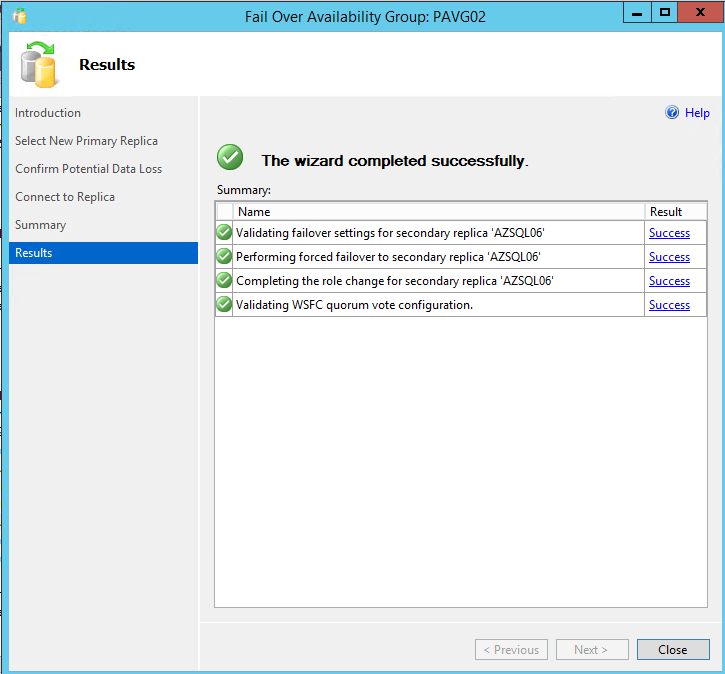
Figure 35 Failover progress listing
- Wait approximately 30 seconds for the process to complete
- Click Close to close the Failover Availability Group Wizard.
- After completing the failover and returning to the availability group/cluster dashboard we observe the results shown in figure 36. We wanted the new primary replica to be online but it's offline with a Synchronization State "Not Synchronizing". We must recover to a known and stable state now.
Note: The manual failover to the Azure hosted secondary left the primary and secondary nodes and the new primary in a "Not Synchronizing" state.
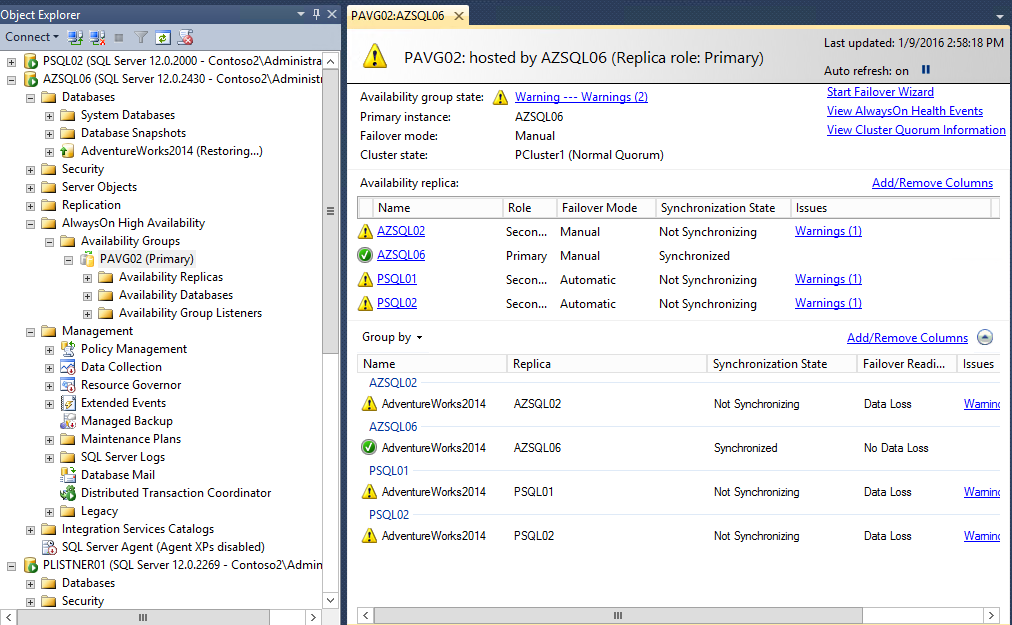
Figure 36 WSFC Availability Group node in Not Synchronizing state
Note: Resuming an availability Database (SQL Server 2014) using SSMS is one option.
We can observe the individual nodes as being in this state by displaying the Availability Group Dashboard. This is the normal expected behavior as per the TechNet article Perform a Forced Manual Failover of an Availability Group.
A forced failover is a form of manual failover that is intended strictly for disaster recovery, when a planned manual failover is not possible. If you force failover to an unsynchronized secondary replica, some data loss is possible. Therefore, we strongly recommend that you force failover only if you must restore service to the availability group immediately and you are willing to risk losing data.
After a forced failover, the failover target to which the availability group was failed over becomes the new primary replica. The secondary databases in the remaining secondary replicas are suspended and must be manually resumed. When the former primary replica becomes available, it transitions to the secondary role, causing the former primary databases to become secondary databases and transition into the SUSPENDED state. Before you resume a given secondary database, you might be able to recover lost data from it. However, notice that transaction log truncation is delayed on a given primary database while any of its secondary databases is suspended.
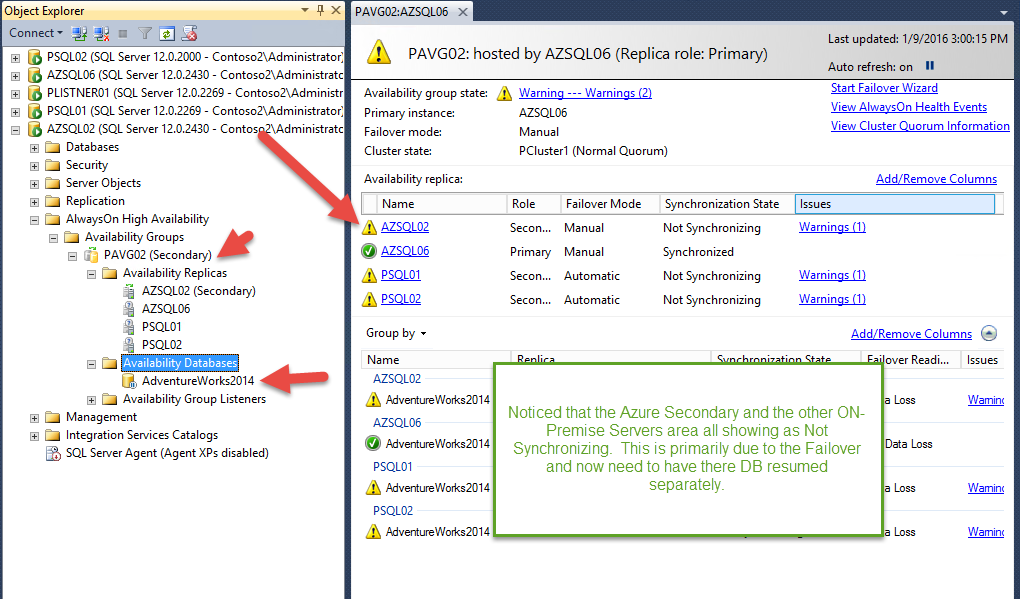
Figure 39 Secondary replica with suspended database
We complete the recovery by completing tasks documented in Essential Tasks after a Forced Failover in the article referenced above. Data synchronization with the primary database won't occur until the secondary database(s) are resumed.
You can resume a suspended availability database in AlwaysOn Availability Groups by using SQL Server Management Studio, Transact-SQL, or PowerShell in SQL Server 2014. Resuming a suspended database puts the database into the SYNCHRONIZING state. Resuming the primary database also resumes any of its secondary databases that were suspended as the result of suspending the primary database. If any secondary database was suspended locally, from the server instance that hosts the secondary replica, that secondary database must be resumed locally. Once a given secondary database and the corresponding primary database are in the SYNCHRONIZING state, data synchronization resumes on the secondary database.
- To resume a secondary database
- In Object Explorer, connect to the server instance that hosts the availability replica on which you want to resume a database, and expand the server tree.
- Expand the AlwaysOn High Availability node and the Availability Groups node.
- Expand the availability group.
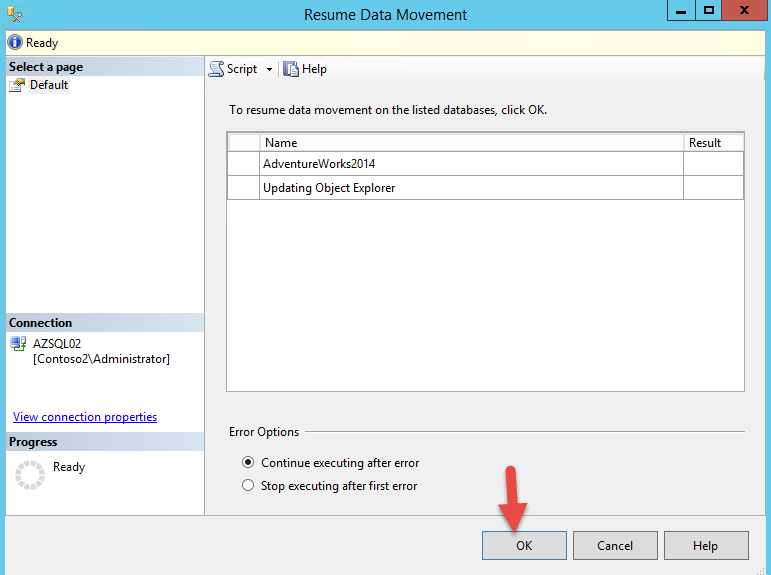
- Expand the Availability Databases node, right-click the database, and click Resume Data Movement.

- In the Resume Data Movement dialog box, click OK.
- Verify that the Server now shows as Synchronizing as shown.
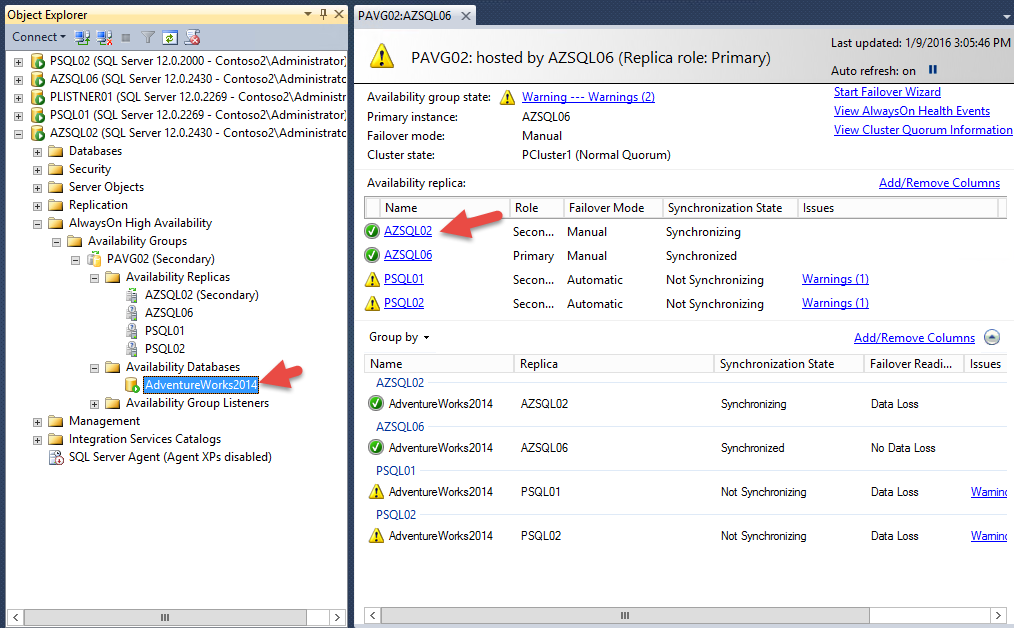
Figure 40 Individual node during forced failover
Note: To resume additional databases on each replica location repeat steps for each database. Use TechNet article Resume an Availability Database as a reference.
We restore the primary and secondary databases as per the article referenced above.
After resuming each replica, our cluster we go ahead and re-ran the "Start Failure Wizard" to restore operations back to normal with the following results in figure 41. 
Figure 41 Cluster Availability Group in stable state
The Availability Group replicas are returned to a pre-failover state in preparation for a second pass.
Appendix A – Data Validation steps for Unplanned Failover
The following steps are needed for testing that data updates in Azure are properly given the chance to replicate back to the on-premises SQL 2014 servers.
Assumption: The Azure DB is failed over to Azure and updates have been made for testing.
- Once you failover to Azure and the SQL box is the primary and the on-premises SQL boxes are back only you need to resume the DB for each server
- Once you resume you will see it identify that it is synchronizing
- Ensure you allow a few minutes to allow for synchronization (will definitely depend on the amount of updates that have been made)
- The on-premises DB are not setup to allow read access so you will need to set that up to view your changes as follows
- Locate and expand the AlwaysOn High Availability folder.
- From there expand the Availability Group folder, locate your AG and right-click it.
- In the Availability Replicas section of the AG Properties screen, locate the replica you want to configure for read-only access and change the Readable Secondary Property.
- Once both on-premises DB have been given read access you should be able to view the changes for the fields updated in Azure
- Once the changes are verified you can go ahead and move the Primary from Azure (SQL Box) back to on-premises SQL Server. Note: The updates that were synchronized will remain as expected.
For more information, refer http://www.bidn.com/blogs/PatrickLeBlanc/ssis/2513/alwayson-configuring-secondary-read-only-access
Appendix B - Planning Sheet
The planning sheet will be used to as a first step in ensuring all elements are setup prior to implementing the DR or Dev\Test labs.
Key Infrastructure Dependencies outlined in the "Hybrid Networking" lab:
- Proof of Concepts (if needed): Technical Contacts Identified: Need to be able to reach the technical contact identified for customers\partners in support of environmental issues that may come up. Both Email and Cell number will be needed. An agreed upon turnaround time that works is recommended.
- Domain Controller with all appropriate accounts needed exist
- Domain Name Identified
- DC operational
- Networking
- At least 2 Networks have been provisioned to support a Backend Networks (10.0.0.0) and Frontend (192.168.x.x) to support DR.
- 2 static IP address has been identified (1 for Failover Cluster, 1 for Listener)
- Network Router identified and is accessible for operational use with no ports being blocked and was tested
- Hardware
- Hardware has been identified on-premises with at least 32 GB of memory
- Software
- Windows Server 2012 R2 (Datacenter) bits and licenses are available for installation + all current hotfixes needed
- SQL Server 2014 bits and licenses are available for installation (Domain Share Works)
- SQL Server 2014 Post Hotfix Rollup (apply to all on-premises SQL Boxes)
- Azure Membership
- Azure has been provisioned and you are a co-admin
- New Azure environment is fully accessible for operational use (Pay-As-You-Go recommended)
- Microsoft Azure Prescription exist and has been provisioned with the right networks – Note: Do not use a "_" (underscore) in any of the names in Azure due to known issues.
- Network Name Identified
- Local Network Provisioned
- Network & Subnets Provisioned
- Availability Set Provisioned
- Gateway Setup (See Networking Lab)
- VPN / Gateway – Site to Site configuration has been built and is operational
- VPN Operational status is online
- S2S configuration completed
- Gateway configured and Operational
- All components reachable (pingable\remote accessible) Note: Ensure all ports are open both ways
- If you are supporting a Dev\Test Environment ensure that the Microsoft Azure Pack has been downloaded and ready for installation - If you do not have one in the on-premises network create one following the steps at http://technet.microsoft.com/en-us/library/dn296439.aspx . For lab purposes, it is recommended to install SQL Server on the same server (you will need to install SQL Server, before configuring the WAP Configuration Site).
- Licenses needed are readily available if they will be used to provide hosted managed services rather than purchasing new ones.
Appendix C - Existing CSP Services Procedure
Create new customer leveraging the CSP Partner Center portal
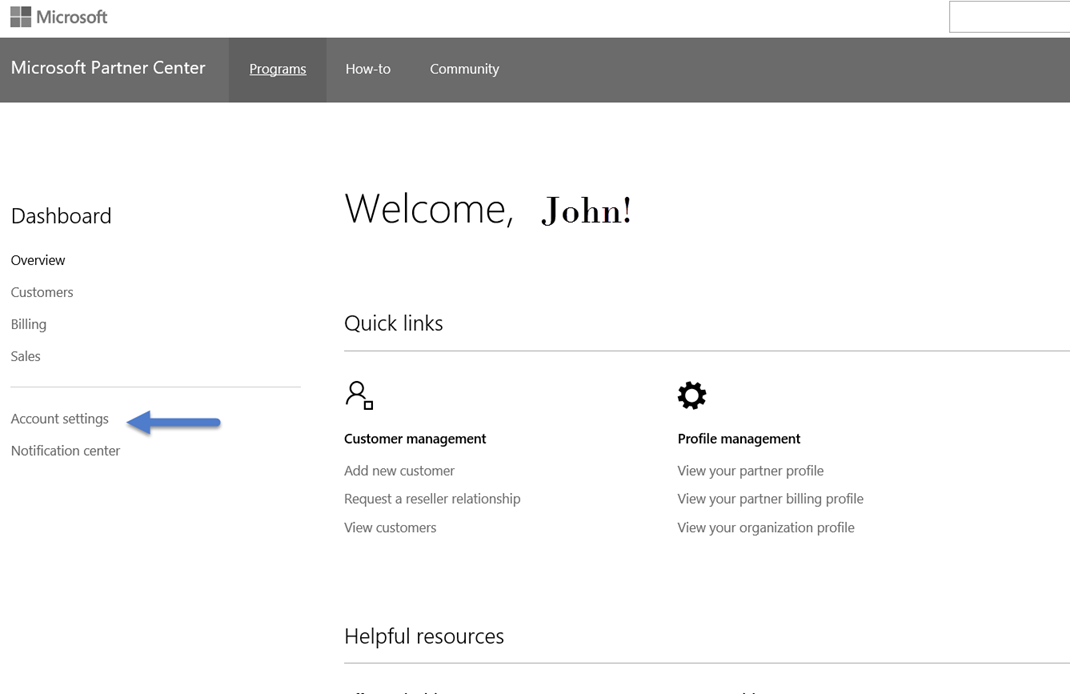
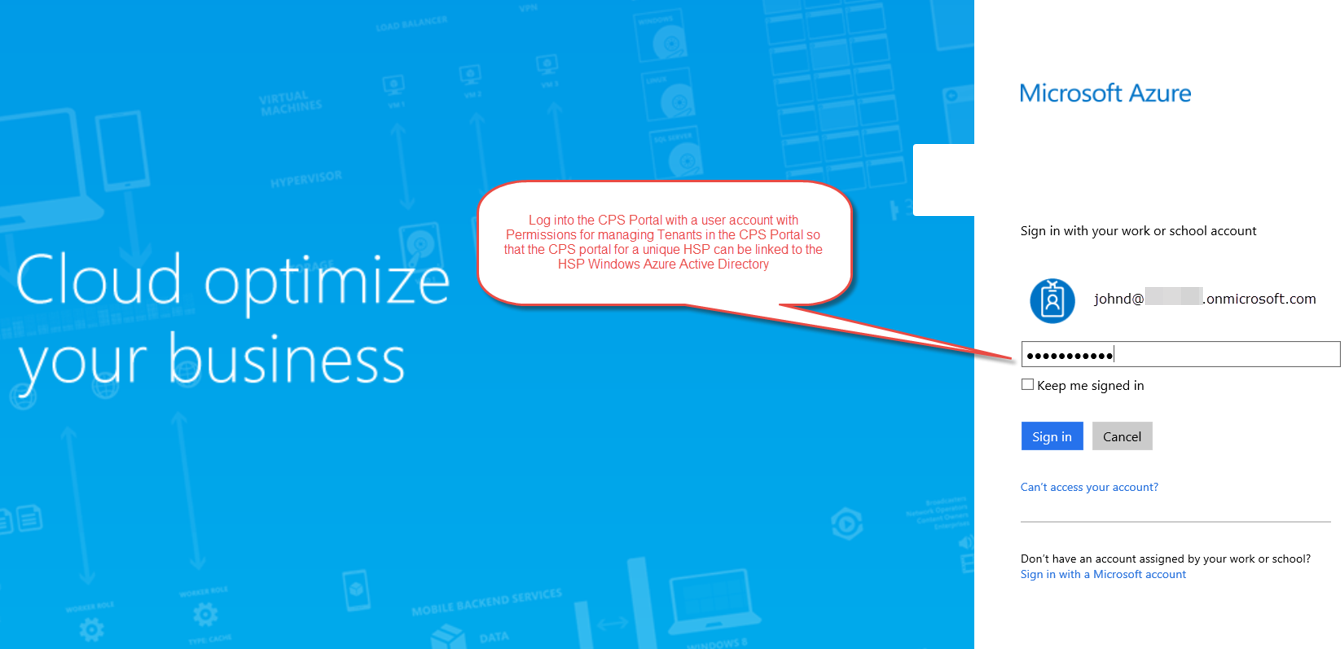
- Go to https://partnercenter.microsoft.com and sign-on into the site using your CSP subscription assigned
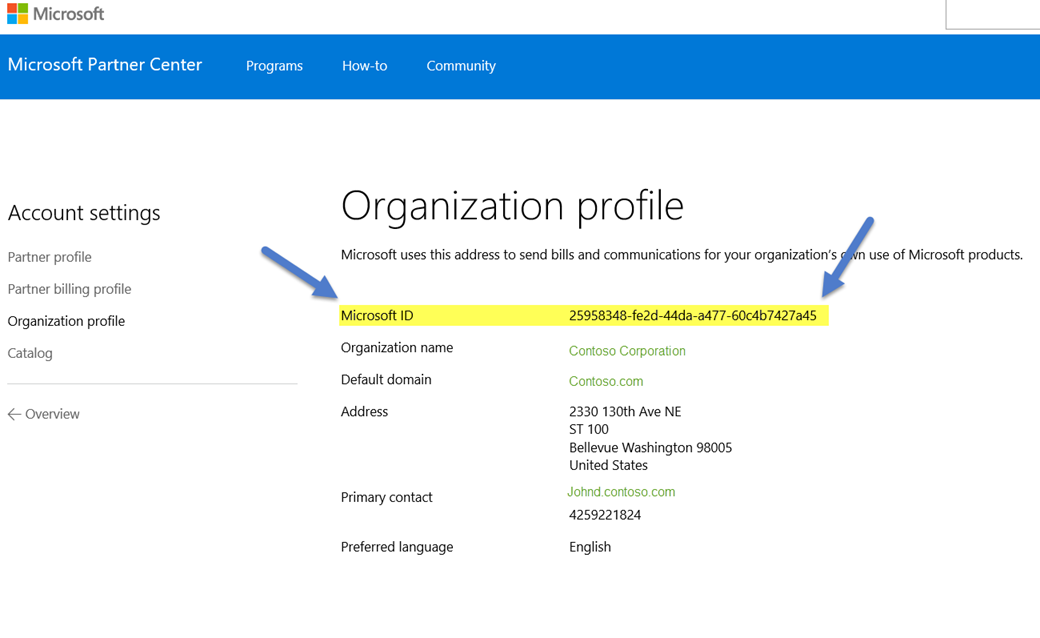
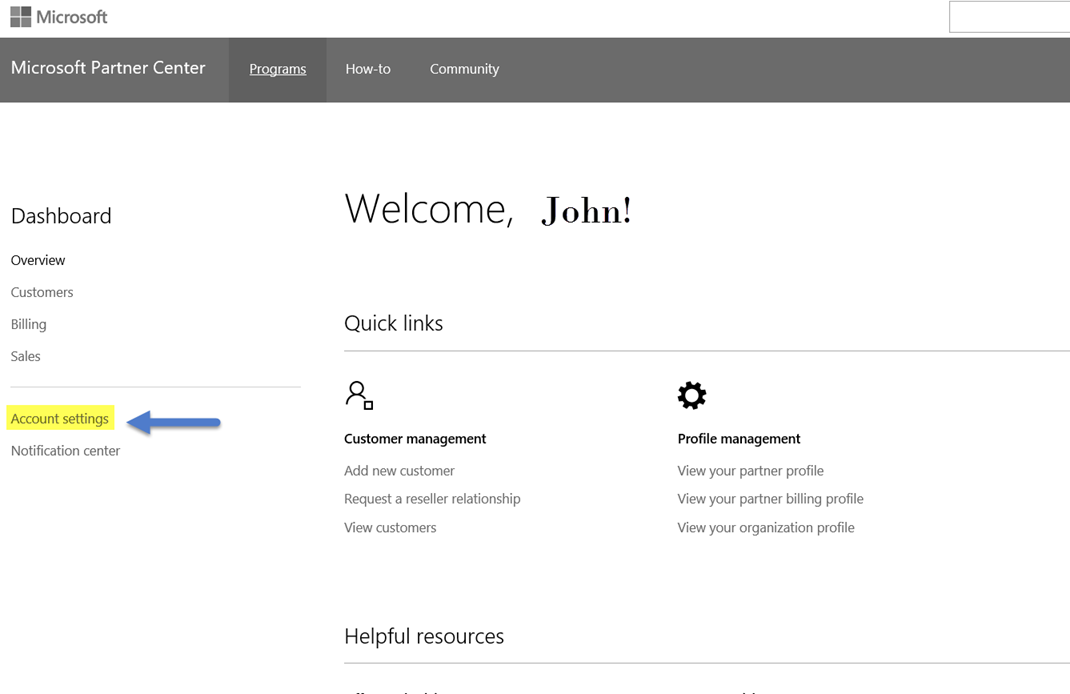
- Once signed on, you will see your Welcome Page with your CSP details. Once there, you can manually add a new customer, request a relationship, view customers, Add new Users, View Users, View your organizational profile.
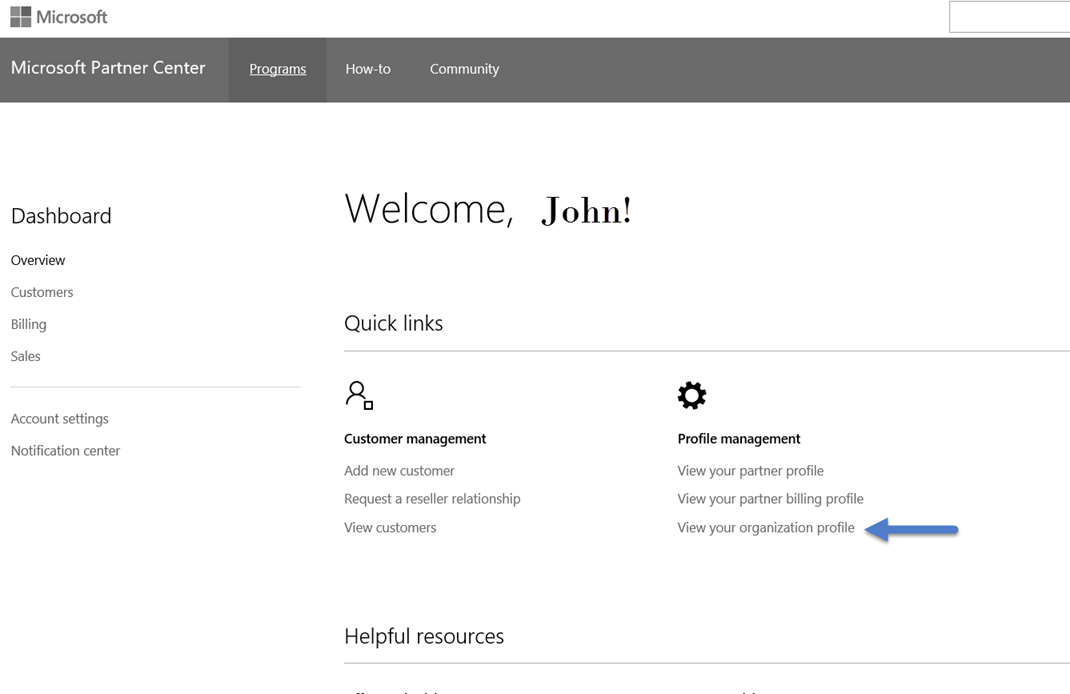
- Capture the Microsoft ID in note pad for later use then return to previous screen by selecting "overview" on the left side.
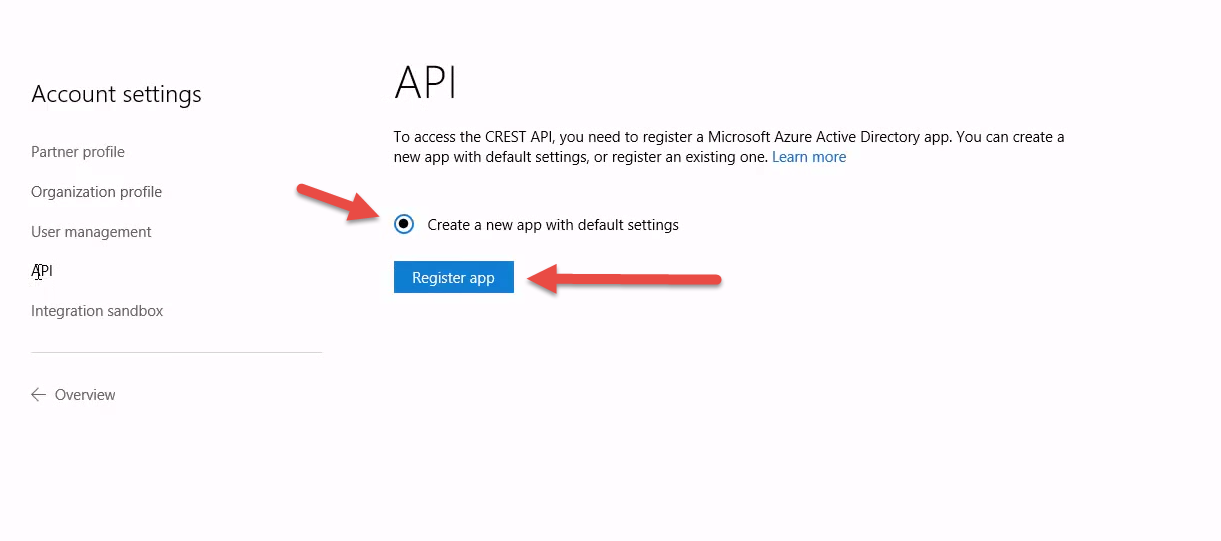
- Now you want to provision the API by selecting the "Account Settings" text as shown below.
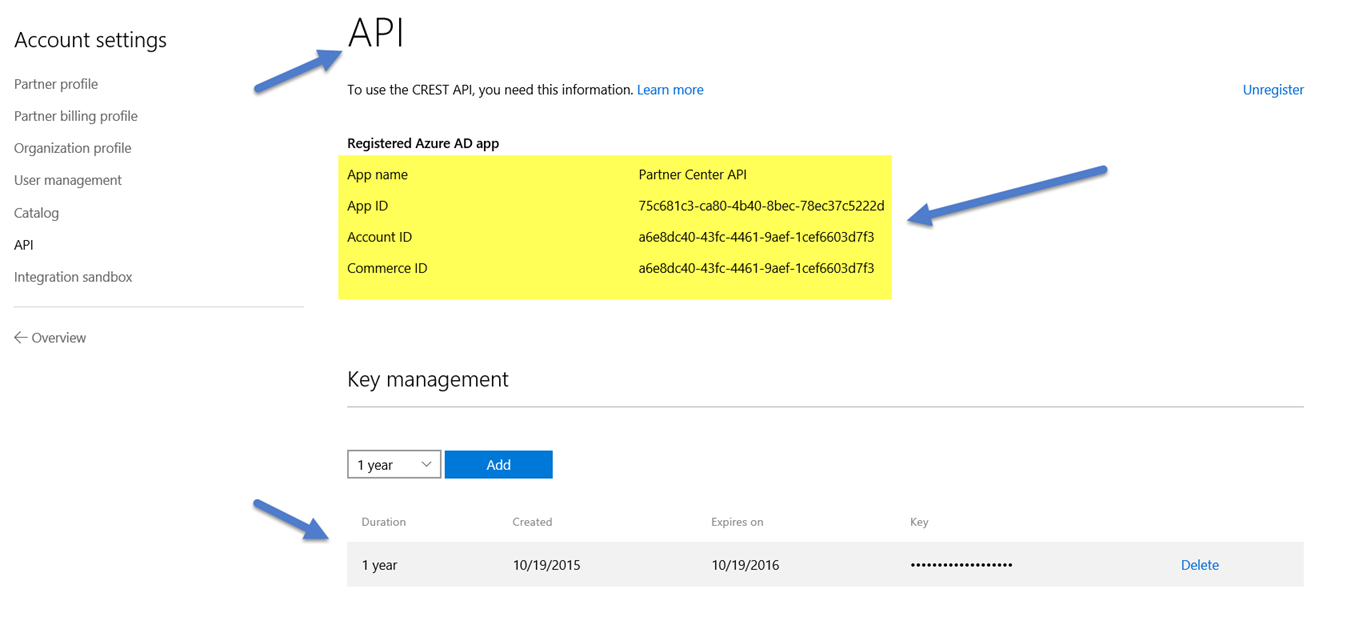
Create a new app with default settings by selecting the Register App
- You will now see the created API information you will need and need to capture it for later use. Ensure you capture the key since it is only shown once and cannot be viewed later for security reasons. Note: If you forget to do this you can always unregister the app and then recreate it which will give you a new key.

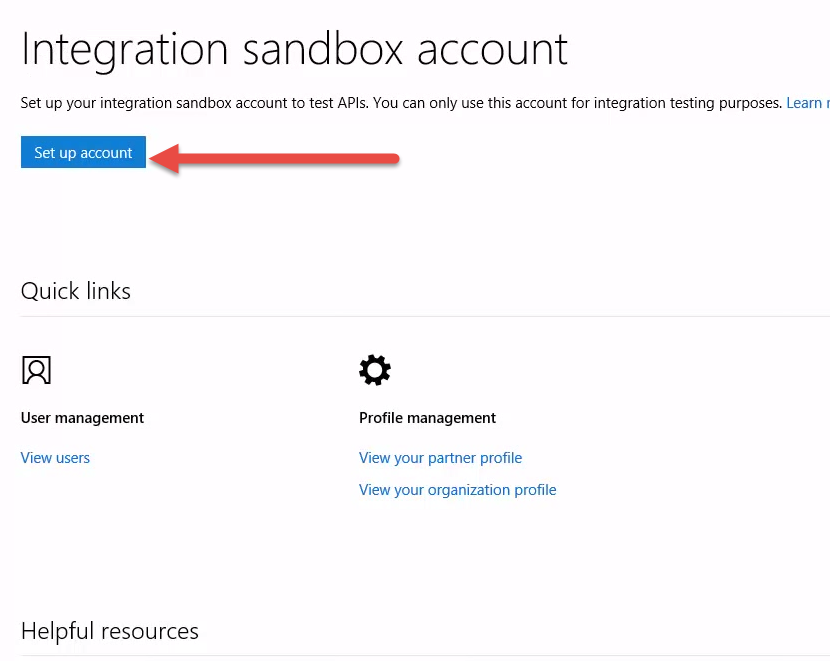
- Because you are using your production account, you are able to create an "Integration Sandbox" which can be used for testing as shown on the left. We are using a production environment for this documentation. If a Sandbox approach is needed, please refer to Appendix C for guidance.
Appendix D – Using a Sandbox environment
Since we realize that some customers may want to leverage a Sandbox environment for testing the following guidance is provided. Below you see where to setup the Integration sandbox.
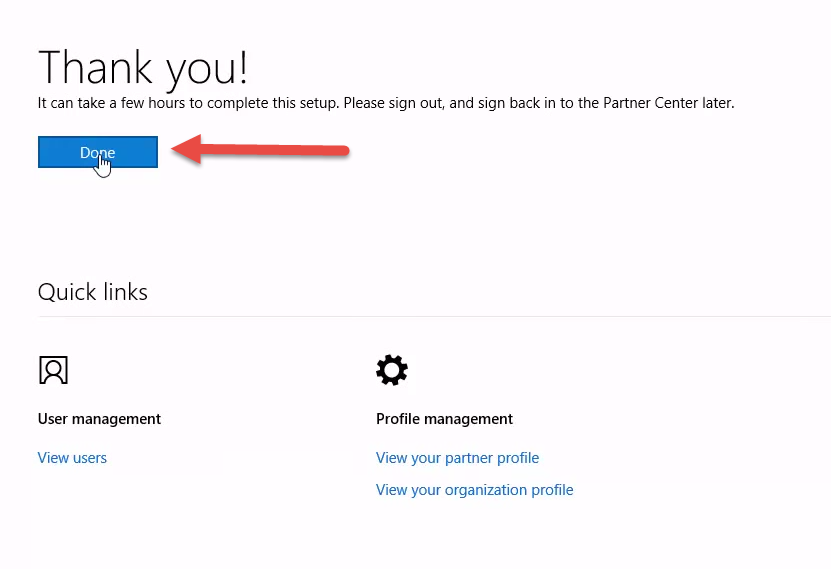
- Once setup it now shows done. Now simply select done and it takes you back to the home screen.
- Log into the Sandbox you just created using the account you provisioned.
- You have completed setup of the Sandbox environment.
Select API settings and register an app for the Integration Sandbox environment

- Capture all of the details for this API settings
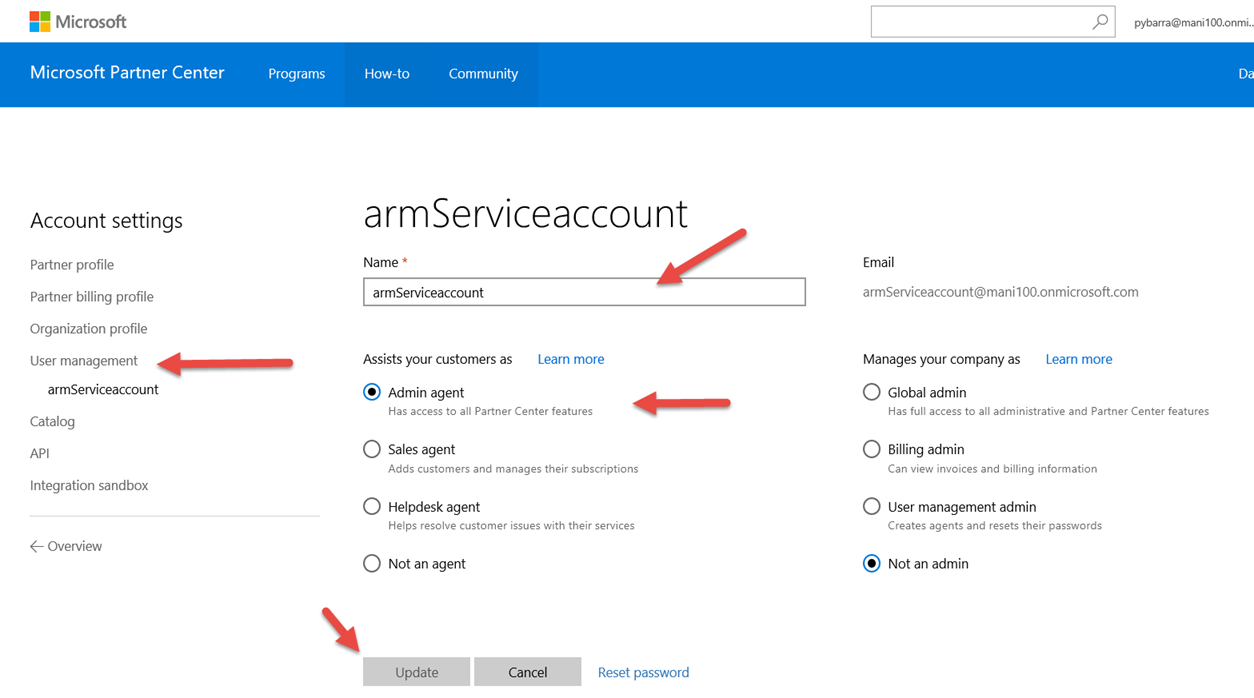
- Now you want to allow the account access the Graph API (AD Mechanism that allows you to connect to Azure AD). First, verify what users have access and if the account does not exist go ahead and create it by selecting User Management as shown.
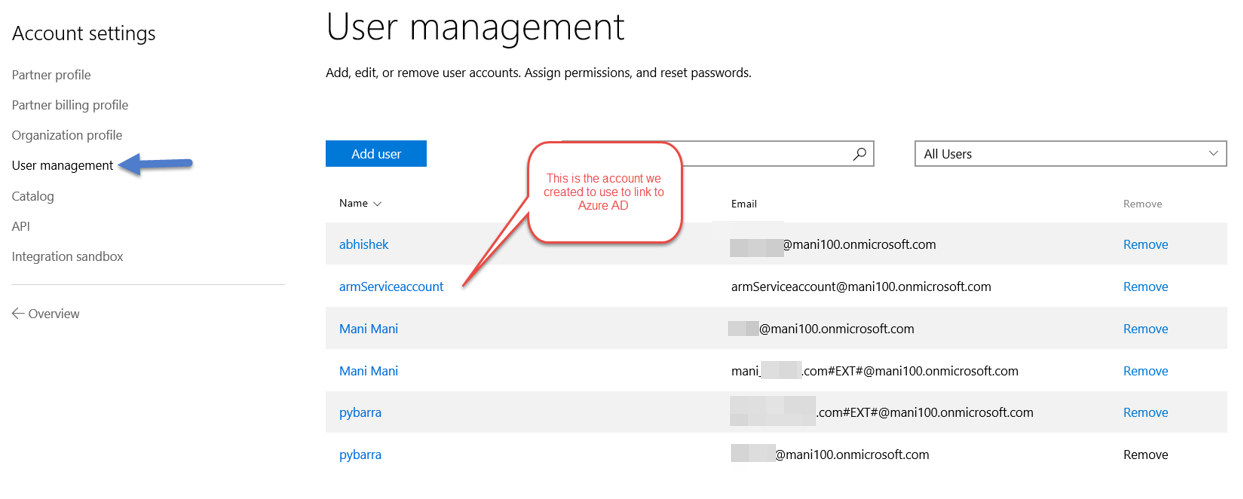
Below you will see the permissions established for the "amServiceaccount". Only select the Admin Agent which will give the right level of permissions needed to use the guidance scripts in this document.

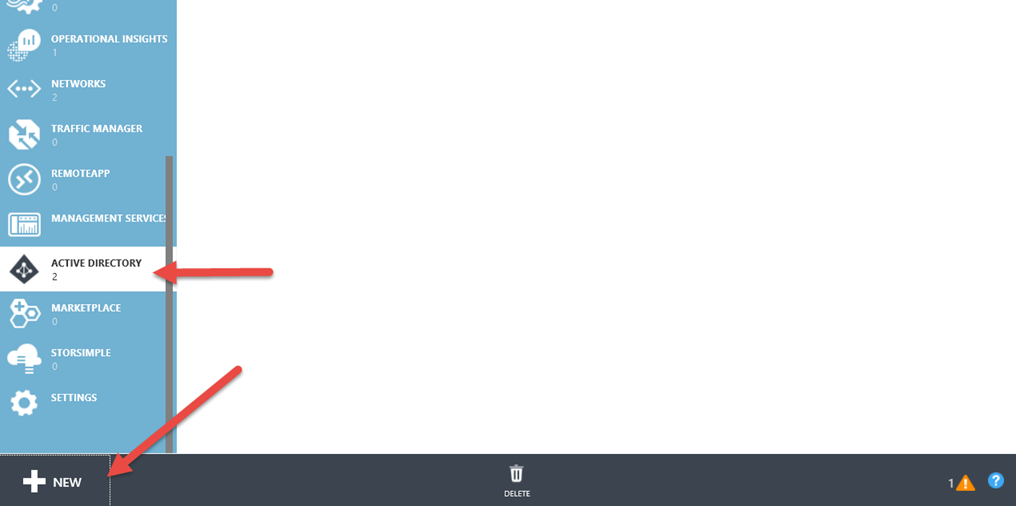
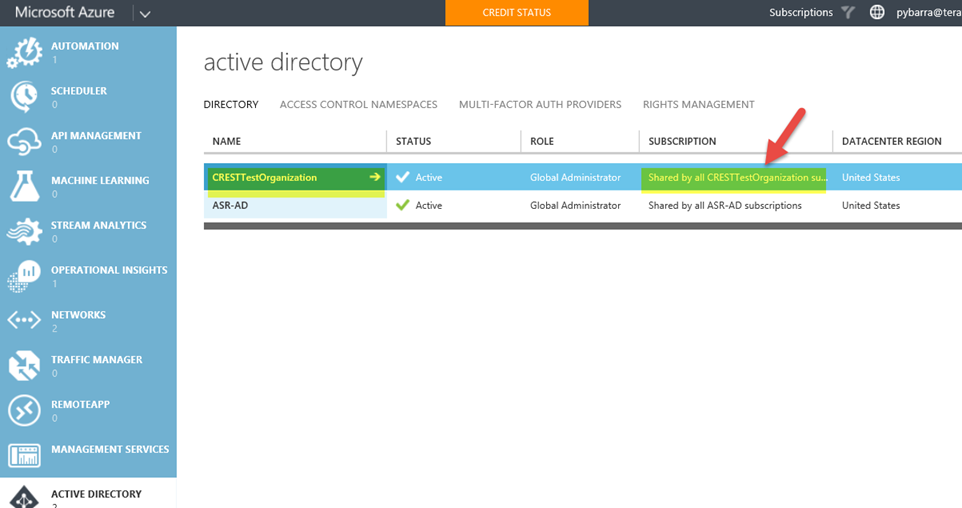
- Now we need to ensure the Partner Center Portal is linked to the CSP partner's Azure subscription. Go to the Azure Management Portal and log in and select Active Directory from the left column. Then select New as shown below…
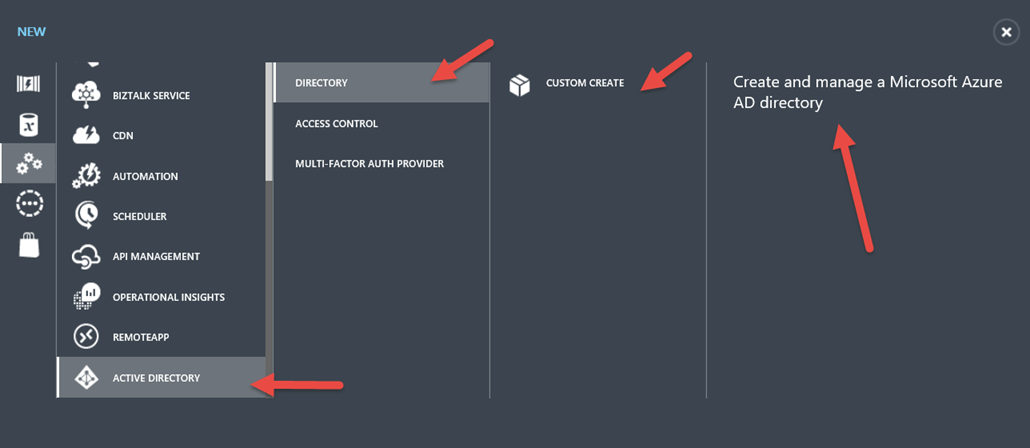
- Select "Active Directory" then "Directory" then "Custom Create" and finally "Create and manage a Microsoft Azure AD Directory"
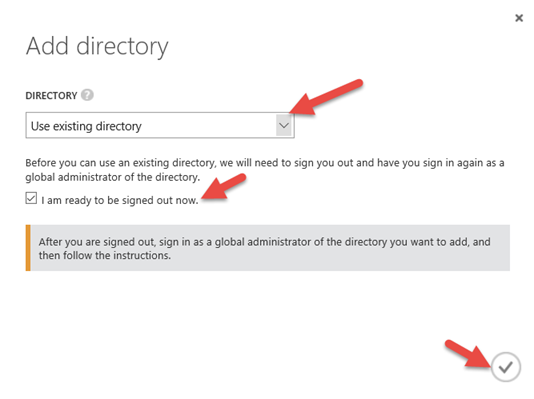
- Since we are linking the Partner Center Portal which has accounts and users to the CSP partner's Windows Azure AD we select "Use existing directory". Then select the toggle box as show below and click the check mark.
- You will then be asked to log into Partner Center Portal using the creds you already established.

- Next you will see that the Organization is found and the global user in the Partner Center Portal and you can now select "Continue" to link it.

- Next you will see it has successfully added the user and select to sign out.

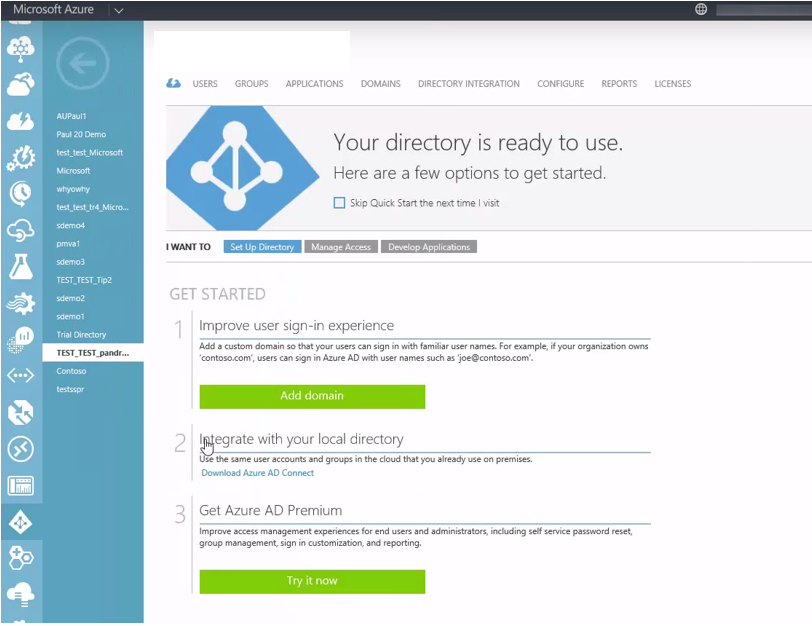
- Now go and log back into the Azure Management Portal and look at the Active Directory section and you should now see the new Integration Sandbox domain.
- Then select it to go view the details
- Then Select the Application to view published apps

- Then select the Show "Applications my company owns" from the drop down

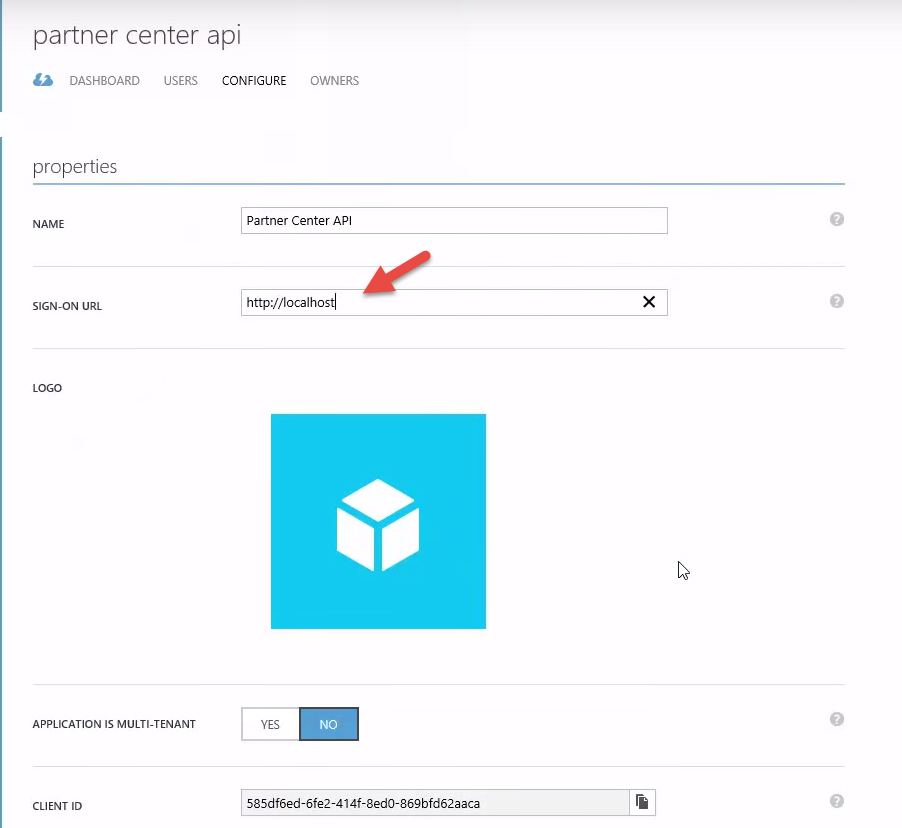
- Now select the application listed for the Partner Center API and view the details that come up and select Configure
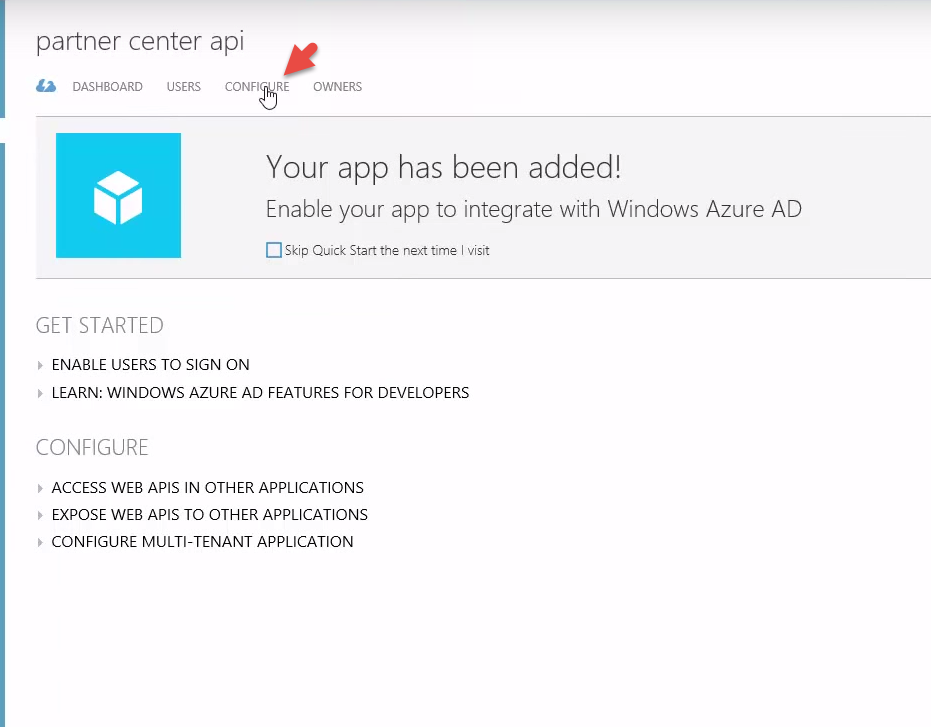
- Once in the Configuration section updated the Sign-on URL as shown below.
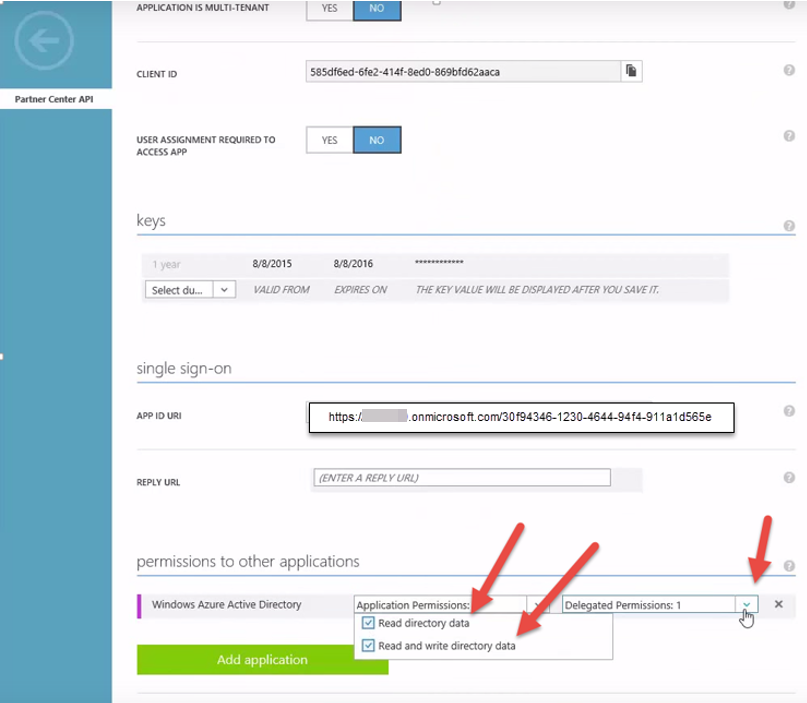
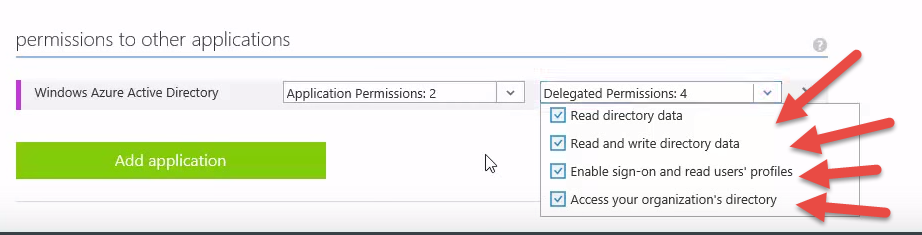
- Now update the read\write permissions as shown
- Then save settings and you are ready to continue implementing an automated solution as identified in section 3 above.
Appendix E – Backing up SQL Server 2014 with Encryption
Procedure and guidance for creating an encrypted backup are covered here:
- Create an Encrypted Backup - Describes the basic steps required to create an encrypted backup
- SQL Server Managed Backup to Windows Azure - Retention and Storage Settings - Describes the basic steps required to configure SQL Server Managed Backup to Windows Azure with the encryption options specified.
- Extensible Key Management Using Azure Key Vault (SQL Server) - Provides an example of creating an encrypted backup protected by keys in the Azure Key Vault.
- SQL Server 2016