Operations Management Suite (OMS): ITSM Integration
Introduction
Customers and users have high expectations of the services provided to the business by IT. Services should always be online and available from anywhere. They should perform well and they should always be up to date. IT Service Management (ITSM) is comprised of several activities, organized and structured in processes and procedures, that are executed by service providers to plan, design, deliver, operate and control IT services. A core function of IT Service Management is tracking issues related to services that may impact service levels. The Operations Management Suite (OMS) now offers ITSM integration to help automate some of the tasks related to incident tracking and notification. Although there are many different frameworks available to implement ITSM, ITSM is often equated with ITIL (the Information Technology Infrastructure Library). For example, Microsoft provides a practical guidance for everyday IT activates in its Microsoft Operations Framework. While ITIL seems a bit of a departure from the other topics in this book, it is an important component of service management. Service management is about managing a service while identifying and coming to an agreement with customers around expectations of service delivery.
The ITSM connector in OMS supports integration with System Center Service Manager (SCSM), ServiceNow, Provance, and Cherwell. In this chapter, we will focus on integration with SCSM and ServiceNow.
There are two primary factors that make service delivery more challenging today:
- Change. Today's modern IT services evolve rapidly. New features and updates are released every month, every week, and sometimes even more often. Customers require the service to support new business needs and integrate with other services
- Complexity. Today's IT services are very complex, often running on several platforms and often integrating with other services. IT services may even run in a hybrid environment, spanning multiple data centers and cloud, making them even more complex to manage.
With the two factors listed above in mind, you may quickly realize there should be rules about how to manage change within services to ensure they deliver on customer expectations. If you have a complex service with 100 components, someone should not change one component without thinking about how the change will affect the other 99 components. This is one of many areas where ITSM and ITIL can help.
The following list is a short description of the different processes were OMS integration with ITSM can deliver value.
- Capacity Management. This process is about making sure required capacity is available all the time. OMS can monitor the capacity used in the environment today and provide data to forecast if more or less capacity is needed.
- Security Management. This process is managing security risk, ensuring that sensitive corporate information is adequately protected. The OMS Security and Audit solution and security related integrations can be used to gather an overview of the current security state of monitored systems. It can also be used to detect and prevent security related threats.
- Service Transition. This process helps with planning and managing change of the state of a service. The process ensures customers experience a stable service throughout the transition. OMS can be used to proactively assess services and recommend changes to stabilize service performance and availability.
- Change Management. This process focuses on managing dependencies between service components, as well as other services, and minimizes risk when making IT related changes. The OMS Service Map solution can be used to identify and visualize relationships between IT components.
- Release and Deployment Management. This process is about ensuring releases are deployed into IT services successfully. A release typically introduces multiple approved changes into an IT service. OMS can deploy software updates to computers and collect information to verify that releases are applied successfully.
- ITIL Asset and Configuration Management. This process is about managing and planning all attributes and relationships between every component in the IT environment. The OMS Service Map solution can be used to document and help the IT organization better understand relationships and dependencies between IT components.
- Service Operation. Service operation is about the day-to-day activities required to deliver a service to the customer. OMS can provide value in collecting, analyzing, and visualizing data to provide a picture of service status, providing insight into how tasks related to service operation may need to evolve.
- Incident Management. Incident management is about restoring a service back to its normal state in the event of failure. OMS can be used for troubleshooting, as it collects data from different sources and makes it easy for administrators to correlate events across service components or other related services upon which the affected service depends.
- Event Management. Event management is about capturing and analyzing events from an application or service to determine if corrective action is needed. OMS can collect events from different sources and administrators can then drill into logged data to better understand the causal factors of service impacts and outages.
- Access Management. Access Management is about making sure users, devices and other services have the permissions they need, but only as much as they need. OMS can collect and analyze event data to identify, significant security and authentication-related events. This data can be used as a foundation for access management.
- Problem Management. A problem is an unknown reason for an incident. OMS solutions can be used to find the root cause of problems. OMS Log Analytics collects data from many different log data sources and provides a query language to join data sets on common fields across multiple applications and devices to correlate events, significantly accelerating root cause analysis.
Supported Scenarios
The ITSM connectors can be used in two general scenarios, both covered in detail later in the chapter.
- Incident creation based on direct action. Direct action is when someone clicks on an event and chooses to generate a work item.
- Incident creation based on Alert Rules. In OMS alert rules, you can configure action, for example, send an e-mail or run a runbook. In the same way, you can configure to trigger an ITSM connector and generate a work item (incident) based on the result of the search query ran by the alert rule.
You configure the connector at the workspace level and it can then be used in both scenarios. It is also possible to configure multiple ITSM connectors in the same workspace.
ITSM Connector Data Types
The ITSM connector will create two data types
- ServiceDeskLog_CL is the data type for the connector. Everything related to the connectors is logged to this channel, for example, if the connection is working or not.
- ServiceDesk_CL is the data type for work item synchronizations. When OMS executes the synchronization between OMS and the ITSM service, all new and updated work items are logged to under this data type. It also includes work items created in the ITSM service, in addition to the ITSM work items generated by OMS.
The following steps show how we can follow a work item in the ServiceDeskLog_CL and ServiceDesk_CL logs.
Note: Although this example is based on a ServiceNow integration, the same examples can be applied to other support ITSM platforms, such as System Center Service Manager.
Figure 1 shows an event collected from the ServiceNow integration, that a work item (an incident in this example) has been created in ServiceNow from OMS. The query in the Figure is scoped to a specific ServiceNow connector (ServiceDeskConnectionName_s) and a specific incident (ServiceDeskID_s)
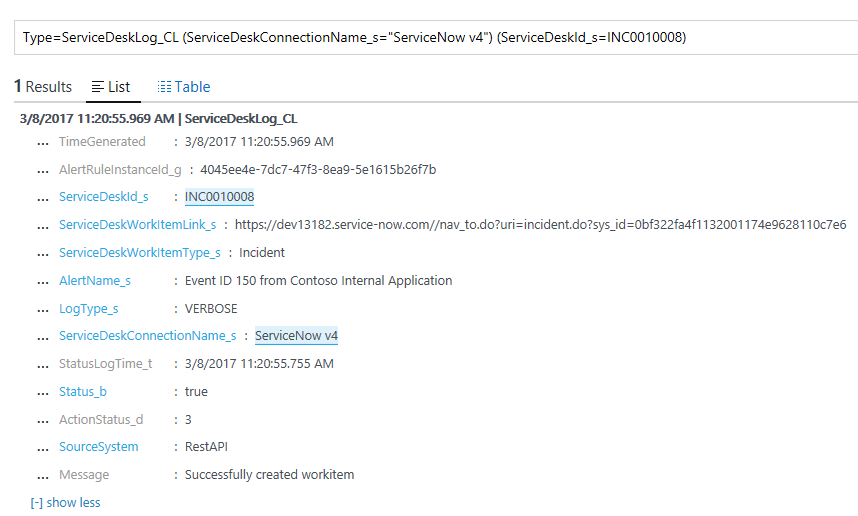
FIGURE 1. INCIDENT CREATED IN CONNECTED SYSTEM CENTER SERVICE MANAGER
If any updates are made to the incidents in ServiceNow, there is also an event showing that these changes have been synchronized to OMS. We can then use the data type
ServiceDeskLog_CL to review updates to the incident from OMS, as shown in Figure 2.

FIGURE 2. SUCCESSFULLY SYNC BETWEEN CONNECTED ITSM SERVICE AND OMS
If we need to view the status of an incident or updates to an incident, we can look for data type of ServiceDesk_CL. Figure 3 shows information about incident INC0010008 in table format. We can see in the Figure that all changes to the incident are logged in OMS. We cannot see what has been updated, such as a comment added, we can only see that there has been an update.
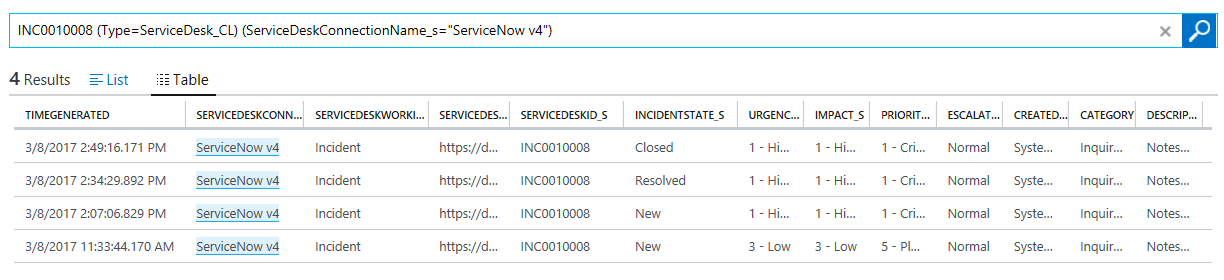
FIGURE 3. INFORMATION ABOUT A SPECIFIC INCIDENT
Figure 4 shows an entry for an update to an incident in ServiceNow. There was a comment added to the incident in ServiceNow, but that comment is not visible in OMS, only that there has been an update.

FIGURE 4. UPDATE OF INCIDENT
You can see the status of the connection on the ITSM Connector under Settings, in the
OMS portal, shown in Figure 5. The ServiceDeskLog_CL type is a good way to monitor ITSM connector activity.
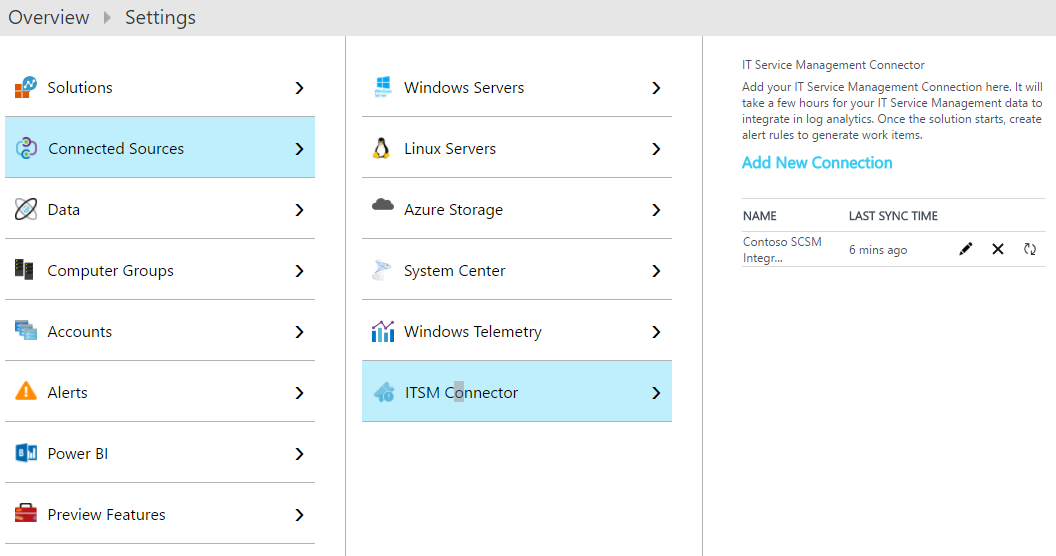
FIGURE 5. ITSM CONNECTORS SETTINGS IN THE OMS PORTAL
You can also run a query and look for type ServiceDeskLog_CL
(Type=ServiceDeskLog_CL), shown in Figure 6. In Figure 6 we can see several Error events with an Actionstatus_D of 1. Errors indicate that the connector is not working, and in this example, the source System Center Service Manager server is offline. OMS will generate one event around every 20 minutes until the server is back online. The Info event, where Status_B=true and ActionStatus_D=0, indicates that the connector is working. The first event on the list, where LogType_S =Verbose and ActionStatus_D=2, informs that several work items have been synchronized.
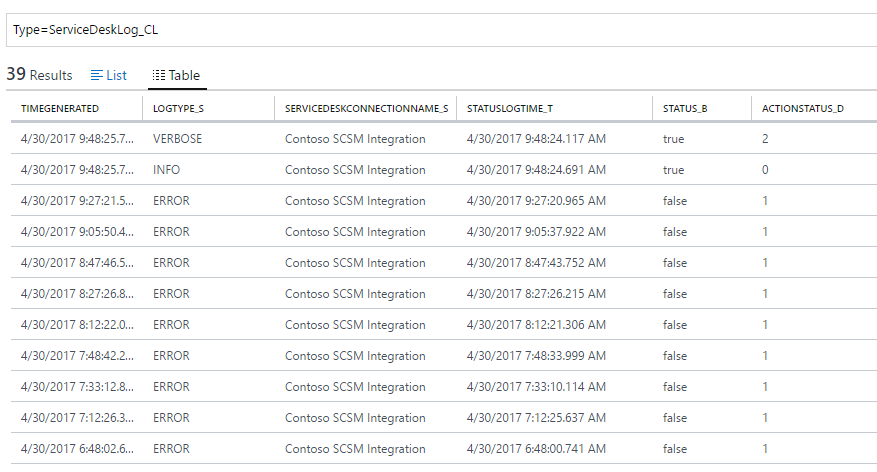
FIGURE 6. LOG DATA FOR ITSM SERVICE CONNECTOR
Note: There is no queue between OMS and the ITSM service. If there is a problem with the network and no direct link can be established, then no work items can be created or synchronized. Failed requests will not be queued to retry later.
ServiceNow Integration
The integration with ServiceNow is easy from the OMS side. Most of the configuration is done on the ServiceNow side. Before you can configure the ServiceNow connector you need to:
- Register OMS as an Application in ServiceNow. More details about the steps are available on the ServiceNow Wiki. Choose to "Create an OAuth API endpoint for external clients". See http://wiki.servicenow.com/index.php?title=OAuth_Setup#gsc.tab=0
- Create a user account for use in ServiceNow. Creating the user is made easy with the "User App for Microsoft OMS integration", shown in Figure 7, an add-on in the ServiceNow store. Navigate to https://store.servicenow.com/sn_appstore_store.do#!/store/application/ab0265b2dbd53200d36cdc50cf961980/1.0.0 and add the integration to your ServiceNow instance.
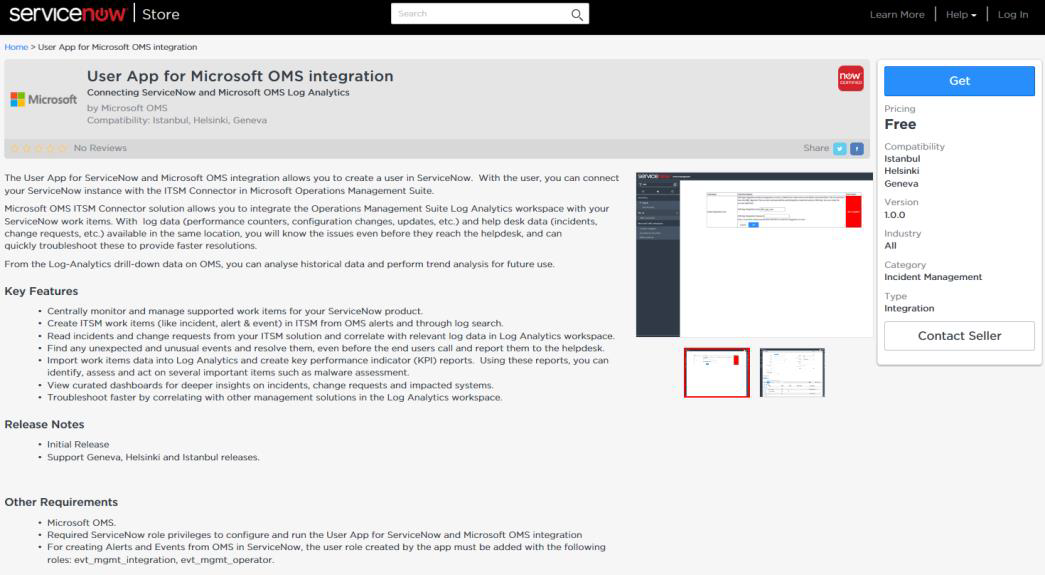
FIGURE 7. USER APP FOR OMS INTEGRATION
Once the Microsoft OMS Integrator app is installed in ServiceNow, you can create the user for OMS integration (as shown in Figure 8).
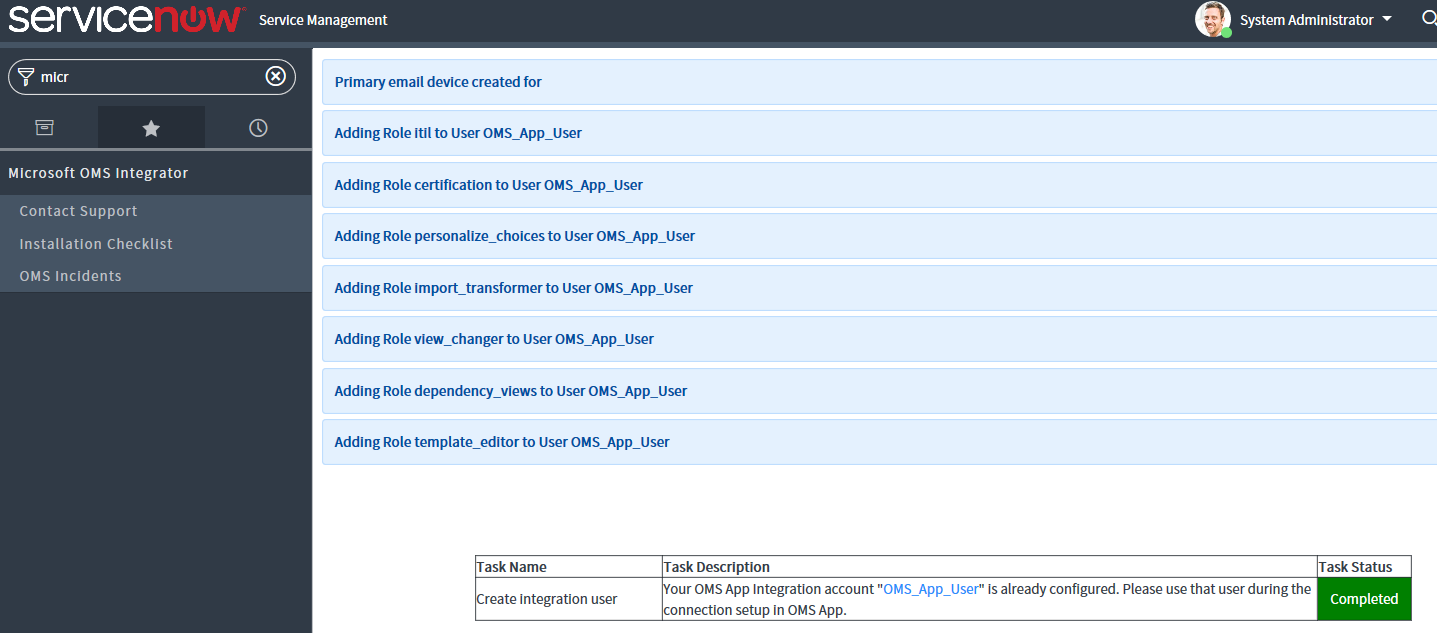
FIGURE 8. OMS INTEGRATION SETTINGS IN SERVICENOW
- Grant permissions in ServiceNow. If you are also planning to create work item of type "Alerts and Events" in ServiceNow from OMS, the user account created with the "User App for Microsoft OMS integration" needs additional permissions. You will need to give the user account, named OMS_App_User by default, evt_mgmt_operator and evt_mgmt_integration permissions.
- Template settings. If you are planning to use templates in ServiceNow, the template must be marked as Global or the OMS user must be the creator of the template. If a new template are added in ServiceNow after the OMS ITSM connector is created, and you want to use it in OMS, the ServiceNow connector must be refreshed.
To create the ServiceNow connector in the OMS portal, navigate to Settings, Connected Sources, ITSM Connector and click Add New Connection, as shown in Figure 9. The Username and Password is based on the user created with the "User App for Microsoft OMS Integration" app in ServiceNow. The Client ID and Client Secret are settings from the application registration in ServiceNow. Server URL is the URL to your ServiceNow instance.
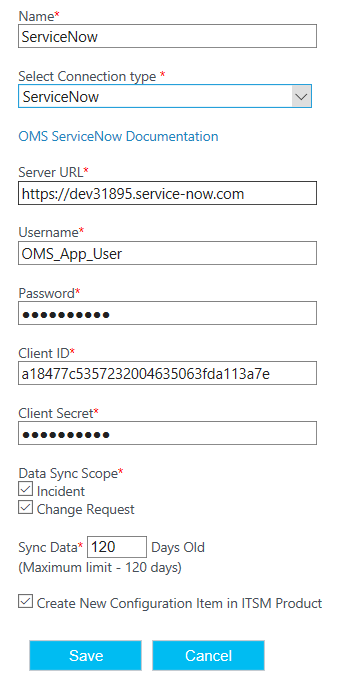
FIGURE 9. SETTINGS FOR SERVICENOW INTEGRATION
You can choose if you want to synchronize Incidents, Change Requests, or both, and for how many days you would synchronize historical data. You can also choose if you want to create configuration items (CI) in the ServiceNow database if they do not already exist. For example, if the incident is created for a server that does not exist in the CMDB, the connector can create it.
If you want to verify if the connector is working, you can use the Log Search feature and look for an event type ServiceDeskLog_CL and you can also filter on the name of the ITSM integration, for example:
Type=ServiceDeskLog_CL (ServiceDeskConnectionName_s=ServiceNow)
System Center Service Manager integration
The integration between SCSM and OMS is a bit more complicated than the ServiceNow Integration. Figure 10 shows the System Center Service Manager integration architecture
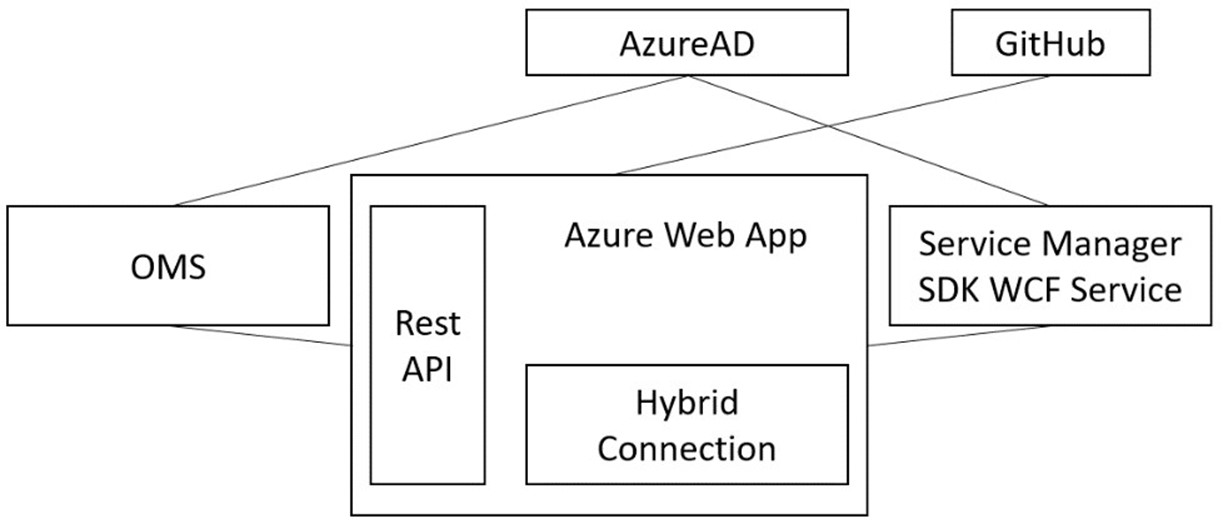
FIGURE 10. INTEGRATION BETWEEN OMS AND SYSTEM CENTER SERVICE MANAGER
The SCSM connector consists of the following components:
- Azure AD. Two objects are created in Azure AD - an Azure AD application, and its service principal. The AD Application is the global representation of the application and service principal is the local representation of the application in an Active Directory. The service principal contains the role assignment that grants access to the application and the AD Application object contains the credentials (an application id and either a password or a certificate). The Service Principal is used to authenticate to the Azure Web App.
- GitHub. GitHub stores the template for the Azure Web App. After deployment, if the App Service binary needs to be updated, they can be synchronized from GitHub and updated to the latest version direct from the Azure portal, shown in Figure 11
- Service Manager. The SCSM management server. It is recommended to use a secondary management server for the hybrid connector service.
- Azure Web App. Hybrid Connection. The hybrid connection creates a WCF service on the SCSM server and exposes it as a REST API on the Azure Web App. The Rest API is used by the connector to push and pull data to and from OMS. The hybrid connection is a feature of Azure BizTalk services and serves as a means to connect websites to resources behind a firewall.
OMS. The integrated OMS workspace
In order to setup the integration between OMS and SCSM, you will need to perform the following steps:
- Run a PowerShell script to setup a Web App and a BizTalk service in Azure.
- Create a Hybrid Connector on the SCSM management server.
- Connect OMS with SCSM via the hybrid connector.
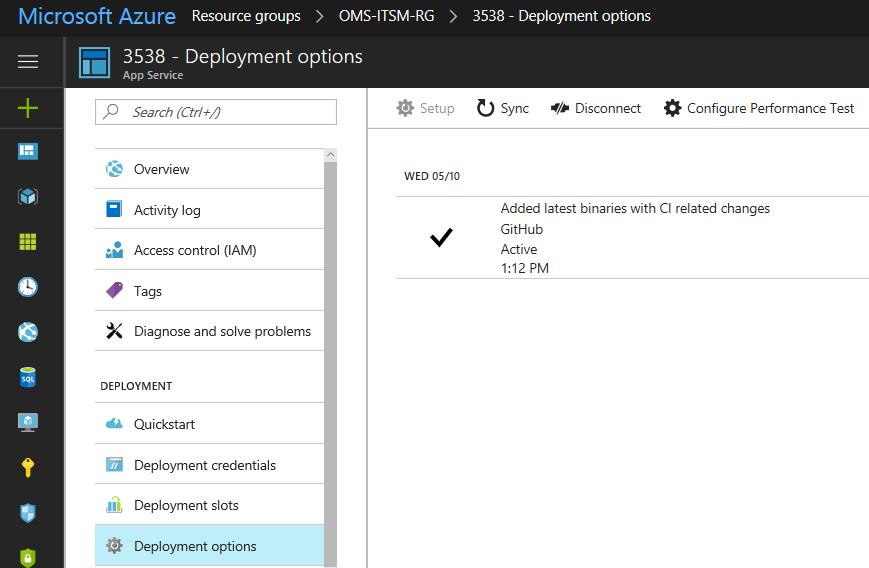
FIGURE 11. UPDATE OF THE APP SERVICE
PowerShell script
The PowerShell script can be download from https://docs.microsoft.com/en-us/azure/log-analytics/log-analytics-itsmc-service-manager-script. Before you run the script, you need to update the script according to your environment
- The name of your Azure subscription that you will use to host the required resources
- A resource group is Azure that will contain the resources. If you specify a resource group that does not exist, the script will create it
- Location where you want to create the new resources. Note that the BizTalk resource does not exist in some Azure regions
- Name of the System Center Service Manager server that will run the connector. This should be input in FQDN format.
- Domain, username, and password of the user account that will be used to connect to SCSM. This user must be at least Advanced Operator in System Center Service Manager
- Site name that will be the site name of the new web app
- Name of the new BizTalk service
The PowerShell will automate the following tasks:
- Set execution policy to Unrestricted for the current user.
Note: If your organization does not allow Unrestricted PowerShell execution policy, you can temporarily bypass execution policy, as described in https://blogs.technet.microsoft.com/ken_brumfield/2014/01/19/simple-way-to-temporarily-bypass-powershell-execution-policy/.
- Verify that required PowerShell modules (NuGet and AzureRM) are installed.
- Login to Azure.
- Deploy the Web App based on a template located on GitHub
- Create an AzureAD Application.
- Configure the Web App with the domain user account, domain, password, AzureAD tenant, System Center Service Manager server name and website address.
- Deploy a new BizTalk resource.
When the PowerShell script is complete, you will see the script output, Client ID, Client Secret and URI. Make a note of these. Figure 12 shows Azure resources in the resource group after the PowerShell script has been executed.
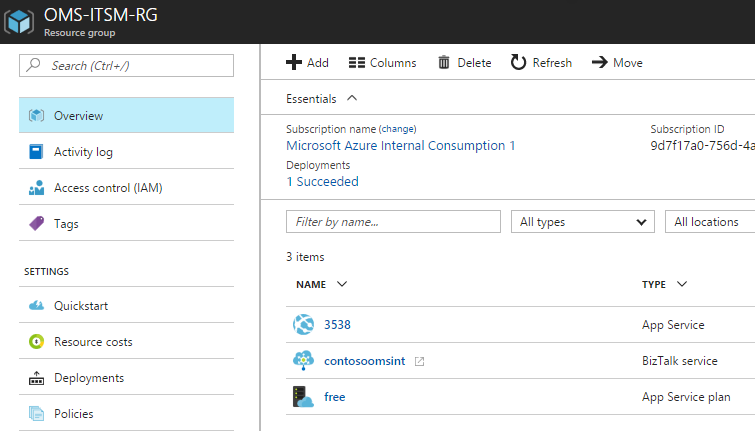
FIGURE 12. RESOURCES IN AZURE CREATED BY THE POWERSHELL SCRIPT
Configuring the Hybrid Connector
Perform the following steps to configure the hybrid Connector:
- In the Azure portal (http://portal.azure.com) navigate to the new Web App created in the previous step and click on Settings, Networking.
- On the Networking page click "Configure your hybrid connection endpoints"
- On the Hybrid Connection page, click "Add hybrid connection".
- On the Add hybrid connection page, click "Create new hybrid connection".
- On the Create new hybrid connection blade, fill in the following information and click OK.
- Endpoint Name: Input a name for the hybrid connection, for example, OMSINT.
- Endpoint Host: Input the FQDN of the SCSM management server, for example, west-scsm-01.west.corp.local.
- Endpoint Port: 5724
- Service bus namespace: leave this blank and a new namespace will be generated.
- Location: for example, West Europe.
- Name: input a name, for example, OMSINT.
- After the hybrid connection is created, select the new connection and then click "Add selected hybrid solution". Confirm that you want to add the hybrid solution
- On the Hybrid connections page, click "Download connection manager", shown in Figure 13.
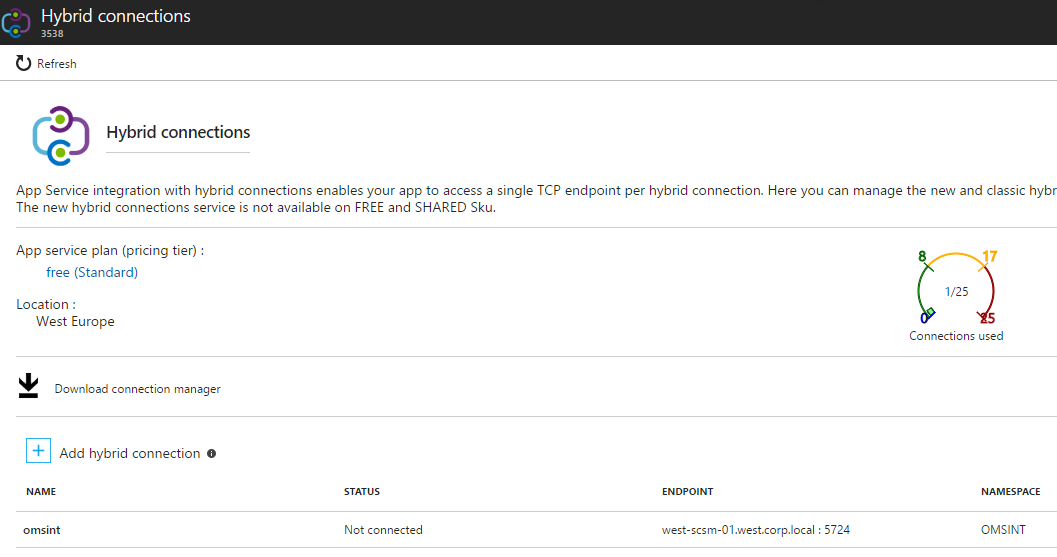
FIGURE 13. DOWNLOAD PAGE FOR THE CONNECTION MANAGER
- Transfer the Hybrid Connection Manager installation package.
(HybridConnection.msi) to the SCSM server and run the setup.
- After the installation is complete, start the Hybrid Connection Manager UI, from the start menu, shown in Figure 14.
- In the Hybrid Connection Manager, click "Configure another Hybrid Connection". You will be prompted to log in to Azure.
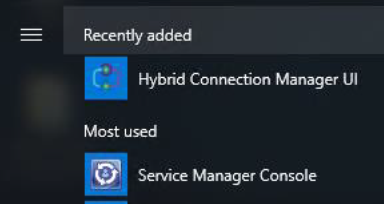
FIGURE 14. CONNECTION MANAGER SHORTCUT AFTER INSTALLATION
- In the Hybrid Connection Manager, select the correct Azure subscription and then select the hybrid connection you would like to use, shown in Figure 15, and click Save.
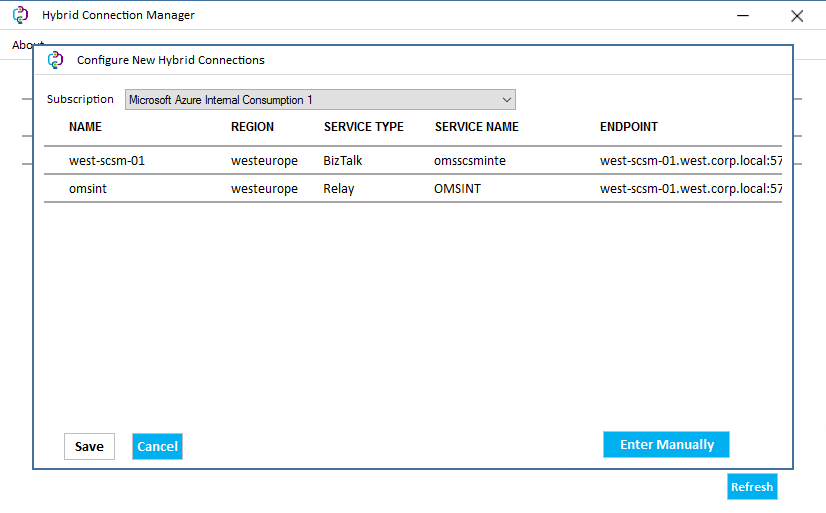
FIGURE 15. LIST OF HYBRID CONNECTIONS IN THE AZURE SUBSCRIPTION
- Verify that the connection gets transitions to Connected, as shown in Figure 16.
(you may need to click Refresh)
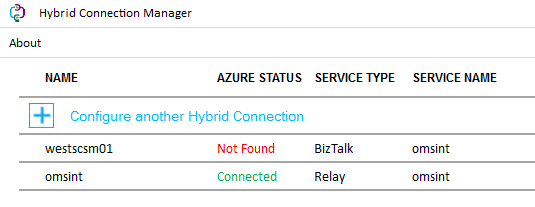
FIGURE 16. HYBRID CONNECTOR NAMED OMSINT CONNECTED
- You can now connect to the URI (from the PowerShell script output and same as the URL of the App Service in the Azure Portal). On the web page, input Client ID and Client Secret to test the connection. Figure 17 shows the web based test to verify that the hybrid connector works.
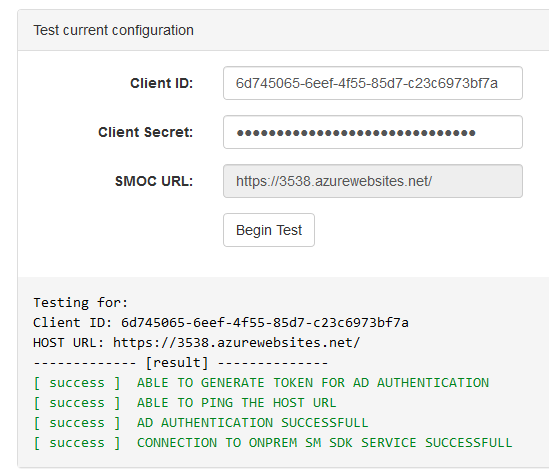
FIGURE 17. WEB BASED TEST FOR THE HYBRID CONNECTOR
Once the Azure resources are deployed and configured, and the SCSM server is configured, it is time to configure OMS.
- In the OMS portal, navigate to Settings, Connected Sources, ITSM Connector and click Add New Connection. On the New Connection page fill in the following and click Save
- Name: Enter a name for this ITSM connector in OMS
- Select Connection Type: Select System Center Service Manager
- Server URL: This is the URI shown in the PowerShell script output, which is the same as the URL on the App Service in the Azure Portal.
- Client ID and Client Secret are also from the output of the PowerShell script. The application can be found in the Azure AD, under App registration.
- When complete, navigate to the IT Service Management Connector dashboard and verify with the ServiceDeskLog_CL events that the connector is working.
Note: Please store the Azure AD Application Client secret in a secure location for future reference. You will not able to retrieve it from Azure again.
Scenario 1 - Alert Rule integration configuration
Now that the ITSM connector is setup, let us take a look at the alert rule integrations. The first scenario for ITSM integration is based on OMS Alert Rules. The data flow is described in the following four steps:
- Event occurs on a data source, for example, a Windows Server, and it is sent to OMS.
- A pre-configured Alert rule in OMS is triggered based on the specific event to generate a work item (incident, alert or event depending on service) in the ITSM service.
- The ITSM Service receives the information and generates a work item based on the OMS event and alert rule settings. The ITSM service applies a template if a template was configured to be used in the OMS Alert rule.
- An event is sent to OMS from the ITSM service that indicates that a work item has been created successfully including the work item ID.
In this example, we will use ServiceNow. However, the connector works the same way for other connectors and ITSM services.
To setup the alert rule integration to an ITSM service, you will need to perform the following steps:
- sIn the OMS portal on the Log Search page. construct the query that will be used to find the data that will generate an incident. When the query is complete, click Alert to setup the Alert rule.
- Setting up ITSM Actions on the alert rule you can configure work item type to create, ITSM service connector and if you want to apply a template to the
incident in the ITSM service. Figure 18 shows an example alert rule that will trigger if an event with ID 150 is collected.
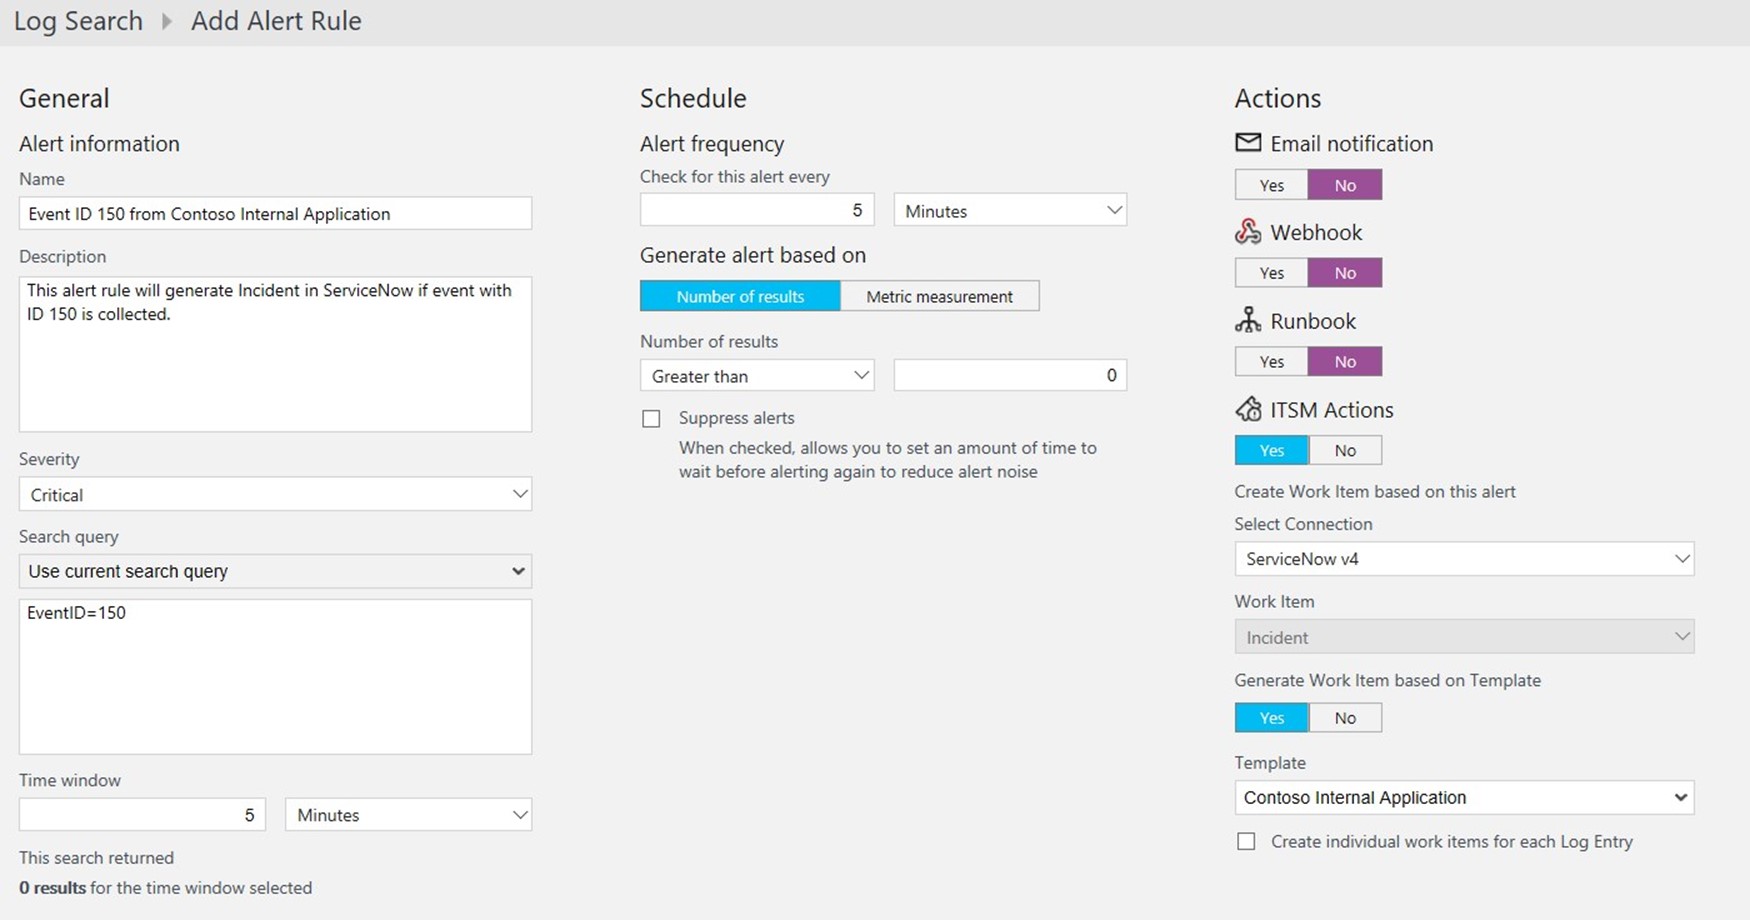
FIGURE 18. CONFIGURATION OF ALERT RULE
In this example, an incident will be created and a template will be applied to the incident. When setting up the alert rule, we can configure whether each event entry should generate an incident, of if an incident is created based on a number of events, shown in Figure 18. For example, if the alert rule finds 10 events when it runs, every 5 minutes with 5 minutes' time window in the example, you can choose if you want 10 incidents or just one incident with information for all 10 events.
During setup phase of the ITSM connection, it is a good idea to also enable email notification on the alert rule. You can then verify with the e-mail that the alert rule has been triggered and is correctly configured.
Before starting to forward events to an ITSM service it is recommended to create a new incident template. The template controls many work item properties including impact, urgency, category and contact type. A template can limit the risk for manual configuration errors.
Another benefit of an incident template instead of configuring all the incident properties in the OMS Alert rule is that incident template supports all incident settings, not only the few listed in the OMS portal. You can use different incident templates in different alert rules.
If you select not to use an incident template you can configure the following settings,
- Contact type: Type of communication used to create the incident, such as e-mail or phone.
- Impact: The effect an incident has on the business or service.
- Urgency: How fast the incident should be resolved, or how long can the resolution be delayed. The priority field is populated based on the Impact and Urgency properties.
- Category. You can classify incidents to improve clarity and granularity both in views and reports. Incident categories can also be used to run automated workflows on incidents. Without the incident category, it will be difficult to accurately report on incident counts last month.
Figure 19 shows an incident in ServiceNow created with the alert rule shown earlier. The incident includes basic information about the event triggered the alert rule. By clicking on "Link to Search Result" (in blue), the OMS portal will open and we can see the event(s) triggered the alert rule. The link uses a custom time range and the alert rule query to find the exact events.
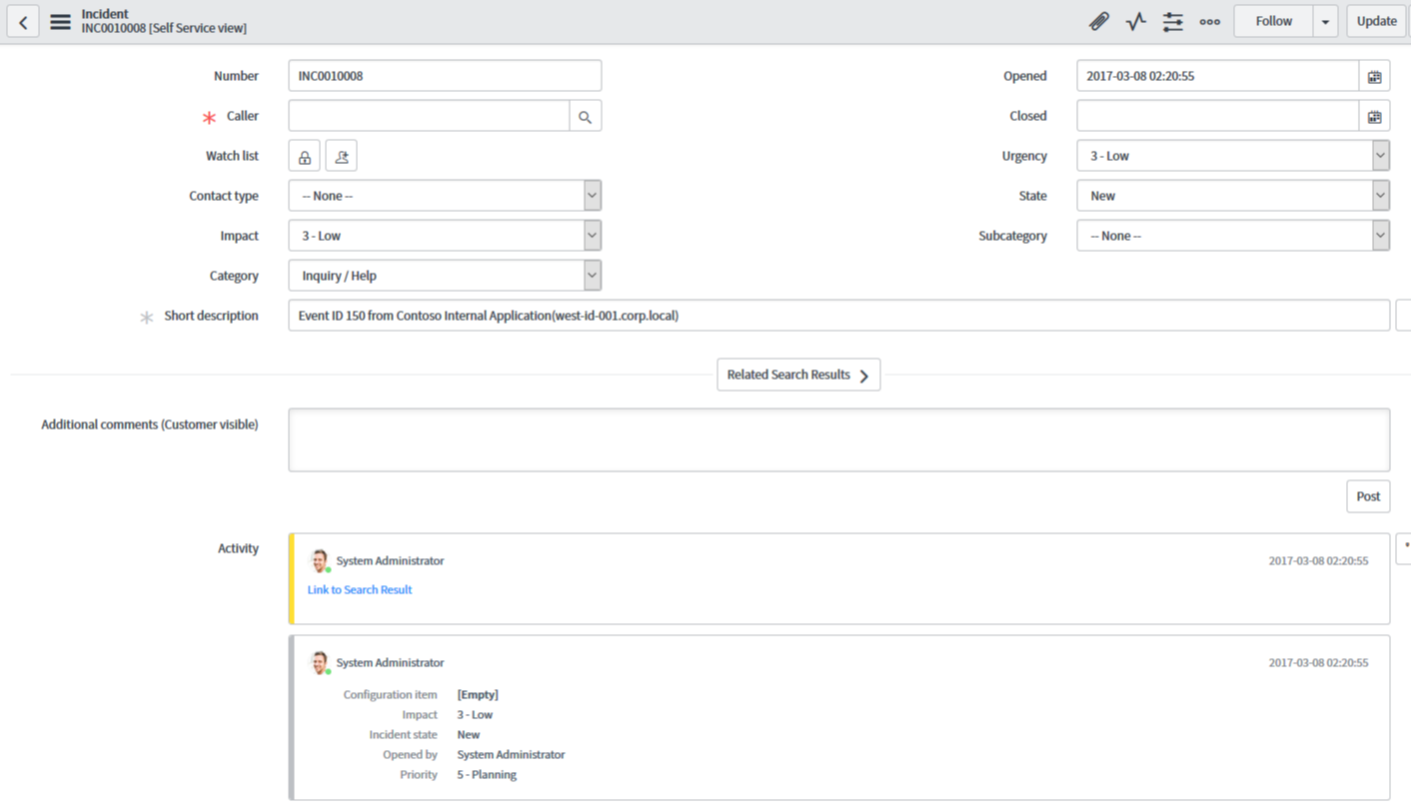
FIGURE 19. INCIDENT IN SERVICENOW CREATED BY OMS
Although the OMS events generated by the alert rule are not stamped with the work item ID from the ITSM service, there are integration connector events (of type ServiceDeskLog_CL) that can be used to verify that the integration is working. The default IT Service Management Connector dashboard also shows the status of the connectors.
Scenario 2 - Take direct action on an event
It is possible to create work items direct based on events without first setting up an alert rule. When clicking on an event, a menu pops up (as shown in Figure 20) and you can create ITSM Work Item by selecting "Create ITSM WorkItem on 'Event'" option.
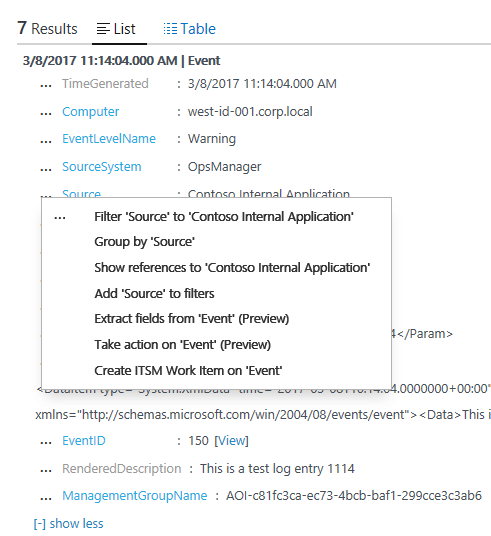
FIGURE 20. THE CREATE ITSM WORK ITEM DIRECT ACTION OPTION
When you click on this link, you will be redirected to the "Create ITSM Work Item" page (as shown in Figure 21)
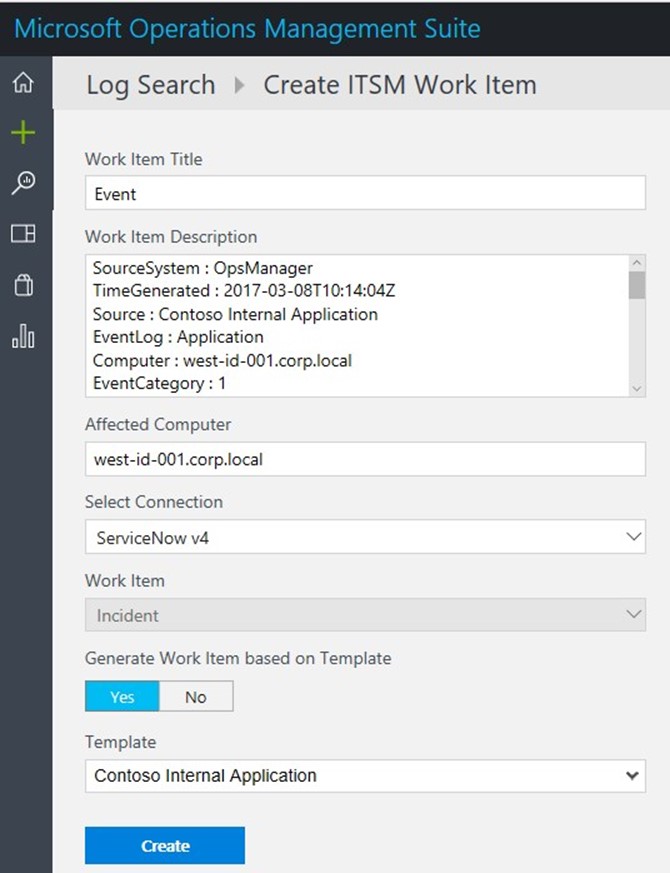
FIGURE 21. MANUAL CREATE ITSM WORK ITEM
Once the work item is created in the ITSM service, the work item ID will be displayed in OMS (shown in Figure 22).
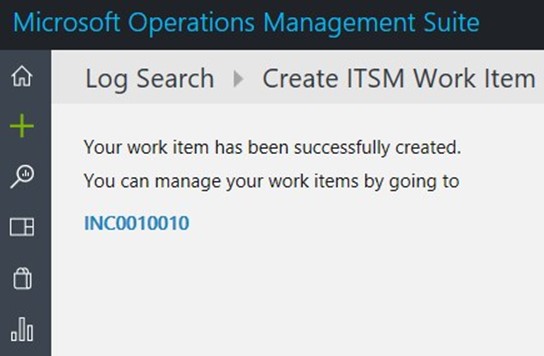
FIGURE 22. CONFIGURATION FROM THE ITSM SERVICE WITH WORK ITEM ID
IT Service Management Connector Dashboard
The OMS ITSM Connector solution also provides a dashboard (as shown in Figure 23). This dashboard contains five data visualizations. Figure 23 does not show the fifth visualizations, which is common queries to work with ITSM work items, such as "all incidents created today". It is possible to filter the dashboard to show data for only one or all ITSM connectors by using the Select Connection drop down menu located on top left corner of the dashboard.
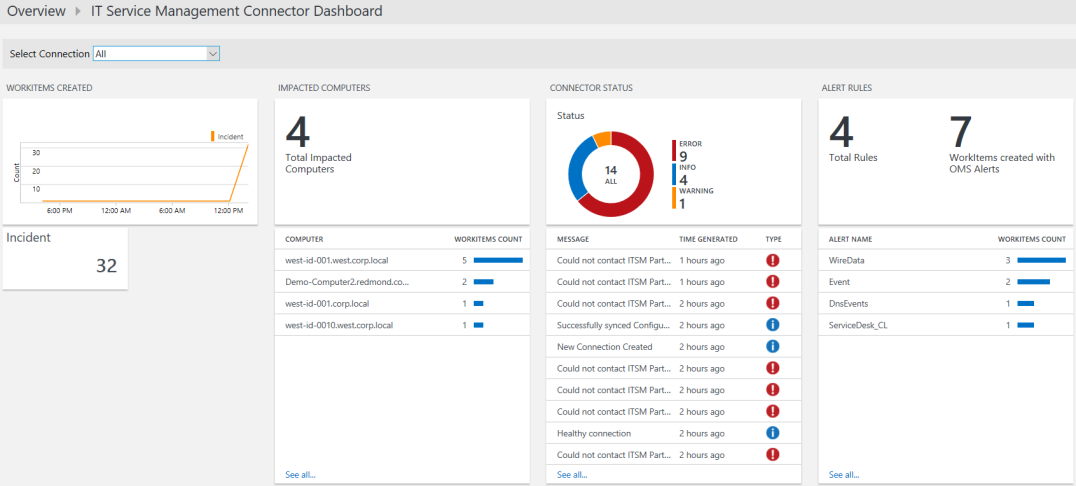
FIGURE 23. THE DEFAULT ITSM CONNECTOR DASHBOARD
The Dashboard contains the following visuals:
- Work items created shows the number of work items created and type of work items. In Figure 23, we see that 32 incidents have been created and we can also see the number of created work items over time. If there were other types of work items such as change requests, we could see those items too. If we click on one of the work items types, another dashboard will load with more specific information, shown in Figure 24. This dashboard contains more details about, in this example, incidents created. For example, name, priority and impact computers.
- Impacted Computers shows the number of computers affected by a work item as well as the list of the computers. In Figure 23, the computer west-id-001 is the one with most work items.
- Connector Status shows data of type ServiceDeskLog_CL. This visual shows the logs related to the connector health states.
- Alert Rules shows information regarding alert rules that are configured to generated work items. The column shows the number of alert rules configured to generated work items, the number of work items created based on alert rules and what kind of data that has generated these work items.
- Common Queries contains several queries that can be used to drill into ITSM connector related information.
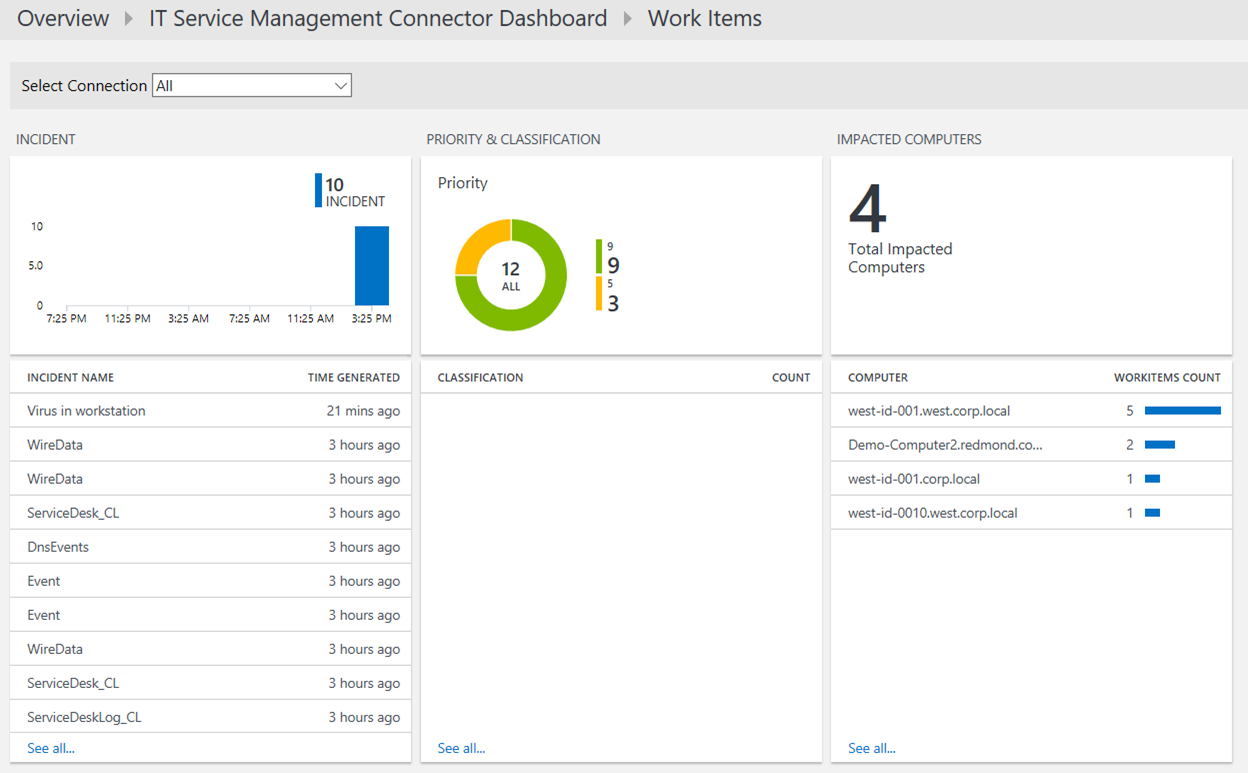
FIGURE 24. WORK ITEM DASHBOARD
Summary
In this chapter, we explored how to connect OMS to different ITSM tools. Although this chapter is focused on ServiceNow and SCSM, at the time of this writing, the OMS ITSM Connector supports the following ITSM tools:
- System Center Service Manager (SCSM)
- ServiceNow
- Provance
- Cherwell
We have walked through how to configure the ServiceNow and SCSM connectors, as well as how to leverage the connector functionalities. We have shown that we can use connectors for direct action on an event and that the connector can also be used in Alert Rules. We learned that "direct action" is useful in situations where we are reviewing collected information and find an event that we should explore further.
By creating an incident, the IT organization can follow the standard ITSM process for documenting investigation related to a service impact. Incidents based on alert rules are valuable when we know what to look for and want to automatically create an incident when the event(s) are detected.